EasyManua.ls Logo

CAME G4000 - User Manual

CAME G4000
24 pages
Print Icon
To Next Page IconTo Next Page
Loading...
Documentazione
Tecnica
25
rev. 6.1
01/2003
©
CAME
CANCELLI
AUTOMATICI
119G25
SERIE GARD |
GARD SERIES
|
SÉRIE GARD |
BAUREIHE GARD
|
SERIE GARD
G4000 / G4001
CANCELLI AUTOMATICI
1. Gruppo GARD
2. Quadro comando
Accessori
3. Asta in alluminio
4. Strisce rosse
fosforescenti
5. Antenna
6. Gomma protettiva
7. Lampade di segnala-
zione
8. Lampeggiatore di
movimento
9. Selettore a chiave
10. Batteria di emergenza
11. Colonnina per
fotocellule
12. Fotocellule di sicurez-
za
13. Colonnina per lettore
magnetico
14. Lettore magnetico
15. Appoggio fisso
16. Sensore magnetico
1. GARD unit
2. Control panel
Accessories
3. Aluminum barrier
4. Red phosphorescent
strips
5. Antenna
6. Anti-collision rubber
7. Movement indicator
lights
8. Flashing movement
warrning light
9. Key-operated selector
switch
10. Emergency battery
11. Photocell Column
12. Safety photocells
13. Column for magnetic
card reader
14. Magnetic card reader
15. Fixed barrier support
16. Magnetic sensor
1. Groupe GARD
2. Armoire de
commande
Accessoires
3. Lisse en aluminium
4. Bandes rouges
phosphorescentes
5. Antenne
6. Boudin caoutchouc
anti-choc
7. Lampe de mouvement
8. Clignotant de
mouvement
9. Sélecteur à clé
10. Batterie d'urgence
11. Colonnette pour
photocellule
12. Photocellule de
sècuritè
13. Colonnette pour
lecteur de carta
magnétique
14. Lecteur de carte
magnétique
15. Appui fixe
16. Capteur magnétique
1. GARD- Bausatz
2. Steuerung Zubehör
3. Aluminium-Stange
4. Rote Phosphoreszenz-
Streifen
5. Antenne
6. Gummi Stoßschutz
7. Bewegungs-
Meldeleuchte
8. Blinkleuchte
9. Schlüsselschalter
10. Notbatterie
11. Photozellen-Säule
12. Sicherheits-Photozelle
13. Magnetkartenleser-
Säule
14. Magnetkartenleser
15. Feste Stütze
16. Magnetischer Sensor
1. Grupo GARD
2. Cuadro de mando
Accesorios
3. Barra de aluminio
4. Bandas roias
fosforescentes
5. Antena
6. Protector de goma
7. Làmpara de
movimiento
8. Làmpara intermitente
de movimiento
9. Selector con Ilave
10. Baterìa de urgencia
11. Columna para
fotocélula
12. Fotocélula de
seguridad
13. Columna para lector
magnético
14. Lector magnético
15. Apoyo fijo
16. Sensor magnético
Automazioni per barriere stradali veloci
Automation systems for swift road barriers
Automatisations pour barrières routieres rapides
Antriebe für Schnell-Schranken
Automatización para barreras viales rápidas
Impianto tipo -
Standard installation -
Installation type
- Standard Montage -
Instalaciòn tipo

Other manuals for CAME G4000

Question and Answer IconNeed help?

Do you have a question about the CAME G4000 and is the answer not in the manual?

CAME G4000 Specifications

General IconGeneral
ModelG4000
CategoryControl Systems
Max Gate Leaf Length4 m
Power Supply230 V AC
Motor Voltage230 V AC
Protection RatingIP54
Operating Voltage230 V AC
Output Current5 A
Operating Temperature-20°C to +55°C
Weight8.5 kg
Max Opening Angle120°

Summary

Product Description and Specifications

Models

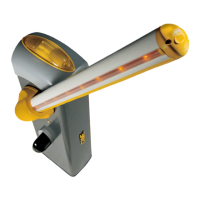
Details G4000 (galvanized steel) and G4001 (stainless steel) barrier models.

Optional Accessories for Completeness

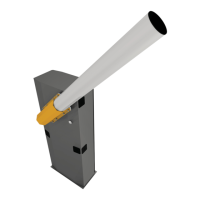
Describes aluminum barrier poles (G0401) and special attachments (G0402+G0405).

Optional Accessories List

Anti-Collision Bumper

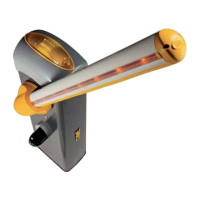
Red anti-collision bumper for barrier rod.

Signal Lamps Package

Package of 24V signal lamps with supports and flash-control board.

Phosphorescent Strips

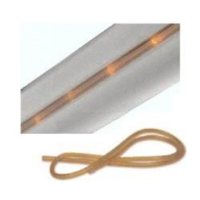
Red phosphorescent strip for barriers.

Barrier Supports

Non-moving and moving supports for barriers.

Aluminum Fencing

White enameled aluminum fencing for barriers.

Joint for Barrier

Articulation joint for barrier.

Photocell Mounting Support

Support for attaching photocell to casings.

Flashing Beacon Support

Support for attaching flashing beacon to casings.

Technical Description

Armoire (Case)

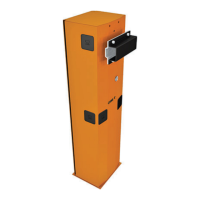
Case constructed in galvanized or stainless steel, factory-configured for accessories.

Mounting Base

Galvanized steel base with anchor stays for pavement fixing.

Barrier Flange

Galvanized steel flange for quick and secure barrier locking.

Gear Motor Lock System

Special mechanical system for motor lock, operated by personal key.

Motor and Reduction Gear

24V DC motor, non-reversible reduction gear with die-cast aluminum housing.

Counterweight Spring

Spring acting as counter-weight/balance system for uniform movement.

Internal Shock Absorber;Barrier Stop

Internal shock absorber or barrier travel stop provided for precise movement.

Limit Switch Unit

Unit indicating the limit switch position for barrier control.

Control Panel

Control panel unit, identified as ZL37.

Installation Procedure

Concrete Base Preparation

Prepare a concrete base with anchor stays for unit installation.

Unit and Barrier Installation

Install the case and mount the barrier rod, adjusting for linearity.

Gate Rod Balancing

Spring Positioning

Adjusting spring position for proper barrier rod balance.

Precise Barrier Rod Balancing

Balancing Procedure Steps

Steps to unlock, adjust spring tension, and re-lock for precise balance.

ZL37 F Control Panel Technical Description

Power and Safety Features

Control board power, safety features like photocell connection and amperometric device.

Additional Functions

Automatic closing, immediate closure, operator present, obstacle detection.

ZL37 F Control Panel Accessories and Adjustments

Series Accessories

Accessories connected in series, like flashing signal lights.

Optional Accessories

Optional accessories such as open barrier pilot lamp and LB35 board.

Adjustments

Adjustments for automatic closing time and amperometric sensitivity.

Main Components of the Control Board

Terminal Block

Terminal block for external electrical connections.

Line Fuse

3.15A fuse for the main power line.

Accessories Fuse

2A fuse for accessories.

Function Selection Dip-Switch

Dip-switch for selecting various functions.

Radiofrequency Board Socket

Socket for connecting the radiofrequency board.

TCA Trimmer

Trimmer for automatic closing time adjustment.

SENS Trimmer

Trimmer for amperometric sensitivity adjustment.

Code Memorization Button

Button used to memorize radio codes.

Signal LED

LED indicating radio code or automatic closing status.

Motor Power Connectors

Connectors for supplying power to the motor.

Battery Charger Connectors

Connectors for battery charger (LB35).

Control Type Jumper

Jumper for selecting control type for buttons.

Function Selections

Automatic Closure

Enables automatic closing function.

Button;Radio Control Mode

Selects between 'open only' or 'open-close-reverse' control mode.

24 V Output for Movement Signals

Controls 24V output for movement signals during operation.

Operator Present Function

Activates 'operator present' function for manual control.

Pre-flashing Function

Enables pre-flashing sequence for opening and closing.

Obstacle Detection Device

Activates obstacle detection via motor limit position.

Slave Operation

Enables 'slave' operation for combined motor control.

Immediate Closure Function

Activates immediate closure function, requires safety device.

Stop Button Function

Activates the stop button function, requires safety device.

Braking Action Increase

Increases the braking action of the barrier.

Trimmer Adjustments

TCA Trimmer Adjustment

Adjusts automatic closing time from 1" to 120".

SENS Trimmer Adjustment

Adjusts amperometric sensitivity.

Electrical Connections

Power Supply and Motor Connections

Wiring for 230V AC power supply and 24V DC motor.

24 V Output and Signal Lamp Wiring

Connections for 24V output and 'bar open' signal lamp.

Accessory and Stop Button Connections

Wiring for accessories, stop button, and DIP switch settings.

Wiring Connections for Buttons and Sensors

Pushbutton and Radio Connections

Connections for open/close pushbuttons and radio receivers.

Safety Contact Connections

Wiring for re-opening and immediate closure safety contacts.

Microswitch and Antenna Connections

Connections for deceleration microswitches and antenna.

Radio Control Installation

AF Board Installation

Procedure for inserting the AF radiofrequency board.

Transmitter Programming

Steps to encode transmitters and store codes on the base card.

Transmitter Encoding Procedure

Common Encoding Steps

Assign code, connect jumper, register code, disconnect jumper.

Model-Specific Encoding

Encoding variations for T2622M/T3022M and T264M/T304M models.

Transmitter DIP Switch Configurations

ATOMO and T432 M;T312 M Configuration

DIP switch settings for ATOMO and T432M/T312M transmitters.

T434 M;T314 M and T432 SA Series Configuration

DIP switch settings for T434M/T314M and T432SA series transmitters.

TAM and TFM Transmitter Configurations

DIP switch settings for TAM and TFM transmitters.

Code Storage Procedure

Storing Transmitter Codes

Process of using the PROG key and LED to store transmitter codes.

Speed and Deceleration Adjustment

Adjusting Motor Speed

Move faston 'A' to adjust motion speed.

Adjusting Deceleration

Move faston 'B' to adjust deceleration speed.

Connecting Two Motors for Combined Operation

Slave Motor Configuration

Set DIP 7 to ON on one panel to select slave motor.

Wiring Connections

Connect electrical wiring and interlock terminals for master and slave panels.

Related product manuals