


S
Sergio ThompsonAug 20, 2025
Why doesn't my CAME Gate Opener automatically close?
- KKimberly BarnettAug 20, 2025
If the CAME Gate Opener does not carry out the automatic closing, it may be because the N.C. safety contacts are open.
Why doesn't my CAME Gate Opener automatically close?
If the CAME Gate Opener does not carry out the automatic closing, it may be because the N.C. safety contacts are open.
What to do if the CAME Automatic Barriers boom opens but does not close?
If the boom of your CAME Automatic Barrier opens but doesn't close, the first step is to check the power supply and fuses to ensure they are functioning correctly.
Why my CAME Automatic Barriers doesn't work with the transmitter?
If your CAME Automatic Barrier isn't responding to the transmitter, verify the boom's balancing.
How to fix a CAME Automatic Barriers boom that neither opens nor closes?
If the boom of your CAME Automatic Barrier neither opens nor closes, deactivate the MAINTAINED ACTION function.
What to do if CAME Automatic Barriers boom closes but does not open?
If the boom of your CAME Automatic Barrier closes but does not open, it may be due to open NC contacts. Check the NC contacts.
Why CAME Automatic Barriers does not automatically close?
If your CAME Automatic Barrier isn't automatically closing, try deactivating the MASTER-SLAVE function.
What to do if the CAME Automatic Barriers boom does not reach the limit-switch?
If the boom on your CAME Automatic Barrier isn't reaching the limit-switch, check the control devices.
Why is my CAME Automatic Barriers not slowing down?
If your CAME Automatic Barrier isn't slowing down, check the length ratio between the boom and any applied accessories.
What to do if the CAME Other boom opens but doesn't close?
If the boom opens but fails to close, check the power supply and fuses.
How to fix a CAME Other barrier that doesn't work with the transmitter?
If the barrier does not work with the transmitter, check the boom's balancing and spring tautness.
Details on the G12000 barrier, including its construction, safety standards, and warranty.
Lists accessories included with the barrier and optional items for enhanced functionality.
Details on product version, voltage, current, power rating, duty cycle, torque, and weight.
Diagrams showing centre lines and external dimensions of the barrier system.
Detailed description of each main component, from reduction gear to control panel.
Steps for determining positions, marking axes, and preparing the mounting base.
Instructions for assembling the barrier bar, including tube cutting and joining.
Steps for mounting the housing, fixed support, and barrier bar onto the base.
Procedure for assembling counterweights and adjusting mechanical stops for balance.
Overview of the control panel, its main components, and operational logic.
Details on safety devices like photocells, amperometric safety, and important operational notes.
Information on connectable accessories, other functions, and their usage.
Diagrams and explanations for electrical connections, limit switches, and power inputs.
Explanation of how to select various functions using DIP switches on the control panel.
Guide to adjusting amperometric sensitivity (SENS) and automatic closing time (TCA).
Steps for inserting the AF radiofrequency board into the motherboard.
Detailed instructions for encoding various CAME transmitter models.
Procedure for storing transmitter codes onto the control panel's radiofrequency board.
Instructions for connecting two control panels to manage motors in combination (slave mode).
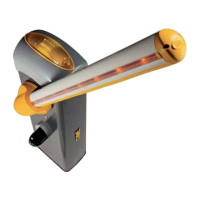
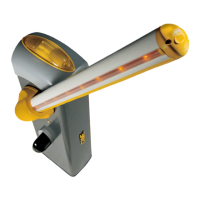
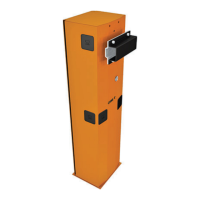
The CAME G12000 is a motorized barrier system designed for controlling passages up to 12 meters wide. Engineered and manufactured entirely by CAME S.p.A., it adheres to UNI 8612 safety standards and boasts an IP54 degree of protection, ensuring reliability and durability in various environmental conditions. The barrier is guaranteed for 12 months, provided it has not been tampered with.
The G12000 barrier operates with a double, non-reversible 24 V DC gear motor, housed within a galvanized steel structure with a painted finish. This robust design ensures smooth and consistent operation for controlling vehicle access. The system is designed for both opening and closing cycles, with various control options to suit different operational needs.
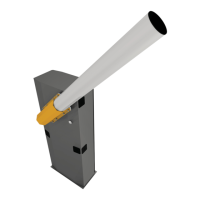
The G12000 system offers a range of features to enhance its usability and adaptability. The barrier bar itself is an aluminum assembly, composed of a Ø120 mm tube with a length of 6200 mm and a Ø100 mm tube with a length of 6000 mm. Hardware and accessories for mounting the barrier bar, along with a fixed support, are supplied.
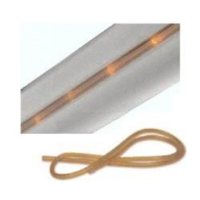
For enhanced safety and convenience, several optional accessories are available. The LB35 circuit card allows for the installation of an emergency battery, ensuring continued operation during power failures. The G0461 package of red phosphorescent strips can be added to the barrier bar, improving visibility, especially in low-light conditions.
The control panel, ZL37B, is a central component of the system, offering a variety of functions and adjustments. It supports automatic closing, which activates at the end of the opening cycle, with an adjustable timer (TCA) from 0 to 120 seconds. This timer is interrupted by any safety system activation and deactivated after a total stop command or power failure.
Obstacle detection is a key safety feature. When the motor is stopped (barrier closed, open, or half-open after an emergency stop), the transmitter and control pushbutton are deactivated if an obstacle is detected by a safety device, such as photocells. In the aperture phase, the bar stops upon obstacle detection, while in the closure phase, the bar's movement is reversed. If an obstacle is detected three times in the closure phase, the bar stops during aperture, and automatic closure is disactivated, requiring manual resumption via keyboard or radio transmitter.
The ZL37B panel also supports "human presence" operation, where the barrier remains open as long as a presence is detected. A flashing signal light can be activated during opening and closing cycles, and a 24V output signal can be triggered during movement phases and when the barrier is in the closed position. "Slave" operation is possible when two motors are used in combination, allowing for synchronized control. The system also includes a function to increase the braking action on the barrier.
Command sequences can be selected, including "open-close-reverse" or "open only." Photocells can be connected to enable re-opening during the closing cycle or a total stop, which interrupts movement and disactivates the automatic closure cycle. Immediate closure is also available, where the bar lowers automatically after a vehicle passes safety devices. An amperometric safety device (SENS) provides adjustable sensitivity for obstacle detection.
The control panel features a jumper for selecting the type of control for button input, connectors for power supply and motor, a terminal block for motor connections, and fuses for accessories and the main line. It also includes a button for memorizing code numbers for remote control, an LED for radio code/automatic closing signals, and a socket for a radiofrequency board. Dip-switches allow for selection of various functions, such as automatic closure, flashing light during opening and closing, obstacle detection, slave operation, 24V output during movement, human presence, immediate closure, total stop, and increased braking action.
For easy installation and maintenance, it is crucial to use CAME original control equipment, safety systems, and accessories. The design allows for straightforward assembly of fixed structures, including marking the desired positions for the housing and fixed support. The mounting base can be detached from the housing, and anchor stays can be mounted, with threaded bolts protected by grease or tape.
The barrier bar assembly involves sliding the rear tube into the front tube and securing it with centring pins and mounting jaws. Installation of the barrier involves removing the housing cover and sides, cleaning cement bases, and freeing anchor stay bolts. The housing and fixed support are then positioned and mounted, ensuring perfect longitudinal alignment. The barrier bar is placed at the approximate height and axis of operation with the aid of a stand and fixed support. The fork and mounting jaws are installed on the barrier bar, and the barrier bar is mounted on the rotation shaft's terminal plates. Misalignment can be adjusted before firmly tightening the bar onto the fork and the fork onto the housing.
Counterweights are assembled by inserting plates onto the support until the bar shows signs of raising. If not all plates are used, they must be fixed with a hose clamp to prevent release during movement. The bar is balanced to remain at a 45° angle when manually placed. Vertical and horizontal mechanical stops are adjusted to ensure the open barrier bar does not exceed 90° and to define the lowered position.
The ZL37B control panel is powered by 230V A.C. and protected by a 3.15A fuse. Low voltage control systems (24V) are protected by a 2A fuse. The total power consumption of 24V accessories should not exceed 40W. Important safety advice includes shutting off mains power and disconnecting batteries before servicing the unit's interior.
Programming the remote control involves inserting an AF card, encoding transmitters, and storing the code in the motherboard. The AF board should always be inserted when the power is off, as the motherboard only recognizes it when powered. The manual provides detailed instructions for encoding various transmitter models, including TOP QUARTZ, ATOMO, T432M-T312M, T434M-T314M, T432S, TAM, and TFM. Code storage involves holding down the "CH" signal LED on the AF radiofrequency board while pressing the control key on the transmitter; the LED lighting up confirms code storage. It is important not to store the code on the circuit card unless the barrier is closed.
For two combined motors controlled together, one control panel is set to "slave" mode (Dip 7 to ON). Electrical connections are wired only on the terminal board for the pilot motor, and the two control panels are connected using interlock terminals.
| Protection Rating | IP54 |
|---|---|
| Input Voltage | 230 V AC |
| Power Supply | 230V AC |
| Motor Power | 300W |
| Output Voltage | 24V DC |
| Maximum Current | 5A |
| Operating Temperature | -20°C to +55°C |