92
ENG
pRack +0300025EN rel. 1.3 - 17.12.2015
If the terminal detects inactivity of the entire pLAN network, that is, it does
not receive any messages from the network for 10 seconds consecutively,
it clears the display and shows the following message:
NO LINK
A.3.2 Setting the address of the pRack pR300 board
The pLAN address of the pRack boards can be set from any pGD1 terminal,
using the following procedure:
1. set address 0 on the terminal (see the previous paragraph for details
on how to set this address);
2. power down the pRack pR300 board;
3. disconnect any pLAN connections to other boards from the pRack
pR300 board;
4. connect the terminal to the pRack pR300 board;
5. power up the pRack pR300 board, while pressing the and
buttons on the terminal together. After a few seconds the pRack
pR300 board begins the start-up sequence and the display shows a
screen similar to the one below:
####################
selftest
please wait
####################
6. when this screen is displayed, wait 10 seconds and then release the
buttons;
7. the pRack pR300 board interrupts the start-up sequence and shows
a confi guration screen, similar to the one below:
pLAN address: 0
UP: increase
DOWN: decrease
ENTER: save & exit
Then set the pLAN address using the and buttons on the terminal.
8. Confi rm the address by pressing : the pRack pR300 board
completes the start-up sequence and uses the set address.
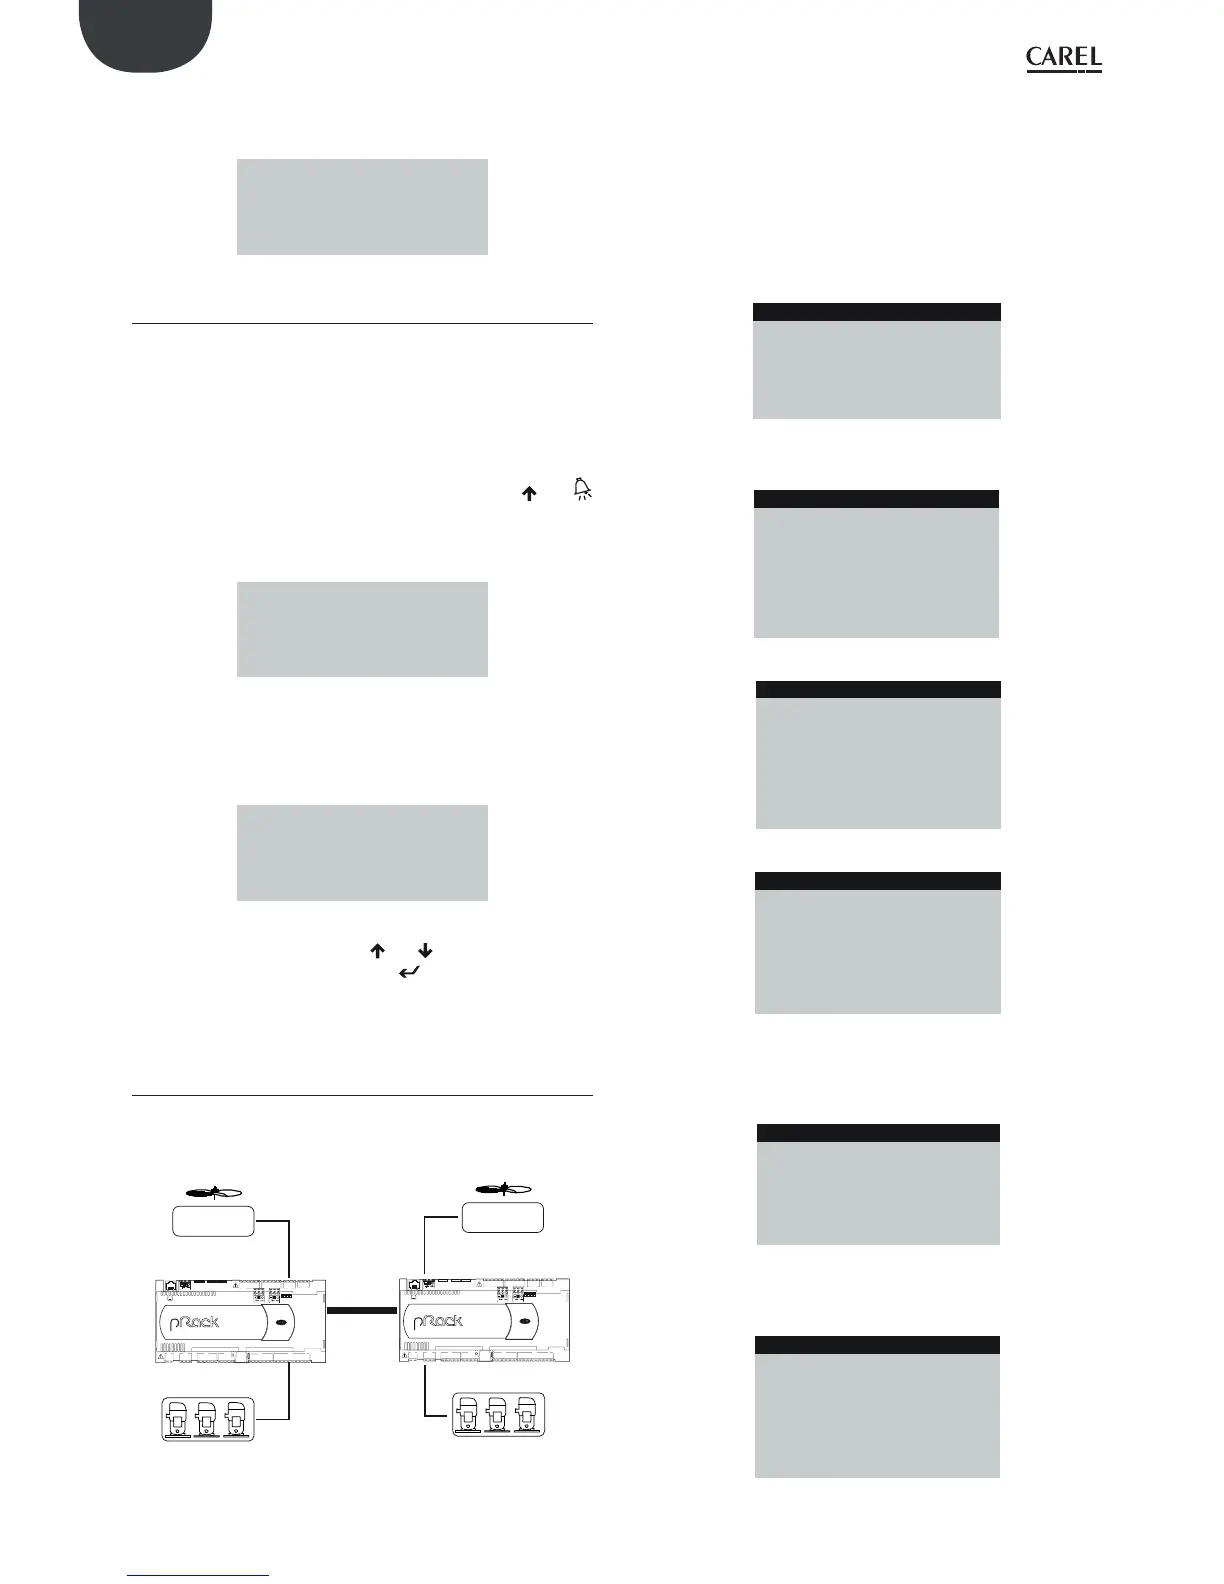
A3.3 Example of confi guring a system with 2 suction
and condenser lines using the Wizard
Below is a possible example of using the Wizard to confi gure a typical
system like the one shown in the fi gure, with 2 suction lines and 2
condenser lines on diff erent boards:
pLAN
I/O
I/O
C1
NO1
NO2
NO3
C1
C4
NO4
NO5
NO6
C4
C7
NO7
C7
NO8
C8
NC8
G
G0
U1
U2
U3
GND
+VDC
+Vterm
GND
+5 VREF
U4
GND
U5
GND
VG
VG0
Y1
Y2
Y3
Y4
ID1
ID2
ID3
ID4
ID5
ID6
ID7
ID8
IDC1
J1 J24 J2 J3
J4 J5
J14
J10
J13J12
J15
FieldBus card B MS card
J11 pLAN
J25
BMS2
J26
FBus2
43 21
pR300
I/O
I/O
C1
NO1
NO2
NO3
C1
C4
NO4
NO5
NO6
C4
C7
NO7
C7
NO8
C8
NC8
G
G0
U1
U2
U3
GND
+VDC
+Vterm
GND
+5 VREF
U4
GND
U5
GND
VG
VG0
Y1
Y2
Y3
Y4
ID1
ID2
ID3
ID4
ID5
ID6
ID7
ID8
IDC1
J1 J24 J2 J3
J4 J5
J14
J10
J13J12
J15
FieldBus card B MS card
J11 pLAN
J25
BMS2
J26
FBus2
43 21
pR300
Fig. A.w
The preliminary operations to be completed before confi guration are as
follows:
1. with the boards not connected in the pLAN, power up the second
pRack board and set the pLAN address to 2 (for details see Appendix
A.2)
2. power down and connect the two boards in the pLAN, plus any
terminals, as described in paragraph 3.7
3. power up the boards and wait for the Wizard selection screen to be
displayed
Then select the type of system as SUCTION & CONDENSER:
Wizard Ib01
Type of Installation:
SUCTION & CONDENSER
Set the type of compressors and control for suction line 1, answering the
questions prompted by the pRack pR300 software, e.g.:
Wizard Ib03
Compressor config.
Compressor type:
RECIPROCATING
Compressor number: 3
Wizard Ib40
Compressor config.
Regulation by:
PRESSURE
Measure unit: barg
Refrigerant: R404A
Wizard Ib41
Compressor config.
Regulation type:
PROPORTIONAL BAND
Enable integral time
action: YES
After having confi gured suction line 1, a prompt will be shown to
confi gure another suction line, obviously the answer is YES:
Wizard Ib43
Compressor config.
Configure another
suction line:
YES
To the next question, which prompts if there is a pRack board dedicated
to the second line, answer YES; in this way, the pRack pR300 software
prepares to confi gure the board with address 2 in the pLAN:
Wizard Ib45
Compressor config.
Dedicated pRack
board for
suction line:
YES
 Loading...