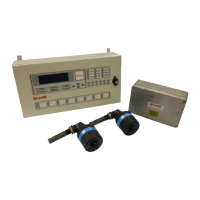
6.1.1 Control Unit PCB Replacement
Note: The Modbus data cable to the Remote Display Unit should NOT be connected to or
disconnected from the Control Unit with the power applied to the Control Unit or the Remote
Display Unit.
1. Prior to powering down the Mk7 OMD system use the Remote Display Unit to read and make note of
the parameters below.
These values will need to be re-entered into any replacement Control Unit PCB, using the Remote
Display Unit during commissioning.
a. The Modbus address of the Control Unit.
Note the Factory default Modbus address = 1.
b. The number of Detectors connected to each Control Unit,
c. The Pre-Alarm and Slowdown Alarm levels for each detector.
Pre-Alarm level: adjustable between 0.5 - 1.2mg/l
(Factory Default level of 0.9mg/l).
Engine Slow/Shutdown Alarm level: adjustable between 1.3 - 2.4mg/l
(Factory Default level of 1.8mg/l.
d. The positions of the End of Line jumpers on each Control Unit.
Note: End of Line jumpers are ONLY installed on the last Control Unit connected to the Modbus
in any Mk7 OMD multi-engine system or to Control Unit 1 for a single engine system
2. Power down the system.
3. Remove the 4 screws from the lid and lift the Control Unit lid off.
The metal lid is connected to a PCB fixing point by a short earth wire (see below). The Membrane
Keypad is also connected to the Control Unit PCB by two ribbon cables.
Figure 183 Control Unit Earth Wire
4. If the Mk7 Control Unit has a keypad membrane, prior to removing the ribbon connectors from the
lid, the sticky pads holding the ferrites to the lid must be eased off.
 Loading...