Do you have a question about the Carrier GRAVINER Mk 6 and is the answer not in the manual?
Explains the purpose of oil mist detection in diesel engines and the formation of explosive conditions.
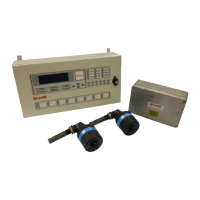
Details the system components: Detectors, Control Panel, and Engine Junction Boxes, with part numbers.
Provides specifications for Detector, Junction Box, and Control Panel, including ratings and dimensions.
Describes the system's differential measuring system, optical sensing, modular construction, and alarm philosophy.
Instructions for mounting the control panel, including bulkhead and flush mounting options.
Details on connecting 24v DC input supply, communications, and relay outputs to the control panel.
Guidelines for mounting the junction box, including gland types and location near the engine.
Instructions for mounting detectors to the crankcase, recommending optimal positions.
Details on connecting detector cables and ensuring proper routing to prevent damage.
Comprehensive guide to wiring power, communications, and relay connections for the system.
Essential pre-power-on checks for detectors, cabling, and system voltage to ensure correct operation.
Step-by-step configuration of engines, detectors, alarms, time, and date for system setup.
Procedures for verifying system functionality, including visual inspection, relay tests, and smoke tests.
Describes the sequence of actions when the system is powered on, including LED and LCD indicators.
Explains the three access levels (User, Engineer, Service) for system interaction and their capabilities.
How to view engine details and detector readings via the control panel's engine screen.
Accessing and interpreting engine status information, including alarms and faults.
Accessing and performing system tests via the control panel's test menu for relays and indicators.
How to access and view recorded system events, alarms, and faults from the event log.
Viewing individual detector status, levels, and faults from the user interface.
How to access Engineer Level for configuration and advanced functions, requiring a password.
Menu for configuring system settings like engines, detectors, alarms, time, and date.
Accessing system status information from the Engineer Level for detailed monitoring.
Explains how average, deviation, and backup alarms are indicated and triggered within the system.
Explains the backup alarm system and its operation independent of software for enhanced safety.
Details the function of various relays (Slowdown/Shutdown, Common Alarm, Fault) and their interface with AMS.
Details how to isolate engines, detectors, and relays to prevent alarms during maintenance.
Explains how to monitor system parameters for early indications of engine changes.
Outlines weekly, monthly, and bi-annual maintenance tasks for the OMD system.
Provides detailed instructions and precautions for cleaning detector heads and bases.
Guides on the proper disposal of OMD system components as electronic waste.
Details how system faults are indicated via detector LEDs and the control panel.
Provides detailed steps for diagnosing and rectifying common faults like backup alarm, comms, or detector issues.
Lists spare parts for the control panel, including PCBs, displays, and membranes.
Step-by-step guide for replacing the main control processor PCB, noting parameter recording.
Instructions for replacing the LCD display module, referring to section 5.2.15.
Procedure for replacing the status display PCB, detailing connector and screw removal.
Steps to replace the function key membrane, involving removal of several components.
Steps to replace the status display membrane, requiring PCB removal and reassembly.
Procedure for replacing the engine status display PCB, including screw and connector removal.
Instructions for replacing the door seal by removing old material and applying the new seal.
Steps for replacing the OMD Mk6 firmware using a small screwdriver to ease the IC from the socket.
Guide for replacing the interface PCB, noting different versions and ensuring correct wiring.
Identifies junction box spares and outlines PCB replacement procedures, including fuse replacement.
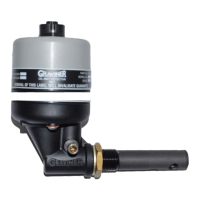
Lists detector spares and identifies components of the detector assembly, including head, base, and fan.
Detailed procedure for replacing the detector head, including safety warnings and isolation steps.
Instructions for replacing the detector base, involving removal of the head and unscrewing the base.
Steps for replacing the detector cable, covering disconnection at both ends and gland removal.
Details the contents of the Commissioning Kit and Service Kit, listing part numbers and quantities.
Lists recommended spare parts for operational use, including boards, cables, and assemblies.
Provides details on straight and 90° connector cable assemblies with part numbers and lengths.
Lists auxiliary parts not supplied by Carrier, like glands and nuts, with part numbers and suppliers.
Information on using the OMD Mk6 Log Reader software for downloading and analyzing event logs.
| Brand | Carrier |
|---|---|
| Model | GRAVINER Mk 6 |
| Category | Security Sensors |
| Language | English |