6.3.1 Detector Head replacement
WARNING - Do NOT remove the Detector from the base whilst the engine is in operation.
This action should be carried out whilst the engine is stopped to avoid the possibility of hot oil
coming out of the Detector Base.
1. Switch off the system (if safe to do so) or isolate the Detector
2. Remove the cable connector fitted to the top of the Detector
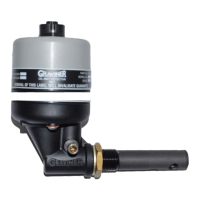
3. Using a 4mm hexagonal key, loosen the two fixing screws in the assembly base.
Figure 163 Base Fixing Screw Removal
4. Lift the Detector head from the base.
5. Fit the new Detector head onto its base and tighten up the fixing screws. Re-fit the cable to the
Detector head.
6. If the system was switched off, switch back on and allow the system to initialise.
7. If isolated, then de-isolate the Detector,
6.3.2 Replacing the Detector Base
WARNING - Do NOT remove the Detector from the base whilst the engine is in operation.
This action should be carried out whilst the engine is stopped to avoid the possibility of hot oil
coming out of the Detector Base.
1. Remove the detector head from the base.
2. Release the locking nut on the detector base.
3. Rotate the detector base to unscrew the base from the mounting hole.
4. Screw the replacement detector base into the mounting hole with the sealing washer against the
surface of the engine.
5. Tighten the locking nut against the engine surface.
6. Attach the detector head to the base.
6.3.3 Detector Cable Replacement
1. Isolate the Detector with the damaged cable.
2. Remove the cable connector on top of the Detector.
 Loading...