25
49
150.4
LR3 batteries
compartment
Label
The radio-frequency remote control can only be used with a radio receiver built into the terminal unit.
This remote control enables you to remote control (up to 10 m range) a fan coil unit equipped with a radio-frequency receiver.
This radio-frequency receiver is tted in the factory on the terminal unit. Its design enables it to be put in the room itself, if
necessary.
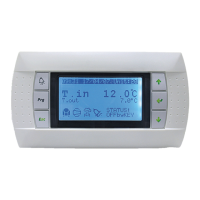
The features and use of this remote control are the same as for the user display terminal.
The receiver and remote control periodically exchange information (return air temperature value, setpoint value, ventilation
speed…).
These exchanges may take longer than with a wire terminal and need a few seconds.
Batteries: the V3000 system CIAT remote control operates with 2 LR03 alkaline batteries (provided). It is advised that these
batteries are replaced once a year. (depending on the use).
● Configuration of the remote control with its radio-frequency receiver
If the remote control is not associated with its radio receiver (in this case the remote control displays CF1):
- Upon switching on, the radio-frequency receiver LED
ashes rapidly.
- If this is not the case, the radio-frequency receiver has already been congured. In this case, refer beforehand to paragraph
“Removing links” below.
- Switch the radio receiver to conguration mode, pressing its button for 3 seconds until the green LED starts ashing more
slowly.
- On the remote control:
- Remove the insulation tab on the batteries to switch it on.
- The display will then be "CF1" (Configuration Menu).
- If "CF1" does not appear, enter the configuration menu, holding the 2 buttons
and or 5 seconds.
- "CF1" means that no radio receiver is associated with the remote control.
- Then on the remote control press the
button until "Add
1
" appears on the screen.
- The rest of the conguration is performed automatically (around 5 seconds).
- When conguration is complete, the remote control display returns to its normal screen (temperature display…).
- The LED on the radio receiver goes out.
Note 1:
The remote control may not return to its normal display, but may return to the "CF" conguration menu:
- If CF2 is displayed, the pairing process has been completed correctly. Allow the remote control to go to standby before
using it.
- If CF1 is displayed, the pairing process has failed; it is therefore necessary to restart the pairing process by clearing any links
created previously (see the paragraph entitled "deleting links between the remote control and the receiver").
Note 2:
* The LED on the radio receiver is lit once it receives an order from its associated remote control.
* Once congured, the
button on the radio receiver enables you to start/stop the fan coil unit on which it is tted.
13 - RADIO-FREQUENCY REMOTE CONTROL (SET-UP)
EN7515935-00 EN - 16