24 Series Installation and User Guide V1.0
20
Connecting an active remote module
MIC LEVEL
1
2
3
4
5
6
MUSIC LEVEL
LINE INPUT
MIC INPUT
LM-2
MIC
PRIORITY
1
4
5
2
3
6
7
9
10
8
0
1
4
5
2
3
6
7
9
10
8
0
1
4
5
2
3
6
7
9
10
8
0
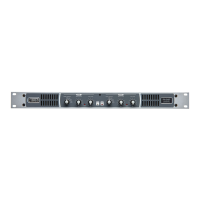
LM-2 mic/line input module, with music source
and level controls
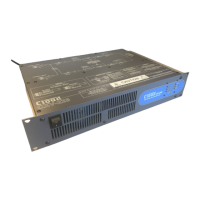
BT-1
PUSH
STAT US
--
TO PAIR
2s 5s
BT-1 Bluetooth wireless audio input module
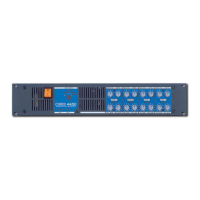
L-1
MUSIC LEVEL
0
1
2
3
4
5
6
7
8
9
10
LINE INPUT
L-1 line input module
M-1
MIC LEVEL
0
1
2
3
4
5
7
8
9
10
MIC PRIORITY
6
M-1 mic input module
LM-2: The LM-2 is an active input module which allows a
microphone and a stereo line input in a remote location to
be connected to the 24 Series mixer-amplier. The module
also includes the functions of a Cloud RSL-6 Remote Control
Plate, which allows remote control of music level and music
source selection in Zone 1 (see notes above re Facility Port
routing).
BT-1: The BT-1 is a Bluetooth remote audio input module
which enables compatible portable devices such as laptops,
tablets and smartphones to stream audio wirelessly to the
module, and thus into the audio system supplying either Z1
only, or both zones, according to the setting of J3. It is also
possible to connect an RL or RSL Series remote control plate
to a BT-1, to allow control of music source and level via the
Facility Port.
NOTE: 24 Series units are only compatible with the BT-1F
variant of the BT-1: do not attempt to connect variant BT-1E.
L-1/M-1: The L-1 and M-1 are remote active input modules
which allows a microphone (M-1) or stereo line level source
(L-1) to be connected within a zone and then routed to the
zone’s audio system. The M-1 includes a mic level control
and a switchable mic-over-music priority function; the L-1
is tted with both phono sockets (RCA jacks) and a 3.5 mm
3-pole jack socket, together with a music level control.
Active remote modules should be connected to the 24 Series’
FACILITY PORT using screened Cat 5 or Cat 6 cable. (Note
that as the cable carries analogue audio, only screened Cat 5/6
should be used.) The LM-2 includes controls for local music
level and source selection, the wiring for these functions
being catered for on the Facility Port. The maximum total
Cat 5/6 cable length should not exceed 100 m.
Connections:
LM-2: The LM-2’s upper PCB is tted with an RJ45 connector
labelled OUTPUT. Connect this to the FACILITY PORT using
screened Cat 5/6 cable with screened RJ45 connectors at
each end. Follow the colour coding shown in the table on
page 19. The metal screening of the connectors should be
bonded to the screen of the cable. Full details can be found in
the LM-2 Installation Guide.
As explained in the preceding section, before the LM-2’s
music source and level controls will operate (in Zone 1 only),
the Z1 LOCAL/REMOTE button [20] must be set to REMOTE.
BT-1: Connect the RJ45 socket on the rear of the BT-1 to the
FACILITY PORT with screened Cat 5/6 cable and shielded RJ45
plugs. Full details can be found in the BT-1 Installation Guide.
M-1 and L-1: Connect the RJ45 socket on the rear of the M-1
or L-1 to the FACILITY PORT with screened Cat 5/6 cable
and shielded RJ45 plugs. Full details can be found in the
Installation Guide supplied with the module.
The Facility Port may alternatively be used as an additional
balanced line input for any other source; see page 22 for details.