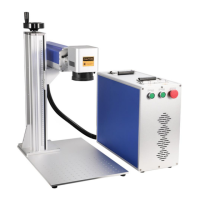
Step 7. Activate the laser guidance system by pressing Red or hitting F1 in EZCad2 Lite.
The design should be displayed in red light on the workbench, showing where the laser will
fire.
Step 10. Replace the test material with the actual material. Use the foot pad or press Mark
or hit F2 in EZCad2 Lite to engrave your pattern. Again, do not stare at the laser in operation
even with protective eyewear. Watch for possible issues like sparks or fires, however, and be
prepared to quickly extinguish a fire if necessary.
Step 11. Examine the quality of your first run and adjust the laser parameters in EZCad2
Lite as necessary to create your desired effect. The foot pedal is particularly useful for
continuous or repeated operation of the laser once you've settled on your design and its ideal
parameter settings. You can also achieve more control of the marking process by reducing
the laser's speed and using the foot pad.
Step 12. When you have finished engraving your design, close EZCad2 Lite and then turn
off the laser marking machine by following these steps:
1. Press the laser switch.
2. Press the controller switch.
Step 8. Place an expendable piece of the material to be engraved in
the location shown by the laser guidance. Do not use a different target as
the galvo lens automatically focuses on different heights for different
materials. Being careful that no part of your body is near the workbench
or laser path, press Mark or hit F2 in EZCad2 Lite to fire the test laser.
Alternatively, you can activate the laser by using the foot pad.
Step 9. The laser is invisible but will create a buzzing noise and sparks
and begin engraving when it is correctly focused on your test material. If
no sparks are emitted, the laser is out of focus. Continue to fire it while
adjusting the up or down using its height adjustment knob. Small,
consistent sparks will be emitted at the marking point when the beam is
correctly in focus. Take a note of the correct height for future reference.