Do you have a question about the Cloudray LiteMarker and is the answer not in the manual?
Welcomes the customer and introduces the laser marking machine.
Provides contact information for customer feedback and technical support.
Outlines the manual's structure and purpose.
Explains how the laser marker works and its expected lifespan.
Highlights high-voltage warnings and the requirement for protective eyewear.
Notes that the machine may differ from the manual due to updates.
Provides critical safety guidelines for machine operation and maintenance.
Details hazards of Class 4 lasers and necessary safety precautions.
Outlines safe electrical practices for operating the laser marking device.
Addresses material safety during processing and potential emissions.
Lists materials safe for laser marking and those to be avoided.
Lists materials prohibited for use with the laser marker due to hazards.
Details laser power, wavelength, frequency, pulse width, and scanner specs.
Lists computer requirements, interfaces, and operating ambient conditions.
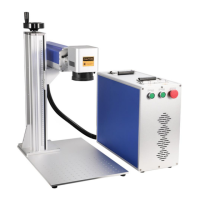
Identifies and describes the main components of the laser system.
Explains the function of front panel buttons: Laser, Controller, and Emergency Stop.
Describes the ports on the rear side for connectivity and expansion.
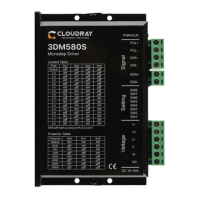
Details internal components: controller, stepper driver, power supplies, and filter.
Overview of system components and general installation requirements.
Provides guidelines for selecting a suitable and safe operating location.
Explains the importance and method of electrical grounding the device.
Details steps for assembling lifting column and light path.
Guides connection of USB, rotary, foot switch, and power cables.
Advises on control computer placement and software familiarization.
Emphasizes adherence to manual instructions for safe operation.
Outlines initial steps for installing laser marking software.
Step-by-step guide for installing device drivers via Device Manager.
Steps to uninstall existing drivers before installing new ones.
Instructions for copying and installing EZCAD2 software.
Introduces the EZCAD2 Lite software interface and its main sections.
Defines key marking parameters: loop count, speed, power, and frequency.
Explains functions of F1, F2, and other control bar items.
Describes the importance and method for setting correct focal distance.
Details safety precautions and mounting the rotary attachment.
Guides on creating and marking text using the rotary attachment.
Instructions for adjusting text orientation and placement for marking.
Explains using the hatch function and setting marking parameters.
Details configuration of parameters for vector files with rotary axis.
Explains setting parameters for split marking vector files.
Guides entry of workpiece diameter for rotary marking.
Reminds users about protective eyewear and unattended operation.
Details the correct order for turning on the laser marker.
Guides on reconnecting computer and starting EZCad2 Lite.
Explains creating designs and applying hatching in EZCAD.
Covers adjusting parameters like frequency, speed, and resolution for desired output.
Details using laser guidance and performing a test fire.
Guides engraving actual material and checking quality.
Provides correct steps for turning off the laser marking machine.
Provides specific settings and safety advice for engraving metals.
Offers recommendations for engraving different types of stone.
Emphasizes safety during maintenance and authorized personnel.
Lists routine cleaning and upkeep procedures for the machine.
Provides detailed instructions for safely cleaning laser optical components.
Lists potential causes and solutions for no laser output.
Offers solutions for issues with no engraving despite laser output.
Addresses general laser errors and required technician checks.
| Laser Wavelength | 1064nm |
|---|---|
| Minimum Line Width | 0.01mm |
| Laser Type | Fiber |
| Marking Speed | 7000mm/s |
| Power Supply | AC 220V ±10%, 50/60Hz |
| Operating Temperature | 10°C - 35°C |
| Control Software | EZCAD |
| Supported File Formats | PLT, DXF, AI, BMP |