通过 Type-C 数据线实时连接机器与软件。如果您的电脑没有 USB-A 口,请使用附赠的转接头进行转换。在线工作时,您也可以通
过控制面板的开始 / 暂停按键进行控制。
Connect the machine to a PC via a USB-C cable. If your computer does not have a USB-A port, please use the included
adapter to convert it. While controlling from PC, you can also control it through the Start/Pause button on the control
panel of the machine.
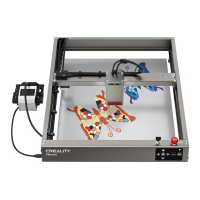
联机工作 Control from PC
1. 首先通过 LightBurn 软件生成雕刻或切割文件(gcode),将文件保存至 TF 卡的根目录中(机器默认读取 TF 卡第一级目录中,系
统修改日期最新的雕刻文件,建议删除第一级目录中其它雕刻文件)。上电前将 TF 卡插入机器,然后使用配套的电源适配器和电源
线连接控制面板,最后打开控制面板右侧的电源开关。
电源接通后,机器发出“滴 ... 滴”两声,机器进行初始化后进入待机模式,指示灯变成绿色呼吸灯效果。
2. 按下 Frame 按键,机器从待机模式进入预览模式,激光模组会发出弱光,并围绕所加工图片的最大 X、Y 边缘重复运动,此时蓝色
指示灯常亮,您可以调整材料至合适位置,或通过控制面板上的方向键进行微调。
1. Generate the engraving file (gcode) through the LightBurn software, and save the file to the root directory of the TF
card (the machine will access the file with the latest data in the root directory of the TF card by default, so it is advised
to delete other irrelevant files in the first directory). Insert the TF card into the machine before powering it on, plug in the
power adapter and power cord, and turn on the power button.
After the machine is powered on, it will sound two beeps and enter standby mode. The indicator light will pulse green
slowly.
Press the Frame button, and the machine will exit the standby mode and enter the preview mode. The laser module will
emit a weak beam and move along the X/Y axis to frame the target working area. The indicator will be in solid blue. You
can adjust the material to a suitable position, or make fine adjustments through the arrow buttons on the control panel.
离线工作 Work with TF Card
13