Do you have a question about the Creality Spider and is the answer not in the manual?
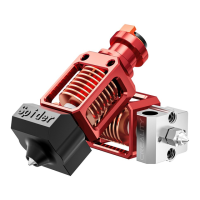
Remove original nozzle fan cover and built-in fans.
Install fan on compatible fan cover; download model or contact dealer.
Remove original nozzle, heating tube, and thermistor for transfer to new hotend.
Install heating tube and thermistor to Spider hotend using M3 screws.
Mount Spider hotend to 3D printer using screws or adapters.
Install fan cover onto nozzle and attach adapter to fan cover top.
Remove blue wire clip, insert Teflon tube, and reinstall clip.
Connect thermistor wire to motherboard; modify if length/terminals mismatch.
Adjust nozzle-platform distance to 0.1mm via Z-axis limit switch and leveling nut.
Install matching fan cover for better heat dissipation; supports BLTouch/CR Touch.
Hotend throat/nozzle are consumables; ensure parallelism during replacement to prevent breakage.
| Nozzle Diameter | 0.4 mm |
|---|---|
| Filament Diameter | 1.75 mm |
| Heater Cartridge Voltage | 24V |
| Supported Filaments | PLA, ABS, PETG, TPU |
| Max Temperature | 300°C |
| Thermistor | NTC100K |
| Compatibility | Ender 3, Ender 3 Pro, Ender 5, CR-10 |