Page 35 - Revision:EU-2020-10-13
PRE-DELIVERY PROCEDURES
DANGER! ELECTRICAL SHOCK HAZARD.
Only qualified personnel who have read and understand this entire manual should attempt to
install, or service this C100 Water Treatment System, failure to do so could result in death or
serious injury. DO NOT plug into an electrical supply until specifically instructed.
WARNING! ALWAYS SANITISE BEFORE USE.
Sanitise before use to eliminate any potential microbiological contaminates.
Materials Needed:
• Personal Protective Equipment. Rubber or Nitrile Safety Gloves and Protective Eyewear
• Phillips Screwdriver.
• Temperature Gauge.
• Water Pitcher or Container to collect water from the faucet
• 3 Litre container or drain basin
• Aquadosa Sanitiser – Or equivalent (5.25% Sodium Hypochlorite)
• 1/4”O.D. Plastic Tubing, at least 1.5m in length, and assorted 1/4” quick connect fittings.
• Test Strips for measuring sanitiser levels
• TDS Meter (Optional)
• Empty filter housing
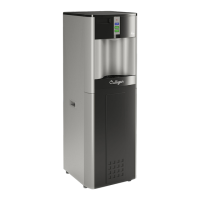
1. Unpack the Culligan C100 Water Treatment System and check exterior for damage.
Flush Filters
CAUTION! FILTER FLUSH REQUIRED.
C100’s Water Treatment Systems are not supplied with filters. Filters should be configured to
optimize your system. Filters need to be configured and specified to do the job given the local
water conditions, usage, maintenance schedule, and placement restrictions.
In order for our filters to perform as represented and to provide the best quality water possible, it
is essential that filters be replaced periodically. The frequency of filter changes depends upon your
water quality and your water usage. For example, if there is a lot of sediment and/or particles in
your water, then you will have to change your filters more frequently than a location with little to
no sediment. Be sure to replace your filters whenever you notice a decline in the performance,
whether it is a drop in flow rate and/or pressure or an unusual taste in the water.
2. Flush thoroughly with fresh water to drain.
3. Once flushed, install the filters. Following the flow direction on the filter.
NOTE: Filters should not be flushed prior to 24 hours before installation to limit Microbial
Growth. Filters must be flushed upon installation.
 Loading...