Do you have a question about the DAKEWE 6250 and is the answer not in the manual?
Explains the meaning of various symbols used in the manual for safety and understanding.
Details the intended use, components, and limitations of the cryostat instrument.
Describes the fundamental mechanism by which the cryostat operates to prepare tissue slices.
Specifies the required training and qualifications for operating the instrument safely and effectively.
Provides information on the specific model and software versions of the cryostat.
Lists any conditions or situations where the instrument should not be used.
Outlines essential safety guidelines and procedures for operating and maintaining the cryostat.
Details specific warning labels found on the instrument and their significance for user safety.
Provides critical warnings related to the safe handling, transportation, and installation of the cryostat.
Lists crucial safety instructions and warnings to follow during the operation of the cryostat.
Highlights essential safety warnings to be observed during cleaning and maintenance procedures.
Specifies the environmental and physical conditions required for optimal and safe instrument placement.
Describes the correct procedures for safely moving and positioning the cryostat instrument.
Encompasses vital precautions to ensure safe and proper usage of the cryostat after installation.
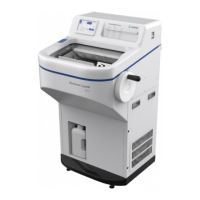
Provides a visual introduction to the cryostat's main parts and their identification.
Details the technical specifications, performance characteristics, and operational ranges of the cryostat.
Outlines the necessary environmental and site conditions for installing the cryostat.
Lists the tools recommended for safely unpacking the cryostat from its packaging.
Guides users through the step-by-step process of safely removing the cryostat from its shipping container.
Covers the procedures for installing various accessories essential for the cryostat's operation.
Details the correct method for installing the hand wheel component onto the cryostat.
Explains the process of installing the hand wheel block accessory for proper functionality.
Describes how to unlock and open the instrument's cover for access or maintenance.
Details the procedure for securing the fixed card core to prevent damage during transport.
Guides on how to properly install the waste trough for collecting discarded materials.
Provides instructions on how to install the blade holder assembly for sectioning.
Explains the steps for correctly installing the glass door onto the cryostat chamber.
Outlines the procedure for connecting the cryostat to the power supply.
Details the essential steps to take before powering on the cryostat for the first time.
Configures various settings related to the sectioning process, including temperature and slicing parameters.
Guides users on setting and adjusting the operating temperature for the cryostat's cooling chamber.
Covers the settings for controlling slice thickness and retouching parameters during operation.
Details how to manage cold stage temperatures and utilize the semiconductor cooling feature.
Explains the function and operation of the internal lighting and UV disinfection lamp.
Describes the process and precautions for using the drying function of the cryostat.
Identifies and explains the function of each button on the cryostat's control panel.
Introduces and explains various functional settings available on the cryostat interface.
Details how to configure manual and automatic defrost cycles for the cryostat.
Explains how to set up hibernation mode for the cryostat, including timing and temperature.
Covers the procedures for manual and automatic disinfection cycles of the cryostat.
Describes how to reset date and time settings to factory defaults.
Explains the built-in safety feature that protects the compressor from overheating.
Allows for configuration of system-wide parameters, including time and retraction values.
Details how to set and synchronize the system's internal clock.
Explains how to adjust the slice retraction value for optimal sectioning.
Provides a detailed description of the blade holder assembly and its components.
Guides on adjusting the front and rear position of the blade holder for precise sectioning.
Explains how to adjust the left and right position of the blade holder.
Covers the safe and correct procedure for installing or replacing the microtome blade.
Details how to adjust the anti-roll plate for optimal tissue slice quality.
Explains the process of adjusting the microtome blade angle for precise cutting.
Guides on how to properly install the sample disk for specimen placement.
Describes the process of preparing and freezing specimens on the cryostat shelf.
Outlines the steps required to safely power on and start the cryostat.
Lists the necessary tools and materials to prepare before commencing sectioning.
Explains the preliminary stage of retouching slices before final sectioning.
Details the core process of performing tissue sectioning using the cryostat.
Provides tips and references for achieving optimal sectioning quality and technique.
Describes the routine tasks to perform at the end of each day for instrument upkeep.
Outlines procedures for preparing the instrument for extended periods of non-use.
Provides general guidelines and restrictions for cleaning the cryostat.
Lists preparatory steps to take before initiating any cleaning process.
Details the method for cleaning the exterior surfaces of the cryostat.
Explains the specific procedure for cleaning the critical blade holder components.
Covers regular maintenance tasks to ensure the cryostat's performance and longevity.
Details the procedure for safely removing the slicing core for maintenance or repair.
Provides instructions for replacing common components such as fuses and UV lamps.
Guides on how to safely replace a blown fuse in the cryostat.
Explains the procedure for replacing the UV lamp used for disinfection.
Describes the proper usage and maintenance of the waste liquid collection tank.
Outlines the terms and conditions of the product warranty provided by the manufacturer.
Provides contact details and information required for requesting technical support or service.
Gives guidance on the proper and compliant methods for disposing of the instrument at the end of its life.
| Model | 6250 |
|---|---|
| Accuracy | ±5% |
| Type | Infusion Pump |
| Power Supply | AC 100-240V, 50/60Hz |
| Display | LCD |
| Alarms | Occlusion, Low battery |