This document describes the DEKO TV Digital TV Receiver, available in PRO and PRO 2 models, which supports DVB-T2 HEVC and DVB-C standards. It functions as a digital TV receiver, allowing users to access terrestrial and cable television channels.
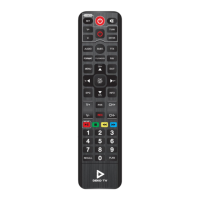
Remote Control Functionality:
The remote control provides comprehensive control over the DEKO TV receiver and, through its MEMORY function, can also operate a connected TV set.
- Power: Turns the tuner on/off.
- TV Control (Programmable): A group of five buttons designed for programming TV IR commands, enabling control of a TV set from the DEKO TV remote.
- MUTE: Toggles sound muting.
- AUDIO: Changes the soundtrack language.
- SUBT: Selects subtitles for films.
- TTX: Switches teletext on/off.
- FORMAT: Changes the aspect ratio.
- TV/RADIO: Switches between TV and Radio channels.
- FAV: Activates the favorites channels function.
- MENU: Accesses the decoder settings.
- EXIT: Closes the current mode or menu.
- OK/LIST: Confirms selected functions and lists all TV channels.
- V+/V-: Adjusts volume.
- CH+/CH-: Changes channels.
- EPG: Displays the Electronic Program Guide.
- INFO: Shows detailed program information and channel parameters.
- PVR: Provides direct access to the directory of recorded material.
- REC: Initiates recording.
- Media Buttons (Colored Keys - Red, Green, Yellow, Blue): These keys are used for navigation and activating functions within the tuner's submenus, with prompts displayed on screen.
- RED: Play/pause and Time Shift (scrolling through content).
- GREEN: Stops playback or recording.
- YELLOW: Fast rewind.
- BLUE: Fast forward.
- 1-9: Channel number buttons.
- RECALL: Switches to the previous channel.
- PLAN: Activates the "Recording schedule" function (in TV mode).
MEMORY Function (TV Control):
The MEMORY function allows the DEKO TV remote to control both the DEKO TV decoder and a connected TV.
- Programming Steps:
- Press and hold the "SET" button for approximately 2 seconds until its red LED brightens, indicating entry into button pairing mode.
- Press the desired button on the DEKO TV remote (e.g., Power) from the "TV Control" section. The LED will flash slowly, signaling it's listening for IR commands.
- Align the DEKO TV remote with the external TV remote (LEDs facing each other, max 3 cm distance). Press the corresponding button on the external remote (e.g., Power). The red LED will flash three times to confirm successful storage.
- Press the "SET" button on the DEKO TV remote to complete the pairing process.
- Note: The "SET" button itself is not programmable. Up to 5 buttons from another remote can be programmed, regardless of their original function.
Hardware Interface:
The DEKO TV PRO and PRO 2 models feature various ports for connectivity.
- RF IN: Connects an antenna cable for DVB-C or DVB-T2 signals.
- RF LOOP (Optional): Connects an output cable for DVB-C or DVB-T2 signals.
- USB Port: For inserting a USB drive, hard disk drive, or Wi-Fi USB module.
- HDMI Output: Connects to the TV's HDMI port using an HDMI cable.
- SCART Output (PRO model only): Connects to the TV's SCART port (for TVs without an HDMI port).
Installation and Channel Search:
Upon initial setup or when no channels are found, the tuner displays an installation guide.
- Initial Setup: Use the CONTROL KEY [▲ / ▼] to navigate and [OK] to select. Move the cursor to "Channel Search" and press [OK] to begin automatic channel search.
- Installation Guide Options:
- OSD Language: Changes the default language.
- Country: Changes country settings.
- FTA Only: Selects only Free To Air channels.
- Search Mode: Changes between DVB-T/T2 or DVB-C.
- Antenna Power: Activates if the antenna requires additional power supply.
- Channel Search: Starts searching for channels.
- LCN Setting: To set a custom channel numbering, the LCN (Logical Channel Numbering) setting should be disabled (Off).
Main Menu:
Pressing the [MENU] key accesses the Main Menu, offering various settings and features.
- Navigation: Use [◄►] or [▲ / ▼] to move the cursor and [OK] to confirm selections. [EXIT] returns to the previous menu.
- Menu Items: Channel Search, Channel Edit, Setting, Upgrade, Network Setting, Weather, YouTube, IPTV, PVR Media, Video, Music, Picture.
Channel Edit:
This section allows users to manage their channel list.
- Access: Press [OK] on the large screen to display the channel list, then press [YELLOW BUTTON] or navigate to "Channel Edit" in the Main Menu and press [OK].
- Channel Delete:
- Press [1] (Del) on screen to enter delete mode.
- Move the cursor to the desired channel and press [OK] to select. Multiple channels can be selected.
- Press [RED] (from Media Section of Deko TV remote) to delete marked channels.
- Move Channels:
- Press [2] (Move) on screen to enter move mode.
- A move marker will appear on the selected channel. Press [GREEN BUTTON] to select multiple channels.
- Move the selected channels to the desired position and press [OK].
- Note: Disable LCN setting first for custom channel order.
- Skip Channels:
- Press [3] (Skip) on screen to enter skip setting mode.
- Select channels to skip by pressing [OK]. Skipped channels will not appear in the channel list.
- Channel Lock:
- Press [4] (Lock) on screen to enter channel lock mode.
- Enter the decoder password (default: 000000, changeable in Decoder Menu).
- Select channels to lock and press [OK]. Locked channels require the password to play.
- Add Favorite Group:
- Press [5] (Fav) on screen to enter add favorite channels mode.
- Move the cursor to the channel to add to a favorite group and press [OK] to confirm. A channel can be added to multiple groups.
- Press [EXIT] to exit the favorite groups category field. Channels in a favorite group will display a flag.
EPG Program Guide:
Access the Electronic Program Guide for program information.
- Access: Press the [EPG] shortcut.
- EPG Information: Press [OK] to display EPG info for the current channel.
- Navigation: Use [▲ / ▼] to switch programs if EPG information is available. Use [▷] to move the cursor to the EPG Display Window for more program details.
- Daily Navigation: [GREEN BUTTON] for the day before, [YELLOW BUTTON] for the day after.
- Detailed Info: Press [INFO] on the remote while watching a program for more details. Double-clicking [INFO] displays the full program description. Pressing [INFO] three times shows transmission parameters and reception strength.
Settings Menu (Main Settings):
- Language: Sets the language for the decoder menu, two audio tracks, on-screen subtitles, teletext, and EPG.
- AV Settings:
- TV Standard - Resolution: Selects the optimum (native) resolution for the receiver (default: 1080i@50Hz).
- TV Ratio: Sets the aspect ratio.
- Aspect Mode: Auto, Global.
- Volum Scope: AC3 Decode, CVBS.
- SPDIF/HDMI:
- TV-Scart:
- OSD Settings:
- Transparency: Adjusts menu transparency on the TV channel.
- OSD Timeout: Specifies how long the menu with program description stays on screen.
- Channel Switch: Selects how channels are switched (e.g., Freeze).
- Lock Control: Enables/disables channel locking by password. Allows changing the default password (000000).
- Time Setting:
- Mode: Selects automatic time setting from the sender.
- Timezone: Sets the time zone.
- Summertime: Toggles summer time on/off.
PVR Management:
- Timeshift: Enables/disables the TIMESHIFT function for recording live programs, activated by the [RED] button on the remote.
- Record Duration: Sets the recording duration.
- Section Record:
- Disk Information:
- Timer Settings: Schedules program recordings.
- Add Item: Press [GREEN] to add a recording event.
- On Mode: Sets the decoder to automatically start at the scheduled date and time.
Network Settings:
- Wi-Fi: An additional Wi-Fi adapter (not included, available separately) is required to connect the device to a network via USB.
- Settings: Device, Mode (None, off), Type (Static IP), IP Address, Subnet Mask, Gateway, DNS1, DNS2, Save, Status (Invalid!).
Software Update:
- Download: Latest software update files are available at www.dekoelectronics.com in the "Downloads" tab, with detailed instructions.
- Uploading:
- Select "Software Update" from the Main Menu and press [OK].
- Select "USB Upgrade" and indicate the path to the software file on a memory stick.
- Click [OK] to start the update.
- CAUTION: Do not unplug the decoder during the update process.
- Note: With the latest software, the decoder can also be updated via the Internet directly from the Decoder Menu.
IPTV (Internet TV):
- Instructions: Detailed instructions for adding additional free-to-air channels are available at www.dekoelectronics.com.
- Adding Channels:
- When the cursor is in the left half of the screen, press [RED] to refresh the list and [GREEN] to display the list of IPTV clouds.
- IPTV channels can be added, deleted, edited, and imported.
- [BLUE] is used to enter the IPTV server address in the .XML file.
- In local IPTV mode, navigate to the XML file, press [BLUE], select the file location, and press [OK] to import.
- After successful import, channel groups and lists will appear. Use [▲ / ▼] for navigation.
Warranty:
- Period: 24 months from the date of sale (proof of purchase and warranty card required).
- Territorial Scope: European Union.
- Acceptance for Repair: Requires valid proof of purchase (receipt, simplified bill, VAT invoice) and the defective product. Inconsistent documents may lead to refusal.
- Warranty Card: Must be stamped and signed by the dealer. Incorrectly or illegibly filled cards are invalid.
- Coverage: Covers defects inherent in the product.
- Exclusions:
- Improper use, non-compliance with instructions or safety regulations.
- Mechanical damage or defects caused by it.
- Defects from unauthorized repairs.
- Damage/malfunctions from improper installation of equipment.
- Normal wear and tear (scratches, stains, worn lettering, batteries).
- Operations mentioned in the user's manual as user responsibility.
- Damage from fortuitous events (fire, flood, power surges, electrical discharges, chemical agents, corrosion).
- Products with removed or broken warranty seals.
- Commercial Use: Warranty covers products used exclusively for non-business purposes. For commercial use, warranty is limited to spare parts replacement; labor costs and warranty duration (excluding consumables) remain unchanged. Consumable parts warranty is 3 months.
- Repair: Free replacement of spare parts and labor during warranty period, performed only by DEKO Electronics Authorized Service.
- Timeliness: Service is not responsible for repair timeliness due to import/export restrictions or other legal/external circumstances.
- Packaging: Product should be sent in original factory packaging. Damage in transit due to improper packaging will prevent repair.
- Complaint: Customer can lodge a complaint at the place of purchase.
- Exchange: Equipment can be exchanged for a new one if DEKO Electronics Service Centre states defect removal is impossible. Replaced equipment must be complete; cost of missing parts is borne by the Purchaser.
- Chargeable Activities: Service activities like operation checks, measurements, cleaning, adjustment, tuning are chargeable.
- Mechanical Damage: Not covered by warranty, even if the dealer accepts it for complaint handling. DEKO TV does not warrant mechanically damaged equipment.
- Lost Warranty Card: No replacement or duplicate document will be issued; repair and claims under warranty will be void.
- Purchaser's Rights: Warranty does not exclude, limit, or suspend Purchaser's rights from non-conformity of goods with the contract.
- Governing Law: Civil Code provisions apply for matters not covered by these terms.
Safety and Operational Recommendations:
- User Manual: Read carefully and follow instructions. Non-compliance voids warranty claims. Keep for future reference. Contact authorized service for repairs.
- WARNING - Electric Shock: Do not open the housing or back cover. High voltages may be present even when off. No user-serviceable parts inside. Repairs only by authorized service. Power cord replacement by specialist workshop. Protect batteries from excessive heat.
- WARNING - Fire/Electric Shock: Protect equipment from water/moisture. Do not place in locations where it may be splashed or near liquids.
- Ventilation: Do not block ventilation openings. Install according to manufacturer's recommendations. Ensure proper ventilation; do not place on soft surfaces (bed, sofa, carpet) or in enclosed spaces (bookshelves, cupboards) without adequate ventilation.
- Repairs: All servicing by a service center. If dropped, power cord damaged, liquid ingress, rain exposure, abnormal operation, or sound degradation, service is required.
- Disposal (Worn Out Electrical and Electronic Equipment):
- Symbol indicates product should not be disposed of with household waste.
- Polish law prohibits mixing used electrical/electronic equipment with other waste.
- Hand over to appropriate collection/recycling points.
- Proper disposal prevents negative environmental/health consequences and conserves natural resources.
- Contact local authority, cleaning service, or shop for recycling information.
- CE Mark: Indicates compliance with Directive 2004/108/EC (electromagnetic compatibility) and Directive 2006/95/EC (low-voltage regulations and safety related to electrical equipment handling).
- Location: Place on a flat, stable surface, away from other electronic devices that could cause interference. Ensure free space for ventilation in racks, low humidity, away from sun/heat sources. Protect from flooding.
- Power Supply: Unplug from mains if not used for long periods. Grasp the plug, not the cord. Do not touch with wet hands (electric shock risk). Use only manufacturer-recommended power supply. Do not place AC adapter in enclosed spaces. Protect from dropping/shock.
- Lightning: Unplug during storms or before long periods of non-use to prevent damage from power surges.
- Cleaning: Clean housing and controls with a soft cloth dampened with mild detergent. Do not use abrasive cloths, scouring powder, or solvents (spirit, petrol).
- Batteries: Remove batteries from remote if worn out or not used for long periods. Use only new batteries; do not mix old/new or different manufacturers. Dispose of properly (contain harmful chemicals). Do not charge, short-circuit, heat, or place in fire. Do not drop remote. If leakage occurs, remove damaged batteries immediately, clean residue, and prevent corrosion. Battery life is typically 1 year, depending on usage.