ON
OFF
30
PUMP INSTALLATION
Fuel out
Fuel in
Side mounted
Heavy Duty pump
pressure regulator
Orientation
The pump is best installed oriented with its outlet pointing
upwards. If installing the pump upright is not possible, the
pump can be installed on its side. Please note that a pump
installed on its side may suffer from increased wear over time
and can result in limited pressure.
In order to get fuel flowing through the pump, it will need to be
primed before its first use. Once the pump has been primed, its
check valves will prevent fuel from being able to flow the
wrong way keeping it primed for use.
If the pump loses its prime, one or more of the 3 check valves
may require cleaning.
See page 44 for pump maintenance
Install the pump in a well ventilated area where it will not be
subject to excessive heat or exhaust.
This pump is not to be used for gasoline.
Fuel
pressure
regulator
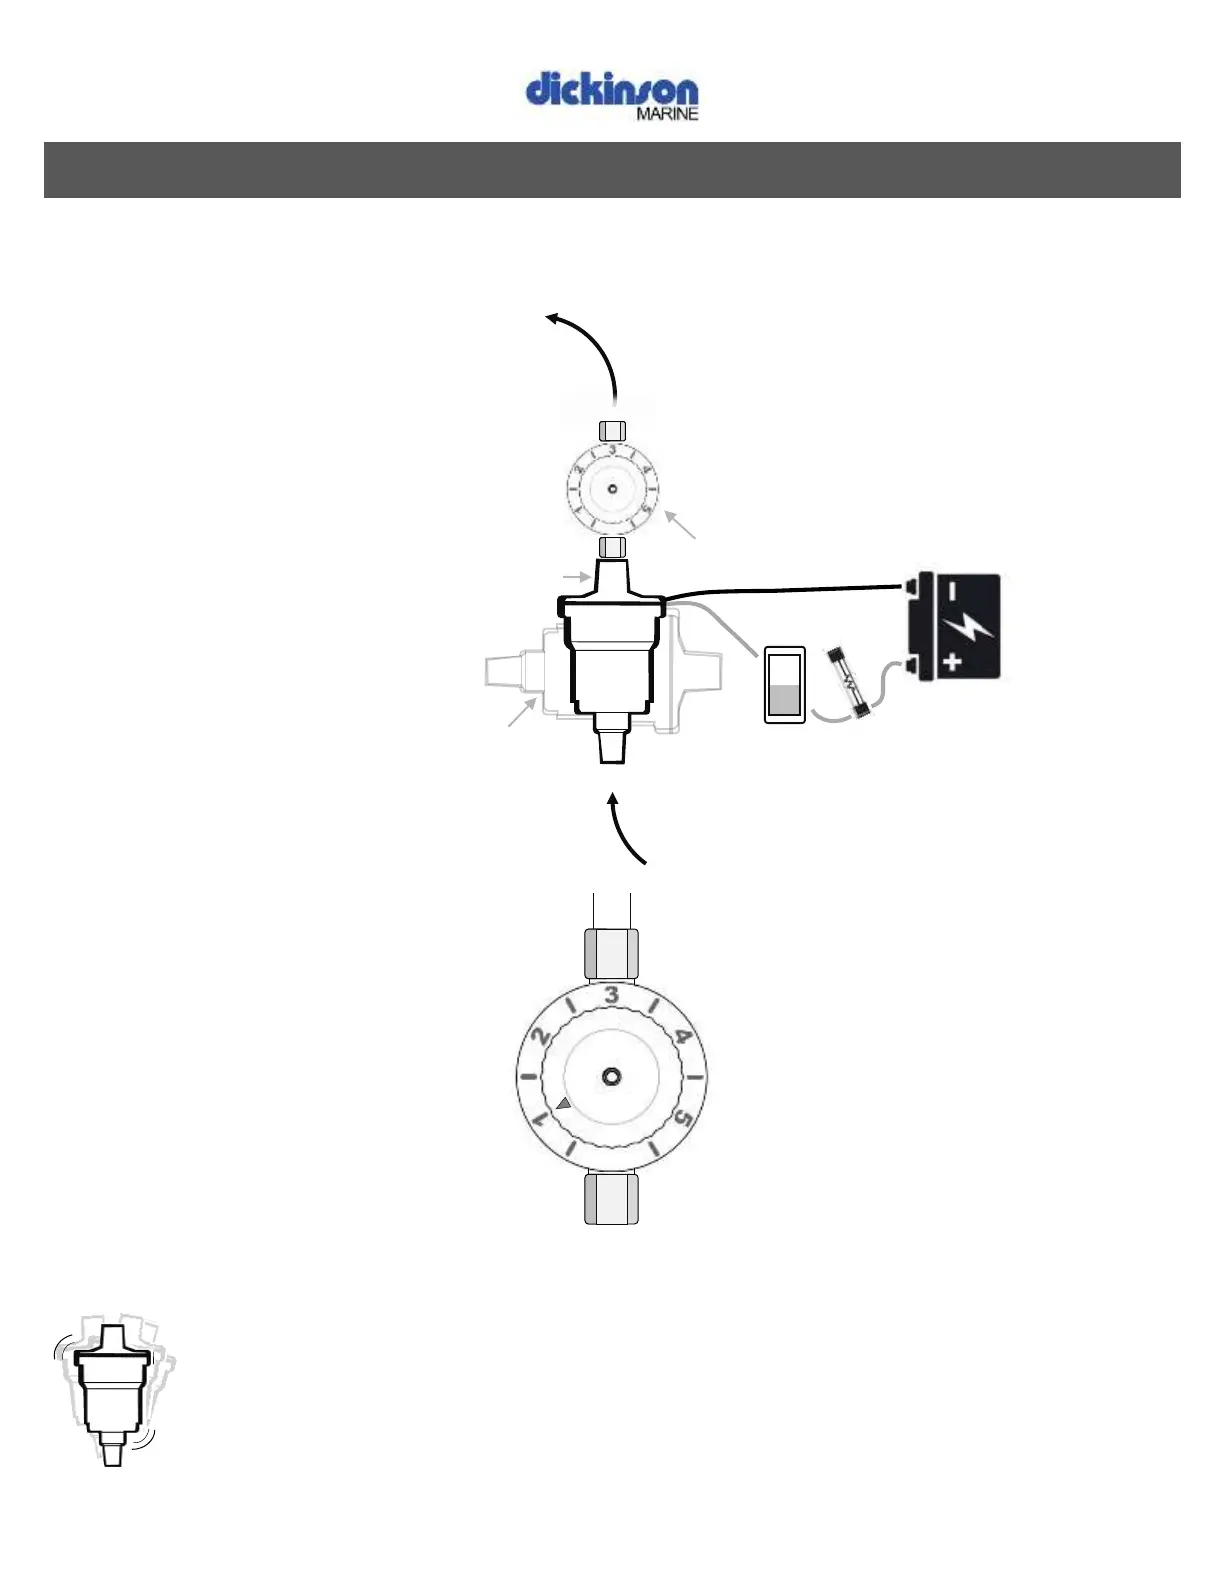
Regulator settings
The numbered 1-5 settings on the pressure regulator do
not represent a specific unit of pressure. The settings are
merely indicative of how ‘open’ the regulator is. Setting 1
represents the lowest pressure setting while setting 5
indicates the highest.
Priming the pump
To prime the fuel pump, disconnect the fuel line where it connects
to the metering valve on the appliance. Direct the open fuel line into
a bucket and switch power on to start the pump.
The pump will push out any air that may be trapped in its lines. Until
it has rid itself of all air bubbles, the pump may, vibrate, pulse noisily
and eject atomized fuel. Once all air has been bled from the lines,
the pump will settle down to a steady flow of fuel without vibration
or excessive noise.
Once the pump has filled the valve to its oil level and the lines are
pressurized, the pump will continue to pulse albeit less frequently.
When the appliance is running, the pump will continue to cycle to
maintain pressure in the lines as the burner uses up fuel.
Using a rubber backing between the pump and the surface it is
attached to will help to reduce the noise it makes each time it
cycles.
Pressure regulator
If you are using a fuel pump equipped with a fuel pressure regulator,
set this to its lowest setting. You are looking for the lowest setting
that will offer a consistent, pulsing flow of fuel. If you are not getting
a consistent flow, adjust the regulator setting one increment higher
and observe the flow. Only adjust the pressure regulator higher to
achieve consistent flow, but avoid setting the pressure regulator any
higher than necessary.
Vibrating, noisy & chattering pumps
If the pump continues to show signs of air in
the fuel lines (Vibrating, chattering or getting
hot) this indicates that there is a leak present
allowing air in. A leak indicated in this manner
will be found between the pump and the
source of its fuel. Even a leak too small to drip
fuel can allow enough air in to prevent the
pump from priming. Investigate leaks and
tighten all connections methodically in order
to trace the source of a pressure side leak.
Calibrate the regulator
If the pressure regulator will not allow fuel through, it may be necessary to adjust or
calibrate it.
In the center of the regulator, a hole opens to a set screw which can be used to increase
or decrease the pressure available across the regulators positions. Use an allen key
(5/64
th
” / 2mm) to turn the set screw in small increments clockwise to increase
pressure, and counter-clockwise to decrease it.
Wiring
We recommend wiring the pump into a 12v control circuit
with a 5 amp fuse so that power to the pump can be
switched off when it is not in use.
Connect the black ground wire on the pump to the negative
terminal of your power source.
Outlet
Siphon effect
When the pump is off, fuel may still be able to flow through the
pump due to the siphon effect. For this reason, it is
recommended that fuel flow should also be prevented using the
shut-off valves and the metering valve on the appliance should
be set to its OFF position.
5 amp fuse
FIG 52
FIG 53