42
FUEL FILTER MAINTENANCE
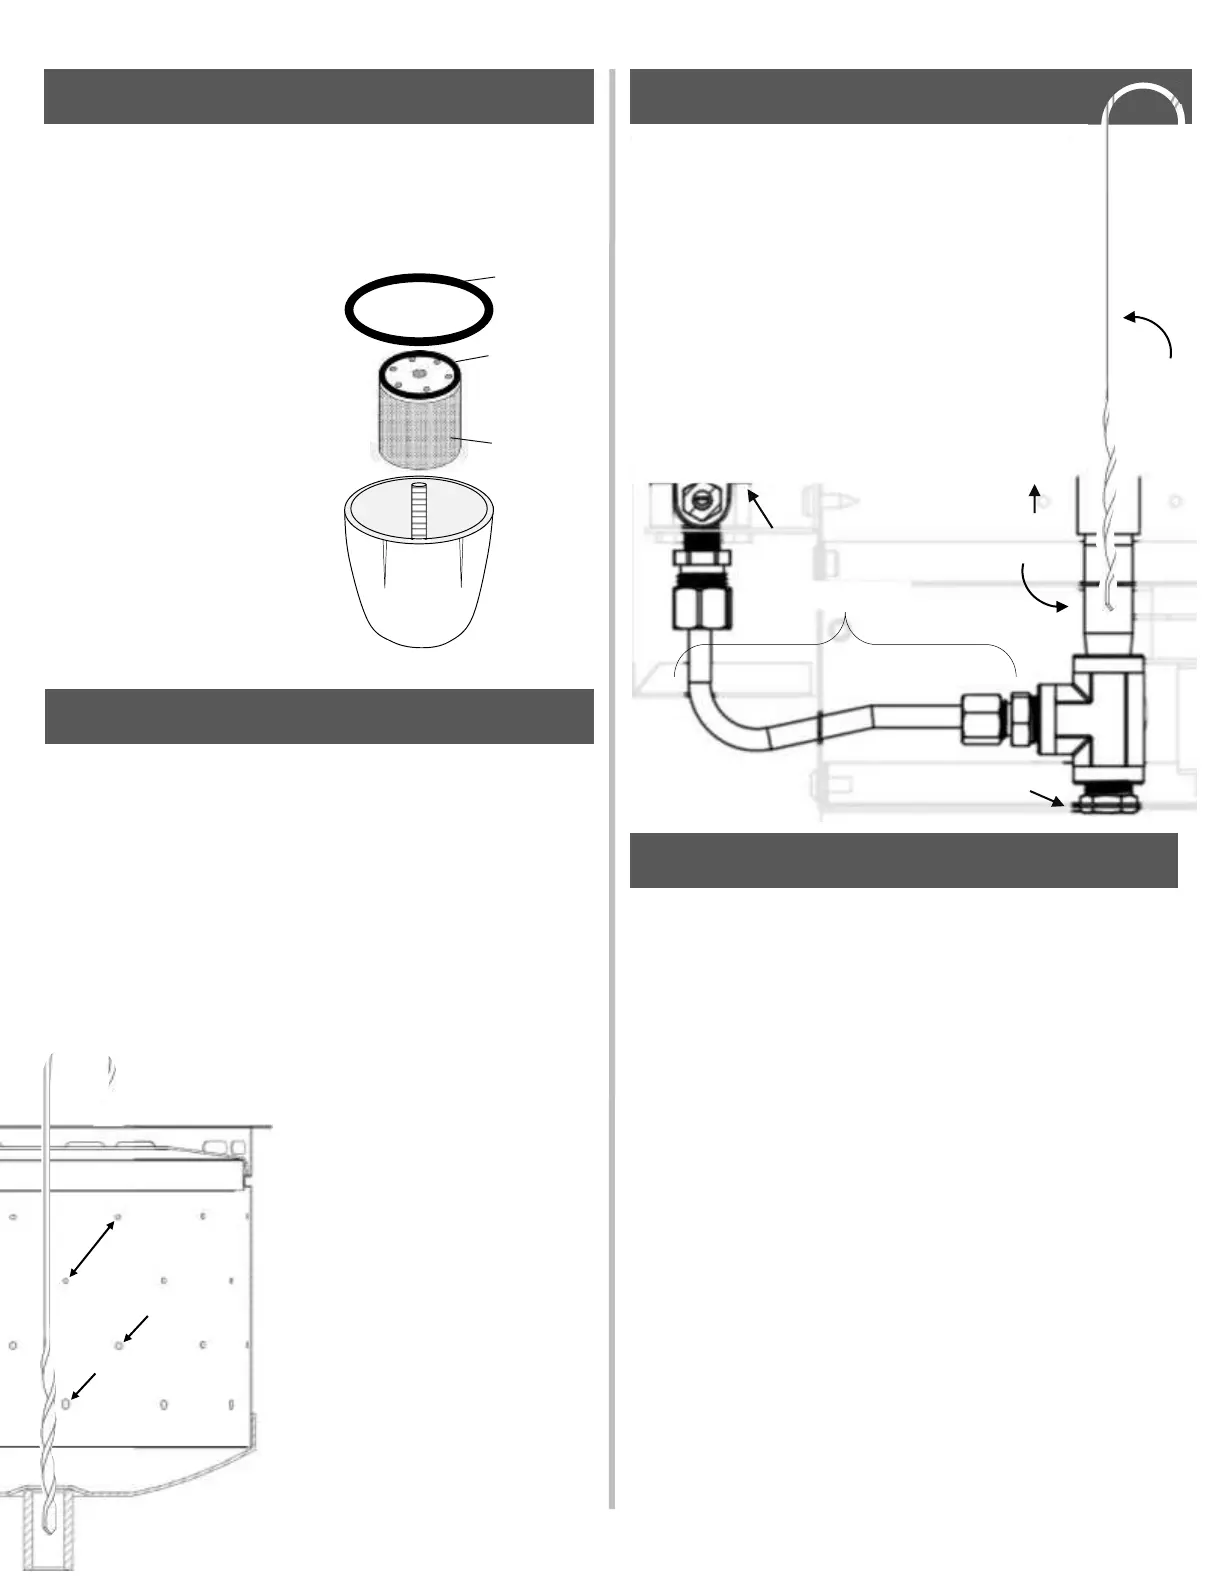
FUEL FILTERS
A fuel filter is required for the installation of a natural draft appliance in order
to keep naturally occurring diesel fuel contaminants out of the fuel lines and
the moving parts inside the metering valve.
O-ring
O-ring
Fuel filter
Element
Part #
20-010
The filter element will need to be
exchanged from time to time as it
becomes dirty. A fuel filter element
may need to be replaced even if it
is not visibly dirty to the naked eye.
This element should be replaced
every 1-2 years, or if fuel supply
issues can be traced back to the
filter.
When replacing the fuel filter,
remember to replace both gaskets
that seal the filter housing. If you
are using a fuel pump, air being
drawn into the pump on it’s intake
or ‘pressure’ side may cause the
pump to function erratically. Make
sure the fuel filter housing is
properly assembled with its O-rings
to prevent air leaks.
Copper fuel line
5/8” plug fitting
Valve
CHIMNEY & CAP MAINTENANCE
CHIMNEY & CHIMNEY CAP CLEANING
Cleaning of the chimney and cap simply involve ridding their interior of any
carbon or soot.
See below for tips on how to go about cleaning the chimney pipes.
• AVOID USING CLEANERS AND ABRASIVES ON THE OUTSIDE OF THE CAPS –
The chimney caps are electro-polished to a much finer degree than other
chimney components to resist corrosion. Avoid scratching or damaging the
smooth finish of these parts in any way during cleaning.
• Use a chimney cleaning brush. If you don’t have one, wrap rags around a
rod or stick like wadding to use to rid the chimney of loose soot. A brush
may be needed to remove any hardened carbon deposits however.
• Avoid removing the deck fitting to clean the chimney. Leave its seal intact,
and disassemble only sections that push-fit together. Removing and
replacing the chimney cap may damage its hardware or gasket making it
difficult to re-seal again.
• If you need to clean a DP chimney Cap, unscrew the acorn nut on its top
and remove the top portion of the cap. If you cannot remove the cap to
empty the it of debris, carbon and soot inside the cap can be blown/swept
out of the gap you will see in between the wider part of the cap and its
pipe.
• If you are cleaning an H chimney Cap, clean its open sections with a stiff
wire brush. Gently tap the flat section of the cap to allow any carbon
deposited there to fall out.
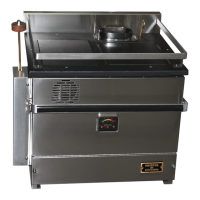
FUEL LINE
Deposits of carbon and dust from the burn chamber will collect
inside the fuel line leading to the burner from the metering
valve over time. Fuel passing through the line may fail to wash
these out if they become adhered to sticky fuel residue inside
the line.
Cleaning the line can help eliminate fuel flow issues, if fuel is
not making its way from the valve to the burner, or if fuel flow
appears inconsistent or reduced.
Detach the copper fuel line to clean it. Do not bend the line.
The compression nuts will remain in place on the line for
reattaching.
Clean the standpipe under the burner by removing the plug
beneath (use a 5/8” socket or wrench) and cleaning the hole
from above using the auger rod provided.
Burner
Standpipe
Auger
FUEL LINE MAINTENANCE
BURNER MAINTENANCE
BURNER MAINTENANCE & CLEANING
Keeping the burner clean is necessary in order to keep it vaporizing fuel. Carbon
deposits inside the burner pot insulate the surface of the burner and prevent it
from getting hot enough to vaporize fuel. Any soot or carbon inside the burner
pot must be cleaned before lighting in order to ensure correct operation.
See below for tips on how to clean the burner pot.
• The burner is made from stainless steel. Abrasives such as Scotch-Brite,
mild-grit sandpaper, Brillo pads, steel wool and wire brushes can be used to
clean its surfaces. Scrub carbon deposits away to reveal clean metal
beneath – a clean metal is needed in order for the burner interior to reach
vaporizing temperatures.
• DO NOT clean the burner pot using chisels, screwdrivers or
other pointed tools which may pierce or damage it. If carbon
needs to be scraped from the bottom of the burner, use an
wood or plastic tool that will not damage the burner.
• Clean all air holes in the walls of the
burner. Every hole must be clear to allow
for proper air flow. Please note that the
burner has rows of holes in different sizes.
Do not force anything through the holes
that might enlarge them. The bottom row
of holes are flared outwards – DO NOT
flare or bend holes in the burner that are
not already flared. DO NOT drill additional
holes into the burner pot.
• While cleaning the burner pot, the fuel
inlet hole at the bottom can be plugged or
covered to prevent debris from entering.
To clean the inlet hole, remove the plug
beneath the burner and clean using the
auger supplied.
.075” ⌀ holes
.095” ⌀ holes
Flared holes
FIG 82
FIG 83
FIG 84