43
VALVE MAINTENANCE
Valve maintenance
The job of the metering valve is to maintain a steady oil level within the valve &
burner, and to precisely meter out the correct amounts of fuel for each
numbered fuel setting. In order to function as intended, the metering valve
must be kept clean.
COOL
When should you clean the metering
valve?
It is a good idea to clean the metering valve at the
start of every season, if the appliance has sat unused
for long enough to allow fuel inside the metering
valve to dry out leaving sticky residue, or if fuel flow
issues are noticed.
How to clean the metering valve
To restore the metering valve to proper functioning, the needle and seat must
always be cleaned. The seat accumulates layers of dried fuel residue over time,
which eventually cause the movement of the needle inside to become sticky. To
clean the seat;
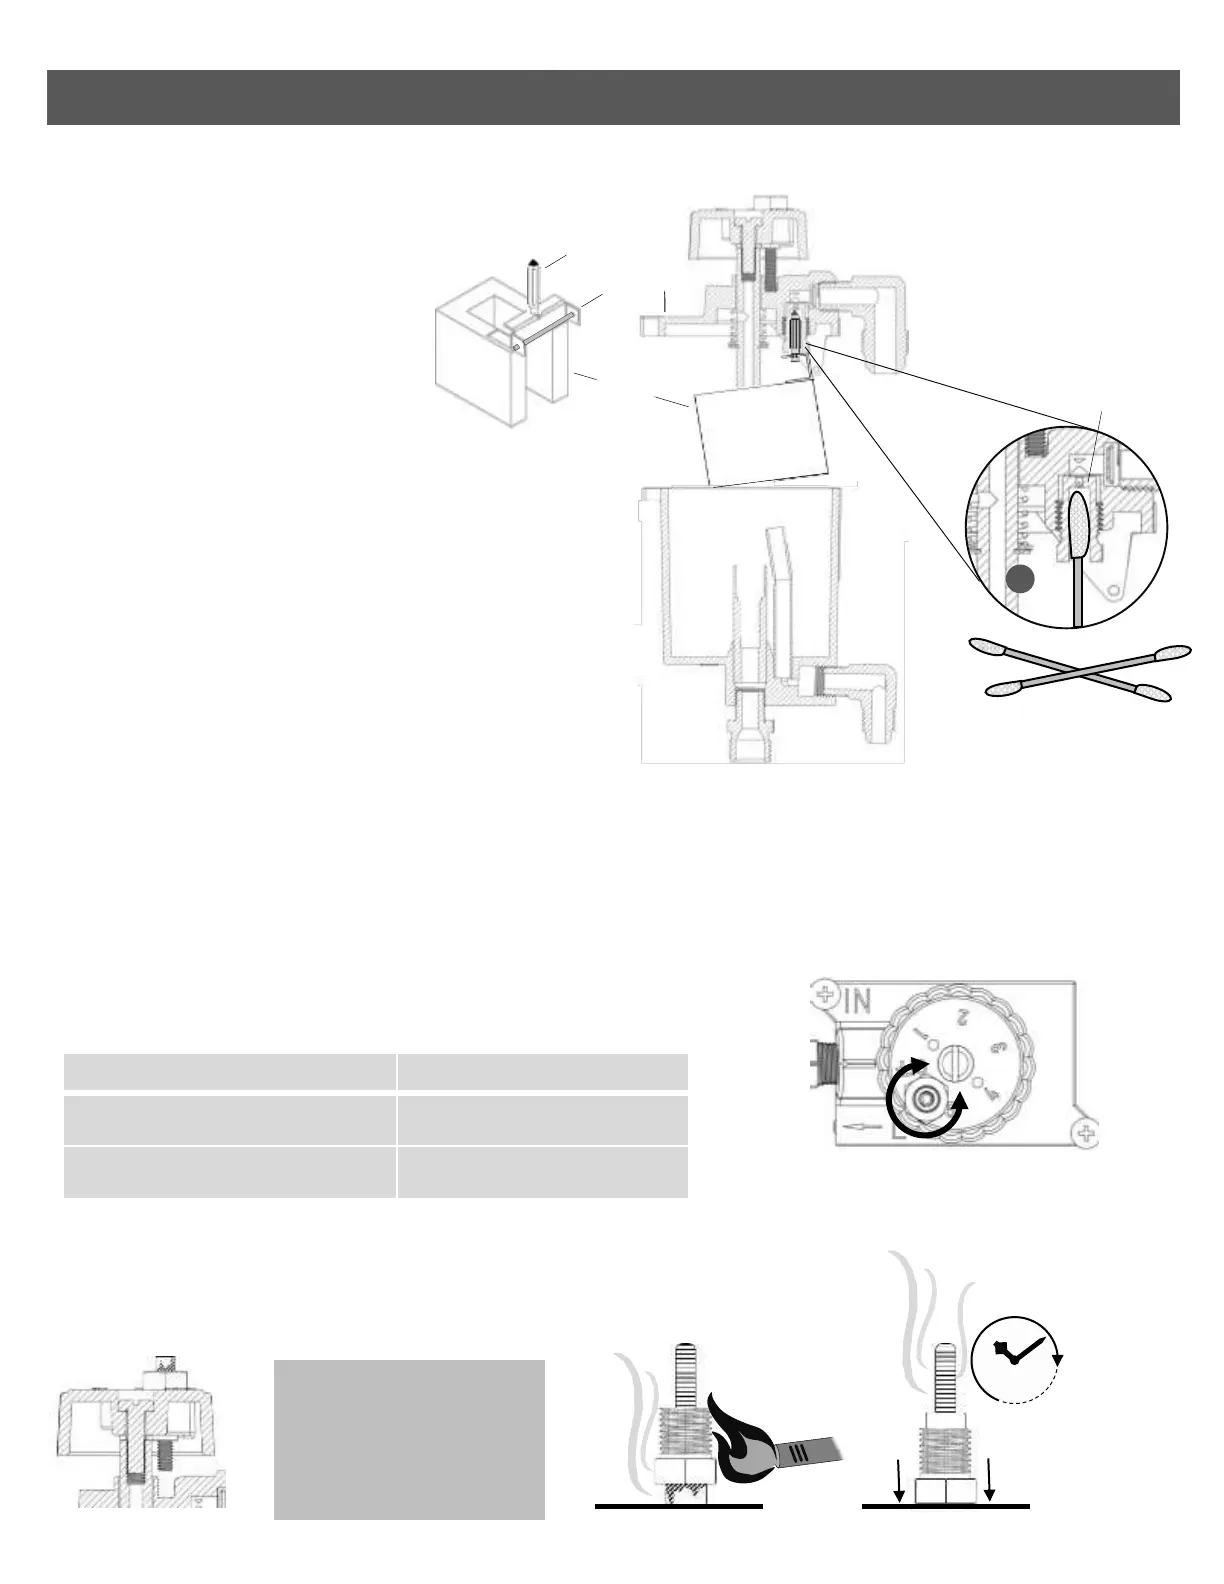
Lid
Detach the inlet fuel line and remove the screws holding on the lid of the valve.
The lid comes off with the float, float pin and needle attached. Slide the float pin
out to release needle and float from the valve lid.
With the needle removed, clean the seat that houses the needle repeatedly until
a cotton swab comes away clean (1) Make sure the cotton swabs penetrate all
the way into the seat tube and twist thoroughly to polish away any fuel residue.
DO NOT use any cleaning agents or solvents to clean the valve as these may
damage rubber seals used in the device.
DO NOT remove the seat for cleaning, the height of the seat must not be altered
by loosening or tightening it down.
The spring loaded metering stem does not need to be removed from the lid in
order to clean the valve.
Reassemble the valve complete with the float, float pin and needle as shown
above.
Needle
Float pin
Float
1
Seat
Calibrating and adjusting the metering valve
Cleaning the seat of the metering valve will correct the oil level if it was previously inconsistent. If the valve was calibrated or adjusted prior to cleaning, the calibration
will need to be adjusted again in order to meter fuel in the correct amounts.
To calibrate the valve, use a 2mm allen key to turn the calibrating screw in small increments clockwise (to increase fuel flow) or in small increments counter-clockwise (to
decrease fuel flow) Note: to gain access to the calibrating screw, a smaller locking screw will first have to be removed.
+
_
Valve type/Appliance Flowrate on setting #1 (lowest setting)
3D /
All heaters & stoves except 00-ATL
Should produce approx. 1 Tsp every 60
seconds
4D /
Atlantic stove
Should produce approx. 1 Tsp every 50
seconds
Detach the fuel line leading from the metering valve to the burner where it connects to the valve. This
will allow fuel to drip straight down from the outlet of the metering valve so it can be measured. Follow
the steps below and use the allen key to adjust the valve flow-rate to the match the correct flow-rate
for your valve listed on the chart.
Use 2mm (0.78”) allen key to first remove the locking screw. Then turn
the calibrating screw in small increments clockwise (to increase flow) or
counter-clockwise (to decrease flow)
Resetting the high-fire fuse
The valve knob is equipped with a safety fuse designed to come apart & stop fuel supply if it becomes overheated. If the
appliance runs too hot and shuts off, check the fuse for signs that it has been sprung due to overheating (fig 89) To reset
the fuse, place it upside down in a pan until its solder melts and the nut drops back into place (fig 90) Allow the fuse
ample time to cool before handling after resetting! (fig 91)
If a fuse has lost all its low-temperature solder it will not be possible to reset it.
Before the fuse is reset and
reattached, make sure you
have cleaned & calibrated
the metering valve to
prevent the appliance from
overheating again!
FIG 85
FIG 86
FIG 87
FIG 88
cotton swabs
FIG 89
FIG 90
FIG 91