Do you have a question about the dji MIC 2 and is the answer not in the manual?
How to link transmitters and receiver automatically by placing them in the charging case.
Step-by-step guide to manually link the transmitter and receiver via their interfaces.
How to connect the receiver to a camera for audio recording using the cold shoe and cable.
Steps to connect the receiver to a mobile device using the adapter for audio transmission.
How to connect the receiver to a computer via USB-C to use it as a microphone.
Explains using the transmitter for standalone recording, storage, file splitting, and formatting.
Detailed steps for downloading and installing new firmware for the transmitters and receiver.
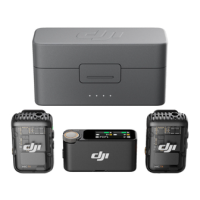
The DJI Mic 2 is a sophisticated dual-channel wireless microphone system designed for high-quality audio capture from two distinct sound sources simultaneously. This system comprises two transmitters and one receiver, offering a versatile solution for a wide range of recording scenarios, from professional videography to casual mobile recording.
Each DJI Mic 2 transmitter is equipped with a built-in omnidirectional microphone, capable of capturing rich and clear audio. These transmitters can be connected to various devices, including the DJI Osmo Pocket 3, mobile phones, and other Bluetooth-enabled devices, providing flexible integration into existing setups. A key feature of the transmitters is their support for standalone recording, allowing users to record audio directly onto the device without needing a connected receiver. This is particularly useful for backup recording or when a receiver connection is not feasible. The transmitters also incorporate intelligent noise-cancelling technology, which helps to filter out unwanted ambient sounds, ensuring cleaner audio recordings. For enhanced portability and discreet placement, each transmitter features a clip, and they can also accommodate external microphones via a 3.5mm TRS input, catering to specific off-camera recording needs and further improving audio quality.
The receiver, the central hub of the system, boasts an intuitive OLED touchscreen display. This screen provides real-time monitoring of crucial information, including volume levels, battery status for both the receiver and transmitters, wireless signal strength, gain settings, and recording modes. This immediate feedback allows users to make on-the-fly adjustments and ensure optimal recording conditions. The receiver's expansion port enhances its versatility, enabling connections to cameras or mobile devices for high-quality audio capture. When connected to a computer, the receiver can function as a microphone, expanding its utility. An independent monitor port on the receiver allows for real-time audio adjustments, giving users precise control over their sound. The entire system is conveniently housed in a charging case, which not only recharges the transmitters and receiver simultaneously but also facilitates automatic linking between the components.
The DJI Mic 2 offers multiple ways to place and link its components for optimal use. Transmitters can be attached to clothing using a magnet or the integrated clip, or they can be placed upright on a stable surface. For outdoor or windy environments, it is recommended to use the provided windscreen, which attaches firmly over the internal microphone.
Linking the transmitters and receiver is designed to be straightforward. In the DJI Mic 2 combos, the components are linked by default. If they become unlinked, automatic linking can be achieved by simply placing the transmitters and receiver back into the charging case. Manual linking is also possible: by pressing and holding the linking button on the transmitter for two seconds, it will search for nearby receivers. The receiver's touchscreen allows users to initiate linking via the "Link Device" option in the "Receiver Settings" menu. The system status LED on the transmitter indicates its linking mode (green for receiver linking, blue for Bluetooth linking).
When using the DJI Mic 2 with a camera, the receiver attaches to the camera's cold shoe, and then connects to the camera's microphone port using the provided camera cable. For optimal audio, it is advised to increase receiver gain and decrease camera gain. For mobile devices, the receiver connects via a mobile device adapter inserted into its expansion port. When connected to a computer, the receiver's USB-C port allows it to function as a microphone, provided a standard charging cable or the DJI Mic 2 Mobile Phone Adapter (Type-C) is used.
The receiver's touchscreen offers extensive control. The home screen displays recording mode (Stereo, Mono, Safety Track), receiver gain, headphone connection status, terminal device connection, camera connection, selected camera model, 32-bit float recording status, wireless signal strength, receiver battery level, and screen lock status. Swiping down accesses the "Control Menu," where users can adjust receiver settings such as recording mode, recommended camera settings (which auto-configure receiver gain for specific camera models), receiver gain, monitoring volume, and enable/disable simultaneous power on/off with the camera. The "Receiver Auto Off" feature conserves power by shutting down the receiver after 30 minutes of inactivity if not linked to a transmitter. The "Link Device" option allows for re-linking components.
Transmitter settings are also accessible via the receiver's touchscreen. "Low Cut" filters out low-frequency noise (100 Hz and below). "Transmitter Gain" adjusts input gain, with a visual indicator (red volume bar) for overexposure. "32-Bit Float Recording" enables independent 32-bit float audio files, offering a wider dynamic range for post-editing, though it shortens recording time. "REC Stop Lock" prevents accidental stopping of standalone recording. "Auto Record" automatically starts independent recording when the transmitter powers on or is removed from the charging case. "Storage" allows users to view available recording hours and format transmitters. "Vibration Notifications" provide haptic feedback for actions like power on/off, starting/stopping recording, enabling/disabling noise reduction, and muting/unmuting. The "LED Indicator" can be enabled or disabled to control the blinking of the recording and system status LEDs.
Swiping up on the home screen allows control over individual transmitters, including starting/stopping standalone recording, muting/unmuting, and enabling/disabling noise reduction.
Transmitters can also connect to Bluetooth devices like the DJI Osmo Pocket 3 or mobile phones. To do this, the transmitter is put into Bluetooth linking mode (system status LED blinks blue slowly), then the linking button is held for two seconds to search for devices (system status LED blinks blue quickly). Once linked, the system status LED turns solid blue. For video recording via Bluetooth, third-party camera, video chat, conference, or livestreaming apps are recommended, ensuring the native camera supports Bluetooth audio input. When connected to a smartphone via Bluetooth, standalone recording and noise reduction functions are unavailable. The transmitter's USB-C port can also connect to digital signal headphones for mobile phone audio monitoring.
Standalone recording is a significant feature, with each transmitter offering 8GB of storage. This allows for up to 14 hours of 48 kHz 24-bit uncompressed audio, with files splitting automatically every 31 minutes. For 32-bit float audio, recording time is approximately 11 hours, with files splitting every 23 minutes. Recorded audio can be exported or deleted by connecting to a computer, and internal storage can be formatted via the receiver. The transmitter's file system supports FAT32 with an allocation unit size not exceeding 16 KB.
Charging the DJI Mic 2 system is efficient. The charging case, with its 3250 mAh built-in battery, charges both transmitters and the receiver simultaneously. It's recommended to use a 5V/2A charger for the charging case. When the case is open, the receiver displays the battery levels of all three devices and the remaining recording time of the transmitters. Components automatically power on when removed from the case. For individual charging of transmitters and receiver, a 5V/1A charging brick with the DJI Mic USB-C Splitter Charging Cable is recommended, taking approximately 70 minutes for a full charge.
Storing the DJI Mic 2 is made easy by the charging case, which securely holds two transmitters with clip magnets, two mobile device adapters, and the receiver. The mobile device adapter can also remain attached to the receiver when stored.
Firmware updates are crucial for optimal performance. When new firmware is available, it can be downloaded from the DJI website. The update process involves connecting each transmitter and the receiver to a computer one at a time via the USB-C cable. The downloaded .bin file is placed in the root directories of the devices. After disconnecting, the receiver will automatically begin upgrading (if off, it needs to be powered on). Transmitters also upgrade automatically when powered on, indicated by the System Status LED blinking red and green alternately. After the upgrade, the firmware version can be verified on the receiver. If an update fails, re-downloading the firmware, restarting the device, and repeating the steps is advised. If a transmitter's firmware doesn't update automatically after powering on, "Auto Record" on the receiver touchscreen should be disabled after connecting the transmitter to the receiver.
The DJI Mic 2 also supports external accessories like the DJI Lavalier Mic. When a 3.5mm TRS lavalier mic is plugged into the transmitter's input port, the transmitter's built-in microphone is automatically disabled, and the lavalier mic becomes the audio input. For proper placement, the lavalier mic should be clipped to the collar or front of the shirt, 15-20 cm from the mouth, with the cable secured inside clothing. The lavalier mic can rotate 360° for flexible positioning, and its windscreen can be removed for a less noticeable appearance.
| Type | - |
|---|---|
| Noise reduction | Yes |
| Microphone frequency | 50 - 20000 Hz |
| Equivalent noise level | 21 dB |
| Microphone direction type | Omnidirectional |
| Maximum sound pressure level (1kHz) | 120 dB |
| Device interface | Bluetooth |
| Connectivity technology | Wireless |
| Maximum operating distance | 250 m |
| Product color | Black |
| Battery type | Built-in battery |
| Power source | Battery |
| Battery voltage | 3.87 V |
| Battery capacity | 360 mAh |
| Battery life (max) | 6 h |
| Number of products included | 2 pc(s) |
| Depth | 30.96 mm |
|---|---|
| Width | 46.06 mm |
| Height | 21.83 mm |
| Microphone weight | 28 g |
| Receiver dimensions (WxDxH) | 54.2 x 28.36 x 22.49 mm |