-3-
START-S1XL
Operating Guide
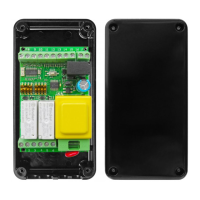
COMUNE
1 - 2 230 Vac power supply
3 - 4 230 Vac signal light
4 230 Vac common contact motor
5 230 Vac OPEN
6 230 Vac CLOSE
16 - 17 IsolatedcontactforlampWITHOUTashing
7 Positive pole antenna: +
8 Negative pole antenna / Common
9 12 Vac Output (J1 - AC) Max 60 mA
10 12 Vac Output (J1- AC) / + 12 Vdc Output (J1 - DC) Max 60 mA
11 Common-12Vdc(J1-DC),commonservicesandsecurities
12 Input command CLOSE or ALT up to DIP4-B
13 Inputforphoto-beams/anemometer
14 Input commande OPEN or STEP BY STEP up to DIP 3-B
15 Bus data // Make a link when not used
The control unit has been designed
formechanicallimitswitches.
PHOTO-BEAMS 11 - 13: Ifthemotorisnot
closing,itinvertsthedirection(NCinput).
Ifthecontrolunitisinstalledinrolling
shuttersorawainings,DIP3Band
DIP 4B should be in OFF position.
230Vacsignallightwithoutashinglight
orforastandardligh.
Makealinkifnotused.
FOTO / AN
ANEMOMETER 11 - 13: CLOSE and STOP the
automationfor3minutes(NCinput)
JUMPER J1
AC - 12 Vac
mors 9-10
DC - 12 Vdc
mors 10-11
1 Installation and scheme of the control unit
 Loading...