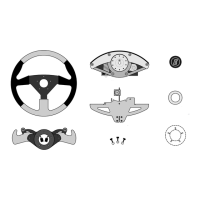
assembly by putting two screws through the steering wheel at the ten and two o’clock
position. Hold the heads in place on the wheel with a piece of masking tape. Note that the
flanged button retaining ring must be placed between the steering wheel and the shift
paddle set. The raised flange of this ring must point towards and fit into the large central
hole in the paddle set. Place the paddle set over the screws making sure the button wires
are in their slots. Once the paddles are close to the wheel, pull the paddle set wires
towards you through the center hole of the wheel.
3 Next position this assembly over the steering unit hub making sure the wheel is upright.
Guide the two screws into their respective holes. Pull the hub wires and connectors
towards you through the center of the wheel/paddle assembly. Next remove the masking
tape and turn the screws in gently making sure before tightening that the paddle button
wires are not in danger of being pinched. The wheel should be centered and not cocked
to one side. If it is tilted, remove the screws and use the next set of hub holes to counter
the tilt. Turn the screws in until snug. Then install the remaining three screws and finally
tighten all five screws progressively using the supplied hex wrench until tight.
4 Connect the button wires to the hub connectors as shown in Figure 5a. Wire colors do not
matter, the paddles will function any way they are plugged in. Carefully arrange the wires
within the hub cavity such that none are pinched when the center logo button is installed.
The center logo button is installed by engaging the four prongs of the button through the
button retaining ring that sits behind the wheel. Push the button firmly until flush.
5
Momo wheel only: Remove and discard the nuts from the five black wheel attachment
screws. Place the paddle set only over the holes in the steering hub. Once the paddles
are close to the wheel, pull the hub and paddle set wires towards you through the center
hole of the wheel. Tighten the five black mounting screws.
6 Connect the button wires to the hub connectors as shown in Figure 5a. Wire colors do not
matter, the paddles will function any way they are plugged in. Carefully arrange the wires
within the hub cavity such that none are pinched when the MOMO wheel is installed.
7 Locate the four screws that mount the wheel. Pass them first through the E-logo plate and
then through the holes in the wheel. Attach to the paddle set and tighten.
8 If you have a Lexan cover, you can now remove the protective covering. First loosen the
cover mounting screws ½ turn. Do not pull the covering straight out, carefully pull the
covering by pulling slowly parallel and close to the cover until it is removed. Then re-
tighten the cover screws.
1.4 WHEEL ANGLE ADJUSTMENT
The final step of wheel unit setup is to adjust the angle of the steering wheel to your
preference. This is done by loosening the rear leg screws [Figure 4] until the rear leg can be
moved up or down. Making this adjustment will also require loosening the bracket tensioning
bolt under the mounting surface [See Figures 2 & 4].
The tensioning bolt and the rear leg puts pressure from bottom and top to hold the unit
securely to the mounting service. To tilt the wheel more towards vertical, the rear leg must be
extended downward and the bracket bolt must be backed down. To tilt the wheel more
forward the rear leg must be raised and the bracket bolt extended.