19
Designed in
Summerville, SC
Support: Support.Eccotemp.com Shop Online: www.Eccotemp.com Phone: 866-356-1992
18
18
Support: Support.Eccotemp.com Shop Online: www.Eccotemp.com Phone: 866-356-1992
PLEASE NOTE: SH12
-
A IS FOR INDOOR PERMANENT INSTALLATIONS ONLY. THIS MANUAL AND ALL ECCOTEMP CONTENT IS SUBJECTED TO CHANGE WITHOUT NOTICE.
PLEASE VISIT SUPPORT.ECCOTEMP.COM FOR MORE INFORMATION.
English
Installation
VENTING
DANGER! Failure to
install the vent adapter
and properly vent the
water heater to the
outdoors as outlined in
the Venting section of
this manual will result
in unsafe operation
of the water heater
causing death, serious
injury, explosion, or
re. To avoid risk of
re, explosion, or
asphyxiation from
carbon monoxide,
NEVER operate the
water heater unless it
is properly vented and
has adequate air supply
for proper operation as
outlined in the Venting
section of this manual.
WARNING!
Use UL approved
Category III Stainless
Steel vent material
only. No other vent
material is permitted.
Owner must refer to
vent manufacturer’s
instructions and
specications. Z-Flex
information can be
found at www.noveex.
com, see page 23 for
additional links.
WARNING!
Refer to page 11-
13 for clearances to
combustible material.
The installation of venting must comply
with national codes, local codes, and
the vent manufacturer’s instructions.
Owner must refer to vent manufacturer’s
instructions and specications. Z-Flex
information can be found at www.
novaex.com, please refer to page 23 for
additional links.
The water heater must be vented to
the outdoors as described in these
instructions. DO NOT connect this water
heater to an existing vent or chimney,
it must be vented separately from all
other appliances. Eccotemp recommends
all termination hoods have a backow
preventer to assist with freezing air.
Consult with an installation professional
for proper installation.
All vent components (adapters, pipe,
elbows, terminals, etc.) should be UL 1738
Certied Stainless Steel Venting Material
(e.g. AL29-4C).
The specied vent termination must be
used. The
termination should be a 90° elbow type
with screen (refer to page 20).
Use a vent pipe with an anti-
disconnection structure.
The use of a high temperature silicone
(500’ F) may be required to seal vent
connections. To prevent accidental gas
exhaust leakage, apply a 1/4” wide bead
approximately 1/4” from the end and
another bead against the joint side of the
stop bead.
Follow vent manufacturer’s installation
instructions. The water heater can be
vented either horizontally or vertically.
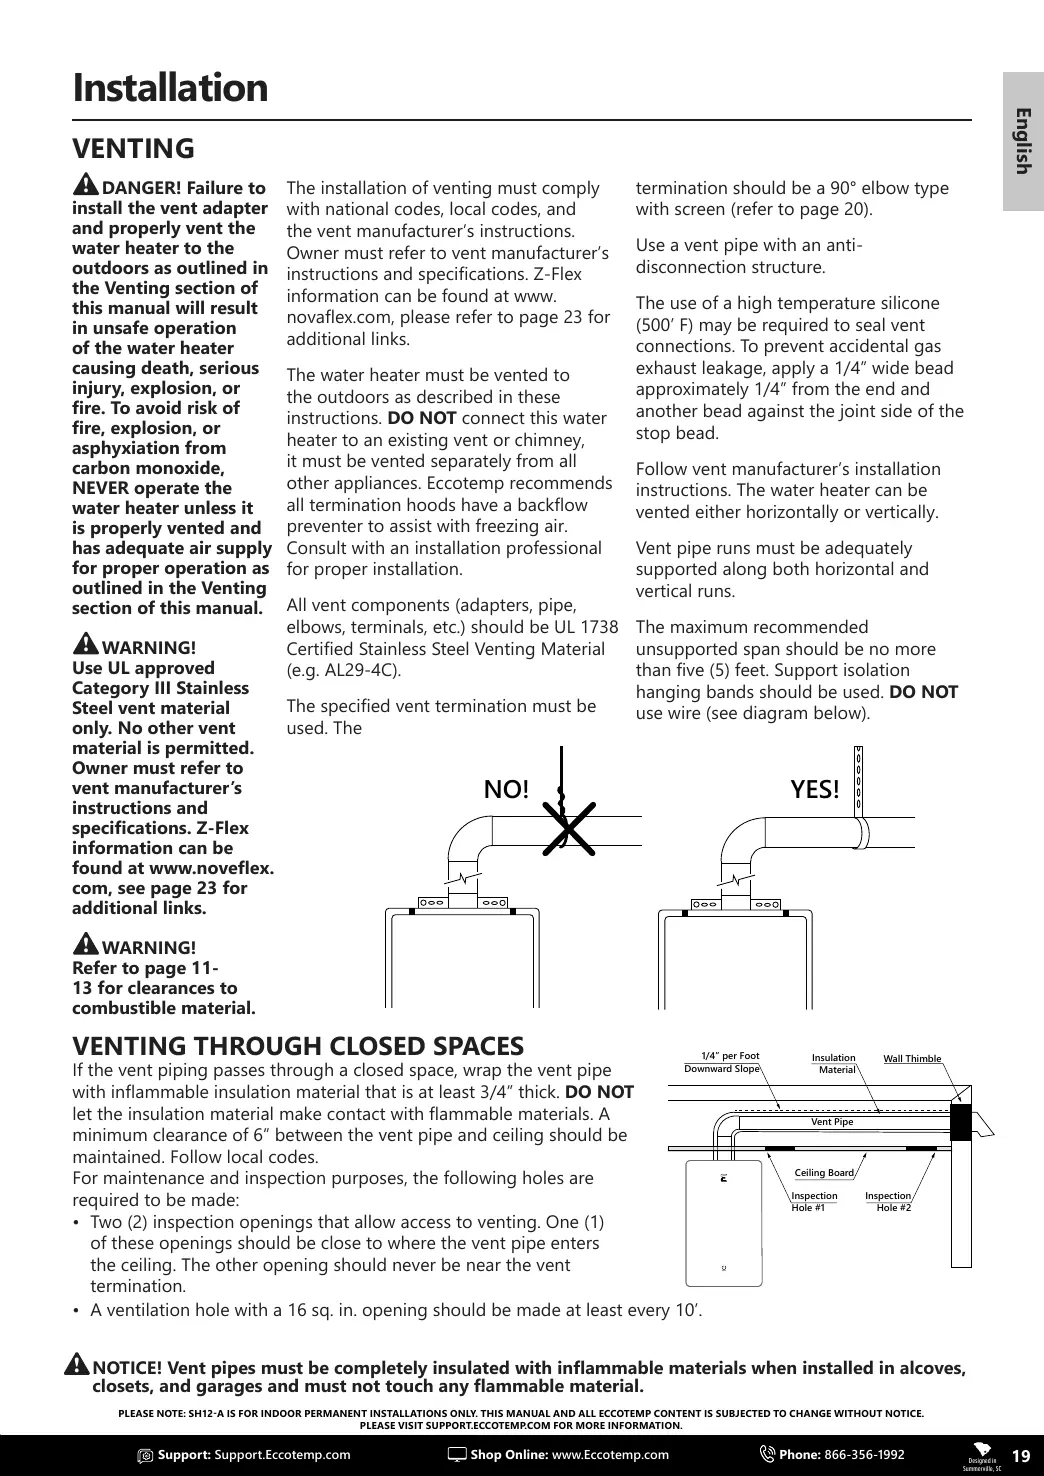
Vent pipe runs must be adequately
supported along both horizontal and
vertical runs.
The maximum recommended
unsupported span should be no more
than ve (5) feet. Support isolation
hanging bands should be used. DO NOT
use wire (see diagram below).
VENTING THROUGH CLOSED SPACES
If the vent piping passes through a closed space, wrap the vent pipe
with inammable insulation material that is at least 3/4” thick. DO NOT
let the insulation material make contact with ammable materials. A
minimum clearance of 6” between the vent pipe and ceiling should be
maintained. Follow local codes.
For maintenance and inspection purposes, the following holes are
required to be made:
• Two (2) inspection openings that allow access to venting. One (1)
of these openings should be close to where the vent pipe enters
the ceiling. The other opening should never be near the vent
termination.
• A ventilation hole with a 16 sq. in. opening should be made at least every 10’.
NO!
YES!
Wall Thimble
Insulation
Material
Downward Slope
Vent Pipe
Ceiling Board
Inspection
Hole #1
Inspection
Hole #2
NOTICE! Vent pipes must be completely insulated with inammable materials when installed in alcoves,
closets, and garages and must not touch any ammable material.