So far, we have basically completed all the work, the next step is to combat, open any of the programs in
Examples. First compile the program, if compiled correctly, you can directly download to the development
board, then connect the corresponding device and the wire, you can see the corresponding phenomenon.
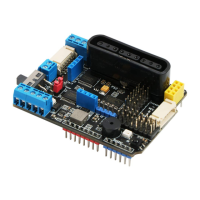
Connect to the Arduino UNO R3 development board
The pin header on the PS2X&Motor Driver Board can be plugged directly into the Arduino UNO R3
development board. No other flying lines are required. The pins are fully compatible and easy to install.
Run the sample code steps
1) Connect the Arduino UNO R3 development board connected to the PS2X&Motor Driver Board to the
computer via a USB cable;
2) Click “Connect→ Serial port→COM4(the number of this COM port is different for different computers)”;
3) Burning sample program (taking DC motor as an example)
4) In the IDE, choose “file → turn on”, Open the DC motor test sample code in the code base (sample
program file path: MotorDriverBoard\ArduinoDemo\TB6612_DC_Motor.ino);
5) Click the Upload button to burn the motor test sample program into the Arduino UNO R3 development
board connected to the PS2X&Motor Driver Board.
Driver Board Power Supply
The power supply on the driver board can be directly powered by the DC port of the Arduino UNO. The
voltage range is 6~12V and the current is 500mA~2A. Or PH2.0 wiring port power supply, the voltage
range is 6~12V, there is a power supply jumper cap on the drive board, you need to short circuit the IN and
5V.