Disassembly and AssemblY
LQ-300 Service Manual
3.2.4.8
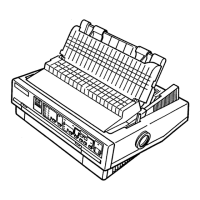
Removing the Ribbon Drive Gear Assembly
1. Remove the printer mechanism (see Section 3.2.4).
2. Release the 3 hooks attaching the ribbon drive
(RD)
cover to the left frame.
3. Remove the RDcover.
4. Remove the belt tension spring between the hook on the CR motor assembly and the hook on
the base frame (see Section 3.2.4.2).
5. Remove the timing belt from the driven pulley.
Make sure not to put the timing belt between the
RD
cover and the
leftj%ame.
RD
Ratchet
RDCover,,o
~2.3m\<17mjn,f3eH
p
+Q
“No
e
pulley
Washer
“e.
G“
&
Belt Pulley Flange
Ribbon Planetary
4
Pulley
Driven
Gear
Shafi
5.1
,16.2mm
Combination
Gear
~
,
,
5,
.WL
Driven Shaft Pulley
\
Plane Washer>
/
‘d
1,.zmm Gear
Spring
Washer”
““’mmGear’
‘:
“%5116.2mm
‘ Left Frame
\q
J’
1
C“ornbination
Gear
IL
‘:’y-&
c
~$<”
‘o&
~
:h:\
q
&
Base Frame
Figure 3-17. Removing the Ribbon Drive Gear Assembly
3-16
Rev.A

 Loading...