Disassembly and Assembly
LQ-300 Service Manual
3.2.7 Disassembling and Assembling the Color Upgrade Kit
3.2.7.1 Removing the Ribbon Motor Assembly
1. Remove
the
2
CBB
(h43
x 8) screws attaching the ribbon motor assembly to the
CS
cover.
2. Release the 2 clips attached to the
CS
cover.
3. Remove the ribbon motor assembly along with the
CS
board assembly from the CScover.
3.2.7.2 Remove the CS Cam
1. Remove theribbonmotor assembly (see Section 3.2.7.1).
2. Remove the E-ring3 from the CS frame shaft.
3. Remove the CS cam
3.2.7.3 Removing the Color Sensor Assembly
1. Remove the ribbon motor assembly andthe
CSboardassembly
(see Section 3.2.7.1).
2. Remove the 4rnm
E-ringfrom
thecartridge holder shaft.
3. Remove the color cartridge holder from the ribbon motor assembly.
4. Release the clip that attaches the color cartridge holder to
tie
color sensor assembly.
5. Remove the connector of thecolorsensor assembly fromthe
CSboardassembly.
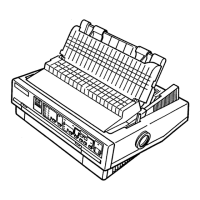
CS Cover
CS
Board Assembly
\
P
-
-1 /
9
p
3mm E-ring
‘“p
/
CS
Cam
CS Lever
\
I
CBS(M3X6)
Color Cartridge Holder
Figure 3-21. Disassembling the Color Upgrade Kit
3-20
Rev.A

 Loading...