EasyManua.ls Logo

ESAB Cutmaster 120 - User Manual

ESAB Cutmaster 120
76 pages
Print Icon
To Next Page IconTo Next Page
Loading...
120
Art # A-12769_AB
208/230V
400V
460V
Revision: AB Issue Date: April 15, 2015 Manual No.: 0-5380
ESAB Cutmaster
®
120
PLASMA CUTTING SYSTEM
SL100 1Torch™
Operating
Manual
esab.com.br

Table of Contents

Questions and Answers

  • D
    Desiree TurnerSep 3, 2025
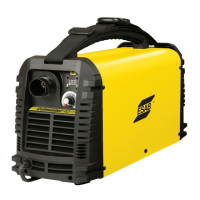
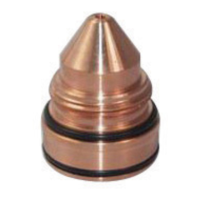
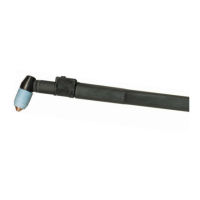
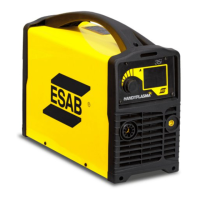
    What to do if the ESAB Cutmaster 120 torch cutting is diminished?
    • D
      Dylan BeckerSep 3, 2025
      If the torch cutting is diminished, you can: - Check and adjust to the proper setting. - Check torch consumables and replace them as needed. - Check the connection of the Work Lead to the work piece. - Reduce cutting speed.
  • K
    Kimberly FosterSep 2, 2025
    What to do if fault and 85 PSI indicators are flashing on my ESAB Cutmaster 120?
    • A
      Andrew JohnsonSep 2, 2025
      If the fault and 85 PSI indicators are flashing, you can try the following: - Remove the shield cup from the torch and check the upper O-ring position, correcting it if necessary. - Turn OFF the power supply, bleed down the system pressure, then remove the shield cup, tip, and starter cartridge. Check the starter cartridge lower end fitting for free movement and replace it if it doesn't move freely. - Inspect the torch consumable parts and replace them if necessary. - Release the torch switch and reactivate it.
  • M
    Mr. Michael GentrySep 1, 2025
    What to do if the ON/OFF Switch is ON but the A/C Indicator does not light on my ESAB Cutmaster 120 Cutter?
    • E
      Ellen WoodSep 1, 2025
      If the ON/OFF switch is ON but the A/C Indicator does not light on your ESAB Cutter, consider these possible causes: * The primary power disconnect is in the OFF position (turn the primary power disconnect switch to the ON position). * The primary fuses/breakers are blown or tripped. * The unit's internal fuse is blown (replace the fuse; if it blows again, the unit needs service). If none of these resolves the issue, there may be faulty components in the unit.
  • T
    Terri CamposAug 31, 2025
    Why is the pilot arc ON, but the cutting arc won't establish on my ESAB Cutmaster 120 Cutter?
    • W
      wagnerbrandonSep 1, 2025
      If the pilot arc is ON but the cutting arc will not establish on your ESAB Cutter, the issue might be: * The work cable is not connected to the workpiece (connect the work cable). * The work cable/connector is broken (replace the work cable). If the problem persists, it may be due to failed components in the unit.
  • I
    Isaac AndersonAug 30, 2025
    Why is the ESAB Cutmaster 120 torch cutting diminished?
    • J
      Jennifer JohnsonAug 31, 2025
      Diminished torch cutting in your ESAB Cutter can stem from several factors: an incorrect current setting (check and adjust to the proper setting), worn torch consumables (inspect and replace as needed), a poor work cable connection to the workpiece (check the connection), excessive cutting speed (reduce it), or excessive oil or water in the torch. If none of these resolves the issue, it could be due to failed components within the unit.
  • C
    Carla ToddAug 30, 2025
    What does it mean when FAULT and 90 PSI indicators are flashing on my ESAB Cutter?
    • J
      jfischerAug 30, 2025
      If the FAULT and 90 PSI indicators are flashing, it indicates an internal error. Try turning the ON/OFF switch OFF and then back ON again.
  • L
    ljonesAug 29, 2025
    Why are the Fault and 65 PSI indicators flashing on my ESAB Cutter?
    • D
      ddickersonAug 29, 2025
      If the Fault indicator and the 65 PSI indicator are flashing on your ESAB Cutter, it may be due to improper input voltage (check for proper primary input voltage). If the issue persists, it may be due to faulty components in the unit.
  • W
    William WardAug 28, 2025
    What to do if TEMPERATURE indicator is ON and FAULT indicator is flashing on ESAB Cutmaster 120 Cutter?
    • A
      ashleyrosarioAug 28, 2025
      If the TEMPERATURE indicator is ON and the FAULT indicator is flashing on your ESAB Cutter, it could be due to: obstructed air flow through or around the unit or the unit's duty cycle has been exceeded (allow unit to cool). If the problem persists, it may be due to failed components in the unit.
  • M
    michaelsandersAug 25, 2025
    Why are the FAULT and 75 PSI indicators flashing on my ESAB Cutmaster 120?
    • M
      matthewbrockAug 26, 2025
      If the FAULT and 75 PSI indicators are flashing on your ESAB Cutter, it could be due to several reasons: * The start signal is active when the ON/OFF SWITCH is turned to the ON position. Start can be active if the hand torch switch or hand pendant switch is held closed, or if the CNC START signal is active low (release the START signal source). * There's a problem in the torch and leads switch circuit (replace the torch and leads). If the issue persists, it may indicate failed components in the unit.
  • J
    Jill HuynhAug 25, 2025
    What to do if FAULT and 70 PSI indicators are flashing on ESAB Cutter?
    • M
      Martin HollowayAug 25, 2025
      If the FAULT and 70 PSI indicators are flashing on your ESAB Cutter, check the following: * Ensure the shield cup is snug (hand tighten it). * Verify the torch ATC is securely fastened to the unit. * There may be a problem in the torch and leads PIP circuit (replace the torch and leads). If the issue persists, it could be due to failed components in the unit.

Summary

ESAB Cutmaster 120 Plasma Cutting System

SECTION 1: SAFETY

1.0 Safety Precautions

Details crucial safety measures, personal protective equipment, and general precautions to ensure safe operation.

Critical Safety Warnings

SECTION 2 SYSTEM: INTRODUCTION

How To Use This Manual

Explains how to navigate and interpret the operating manual, including understanding warnings and notes.

Power Supply Specifications

Input Wiring Specifications

SECTION 2 TORCH: INTRODUCTION

Torch Specifications

Details technical specifications for torch configurations, lead lengths, parts, and cooling methods.

SECTION 3 SYSTEM: INSTALLATION

Unpacking and Lifting

Guides on unpacking the system components and details safe handling and lifting precautions for the power supply.

Gas Connections and Filters

SECTION 3 TORCH: INSTALLATION

Torch Connections

Instructs on how to properly connect the ESAB SL100 torch to the power supply unit.

SECTION 4 SYSTEM: OPERATION

Front Panel Controls; Features

Identifies and describes the main controls, indicators, and their functions on the front panel of the plasma cutting system.

Operation Preparations and Checks

Torch Parts Selection and Connection

Guides on selecting and connecting the correct torch parts for optimal cutting performance.

Cutting Operation Procedures

Cutting Modes and Arc Control

Explains different cutting modes (RUN, RAPID AUTO RESTART, LATCH) and how to initiate and maintain the cutting arc.

Torch Operation Details

Torch Parts Selection and Cut Quality

Guides on selecting torch parts and explains factors affecting cut quality.

Gouging Operation

Torch Consumable Parts Selection

Recommended Cutting Speeds (Exposed Tip)

Recommended Cutting Speeds (Shielded Tip)

SECTION 5 SYSTEM: SERVICE

5.01 General Maintenance

Outlines the general maintenance schedule and tasks required for the plasma cutting system.

Basic Troubleshooting Guide

SECTION 5 TORCH: SERVICE

5 T.01 General Maintenance

Provides guidance on cleaning the torch and lubricating O-rings for optimal performance.

SECTION 6: PARTS LISTS

Ordering Information

Provides instructions on how to order replacement parts by catalog number and includes return policy information.

APPENDIX 1: SEQUENCE OF OPERATION (BLOCK DIAGRAM)

APPENDIX 4: TORCH CONNECTION DIAGRAMS

APPENDIX 5: SYSTEM SCHEMATIC, 208;460 V UNITS

ESAB Cutmaster 120 Specifications

General IconGeneral
BrandESAB
ModelCutmaster 120
CategoryCutter
LanguageEnglish

Related product manuals