ETC Installation Manual
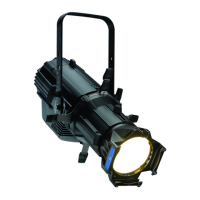
ColorSource Spot
ColorSource Spot Page 3 of 12 Electronic Theatre Controls, Inc.
Mounting hardware
• The ColorSource Spot ships with a standard yoke for mounting with a
c-clamp.
• The provided safety cable (or other approved safety device) must be
attached to the fixture. Two attachment loops are provided on the rear
of the fixture body. Take care to leave as little slack as possible in the
safety cable to avoid catching the yoke of the fixture.
Connectors
• Power: Two powerCON
®
connectors for power in and thru
• Data (DMX512/RDM): Two five-pin XLR connectors OR two RJ45
connectors for data in and thru
Conversion cables are available from ETC. Please contact your ETC
customer service representative and request part number W6538 for
RJ45 to female XLR or part number W6539 for RJ45 to male XLR.
Setting up the fixture
Step 1: Plug power cord into the powerCON In connector on the rear
of the fixture.
Step 2: Make any power-thru cable connections prior to applying a
power source.
Step 3: Plug power cord into power source.
Powering up
Step 1: Press the Mode button once to wake the display. The display
shows the DMX address.
Step 2: Press the Mode button a second time to access the
Presets/Sequences menu.
Note:
This fixture is not Ethernet/data network compatible.
Note:
The ColorSource Spot is not self terminating. You must
terminate the last fixture in line with a 120 ohm resistor.
XLR terminators are not available from ETC.
To purchase an RJ45 terminator, please contact your ETC
customer service representative and request part number
N4086.