6.5 Cleaning/replacing jaws, notcher and cutter
Required parts Order no.13 mm (
1
/
2
″) Order no. 16 mm (
5
/
8
″) Order no. 19 mm (
3
/
4
″)
Jaw (3)* 1831.021.029 1831.021.030 1831.021.031
Notcher (1) (10)* 1831.021.032 1831.021.033 1831.021.034
Cutter (8)* 1821.208.018 ʺ ʺ
Jaw actuator (2) (6) 1831.021.112 ʺ ʺ
Jaw pin (4) 1831.021.039 ʺ ʺ
Jaw axle (9) 1831.021.037 ʺ ʺ
Guidance bolt (5) 1831.021.035 ʺ ʺ
* Wear part
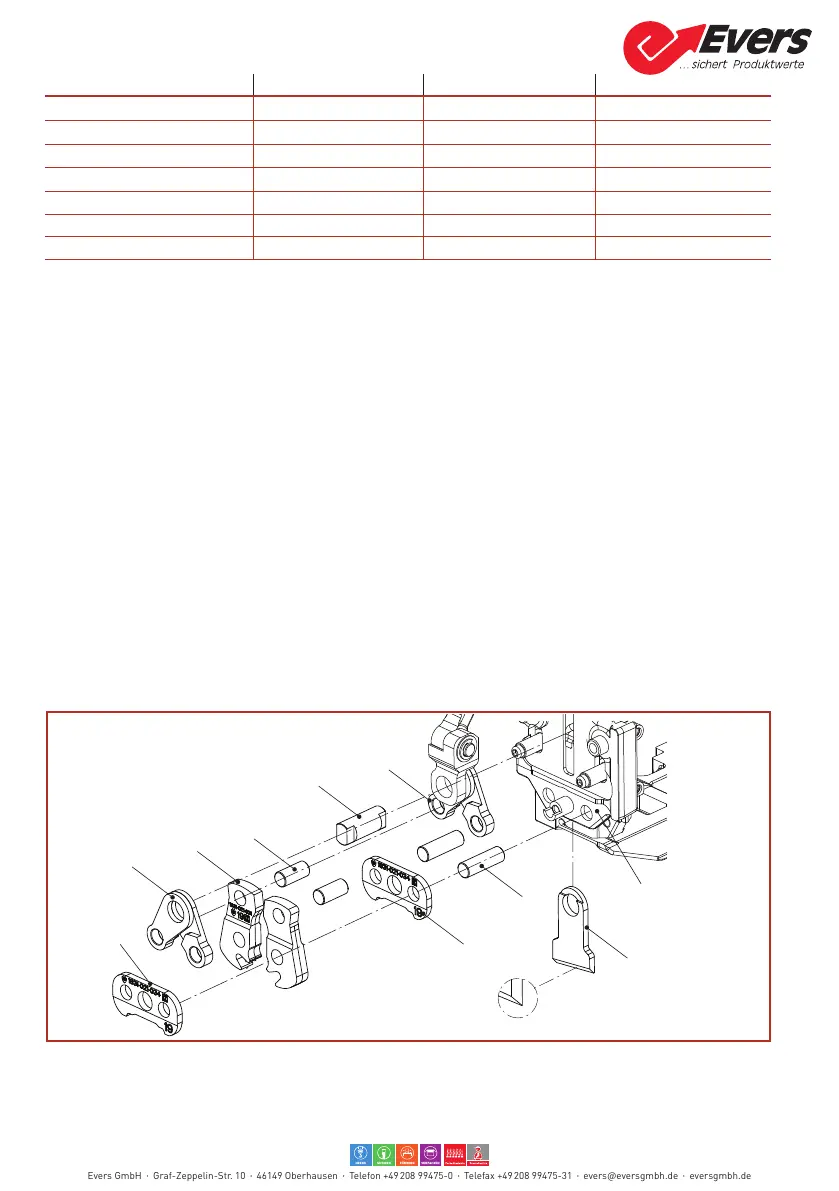
Dismantling
► Remove battery from tool.
► Remove front covers (Section 6.3).
– The jaw mechanism, which is only held in position by grease, is now open.
► Remove two jaw actuators (2) and pull out jaw pins (4).
► Remove notcher (1), jaws (3) and rear notcher (10) and pull out jaw axles (9).
► Pull out the guidance bolt (5) and remove the rear jaw actuator (6) and the cutter (8) mounted
behind the jaw carrier (7) downwards.
► Clean notchers (1 and 10), jaws (3) and cutter (8), check for wear and replace if necessary.The
notcher (1 and 10) can also be turned 180° to use the second cutting edge.
Fitting
► Lubricate the cleaned or replaced parts at the joints and sliding points with universal grease (e.g.
Klüber GBU Y 131, Microlube).
► Bring cutter (8) behind jaw carrier (7) into mounting position, and the rear jaw actuator (6) into
positioninfrontofjawcarrierandxwithguidancebolt(5).Pushtheguidanceboltforwardasfar
as it will go and align the milled surfaces vertically as shown in the drawing.
► Fitting is performed in reverse order.
1
6
2
3
4
5
10
9
8
7
Evers GmbH Graf-Zeppelin-Str. 10 46149 Oberhausen Telefon +49 208 99475-0 Telefax +49 208 99475-31 evers@eversgmbh.de eversgmbh.de