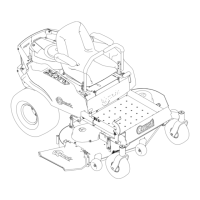
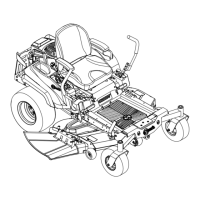
Figure67
MowerDeckwith3Blades
1.Bladessidetoside
3.Outsidecuttingedges
2.Sailareaofblade4.Measurefromthetip
ofthebladetotheat
surfacehere
5.Measurebetweentheoutsidecuttingedgesand
theatsurface(Figure66andFigure67).Ifboth
measurementsarenotwithin3/16inch(5mm),
anadjustmentisrequired;continuewiththis
procedure.
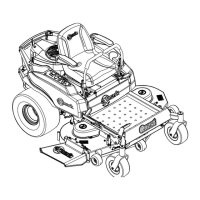
6.Supporttheweightofmowerdeckbyplacing
woodblocksundertheedgesofthedeck.
Note:Avoidplacingthesupportsunderany
anti-scalprollersifpresentonthedeck.
7.Movetotheleftsideofthemachine.
8.Loosentheside-lockingnut.
9.Raiseorlowertheleftsideofthemowerdeckby
rotatingtherearnut.(Figure68).
Note:Rotatetherearnutclockwisetoraisethe
mowerdeck;rotatetherearnutcounter-clockwise
tolowerthemowerdeck.
Figure68
1.Hangerbracket3.Rear-lockingnut
2.Side-lockingnut
10.Checktheside-to-sideadjustmentsagain.Repeat
thisprocedureuntilthemeasurementsarecorrect.
11.Continuelevelingthedeckbycheckingthe
front-to-rearbladeslope;refertoAdjustingthe
Front-to-RearBladeSlope.
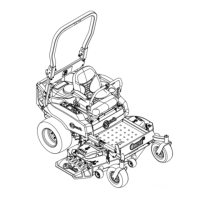
AdjustingtheFront-to-RearBlade
Slope
Checkthefront-to-rearbladelevelanytimeyouinstall
themower.Ifthefrontofthemowerismorethan
5/16inch(7.9mm)lowerthantherearofthemower,
adjustthebladelevelusingthefollowinginstructions:
1.Parkthemachineonalevelsurfaceanddisengage
thebladecontrolswitch.
2.Ensuretheparkingbrakeisengaged,stopthe
engine,removethekey,andwaitforallmoving
partstostopbeforeleavingtheoperatingposition.
3.Settheheight-of-cutlevertomiddleposition.
Note:Checkandadjusttheside-to-sideblade
levelifyouhavenotcheckedthesetting;referto
Side-to-SideLeveling.
4.Carefullyrotatethebladessotheyarefacingfront
torear(Figure69andFigure70).
58