EN
X
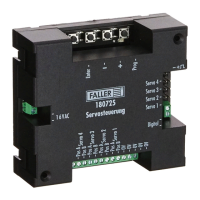
Press the »+« key.
The analog programming path is activated.
»Servo 1« LED lights up.
X
Using the »+« and »-« keys, select the port of the servo that you want
to preset.
ADVICE: If the servo does not move after the next step, this means that polar-
ity is reversed at the connector. In such a case simply rotate the plug by 180°.
X
Press the »Enter« key.
The servo connected to the selected port briefly moves.
X
Using the »+« and »-« keys, preset the first hold position of the servo
(hold position “red”). By keeping the keys pressed, you will also be able
to perform large changes of position easily.
X
Press the »Enter« key.
The servo moves to the second hold position.
X
Using the »+« and »-« keys, preset the second hold position of the servo
(hold position“green”). By keeping the keys pressed, you will also be
able to perform large changes of position easily.
X
Press the »Enter« key.
The servo moves to and fro between both preset hold positions.
X
Using the »+« and »-« keys, preset the motion rate of the servo.
X
Press the »Enter« key.
The settings are saved.
The LED of the programmed servo port goes out.
»Prog« LED flashes at lower heart rate.