6
Fan Alignment And Hanger Bracket Installation (cont’d)
Final Fan Assembly
1. Make sure the electrical supply wires, including
the hanger bracket grounding wire and safety cable
are pulled through the extension pole, between the
hanger bracket and the junction box so that electrical
connections can be made later.
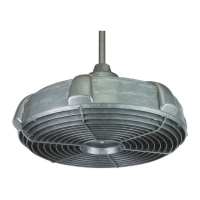
3. Hang the Crossbar / Pole Assembly (assembled
earlier) into the the hanger bracket. Make sure the groove
of the hanger ball is positioned on the tab of the hanger
bracket. (Figure 2)
4. Carefully ROTATE the Hanger Bracket and Crossbar /
Pole Assembly together to orientate the fan in the desired
position. (Figure 2)
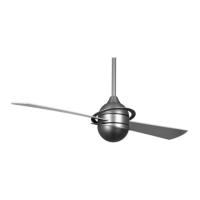
5. Carefully remove the Crossbar / Pole Assembly from
the Hanger Bracket.
NOTE: If the Hanger Bracket rotates prior to tightening
the lag bolt, the fan will no longer be positioned properly.
6. NOW, securely and fully tighten the lag bolt in the
center of the Hanger Bracket while being careful not to
allow the Hanger Bracket to rotate. (Figure 3)
Tab
Rotate both Hanger
Bracket & Crossbar/
Pole assembly
together
Figure 2
Figure 3
Figure 1
Floor
Ceiling
No
less than
7 ft
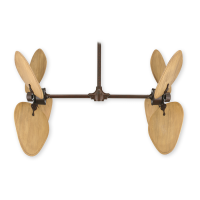
CAUTION
The fan must be hung with at least 7´ of clearance from
floor to blades (Figure 1)
 Loading...