EN
ROBOTIC LAWN MOWER USER MANUAL
Menu functions and how to set them up
21
TIMER
The lawn should not be mown too frequently t achieve the best results. If the robotic lawn mower mows too often, the lawn may appear overly fl attened. In addition, the
robotic lawn mower is subject to unnecessary wear and tear.
The timer function is an ideal means to set the time during which the robotic lawn mower should not mow, for example, when children are playing in the garden.
Use the timer function (see "Timer Start") to ensure that your lawn is not trampled.
Before use, calculate how long the robotic lawn mower needs to work based on the working capacity specifi ed in the table below.
Tabular working capacity
Model Working capacity
FZRR 5650-A About 15 m
2
per hour
FZRR 5950-A About 15 m
2
per hour
Example
If the working area is 300 m
2
, the FZRR 5950-A mower can work for 20 hours a day. This time includes both the mowing time and the charging time.
These times are approximate and depend, for example, on the quality of the grass, the sharpness of the blade and the age of the battery.
IMPORTANT INFORMATION
Use the timer to avoid mowing when children or pets are on the lawn.
If the size of the lawn allows it, the quality of the grass can be further improved if it is mowed every other day instead of several hours a day. The grass also benefi ts from
complete rest for at least three days once a month.
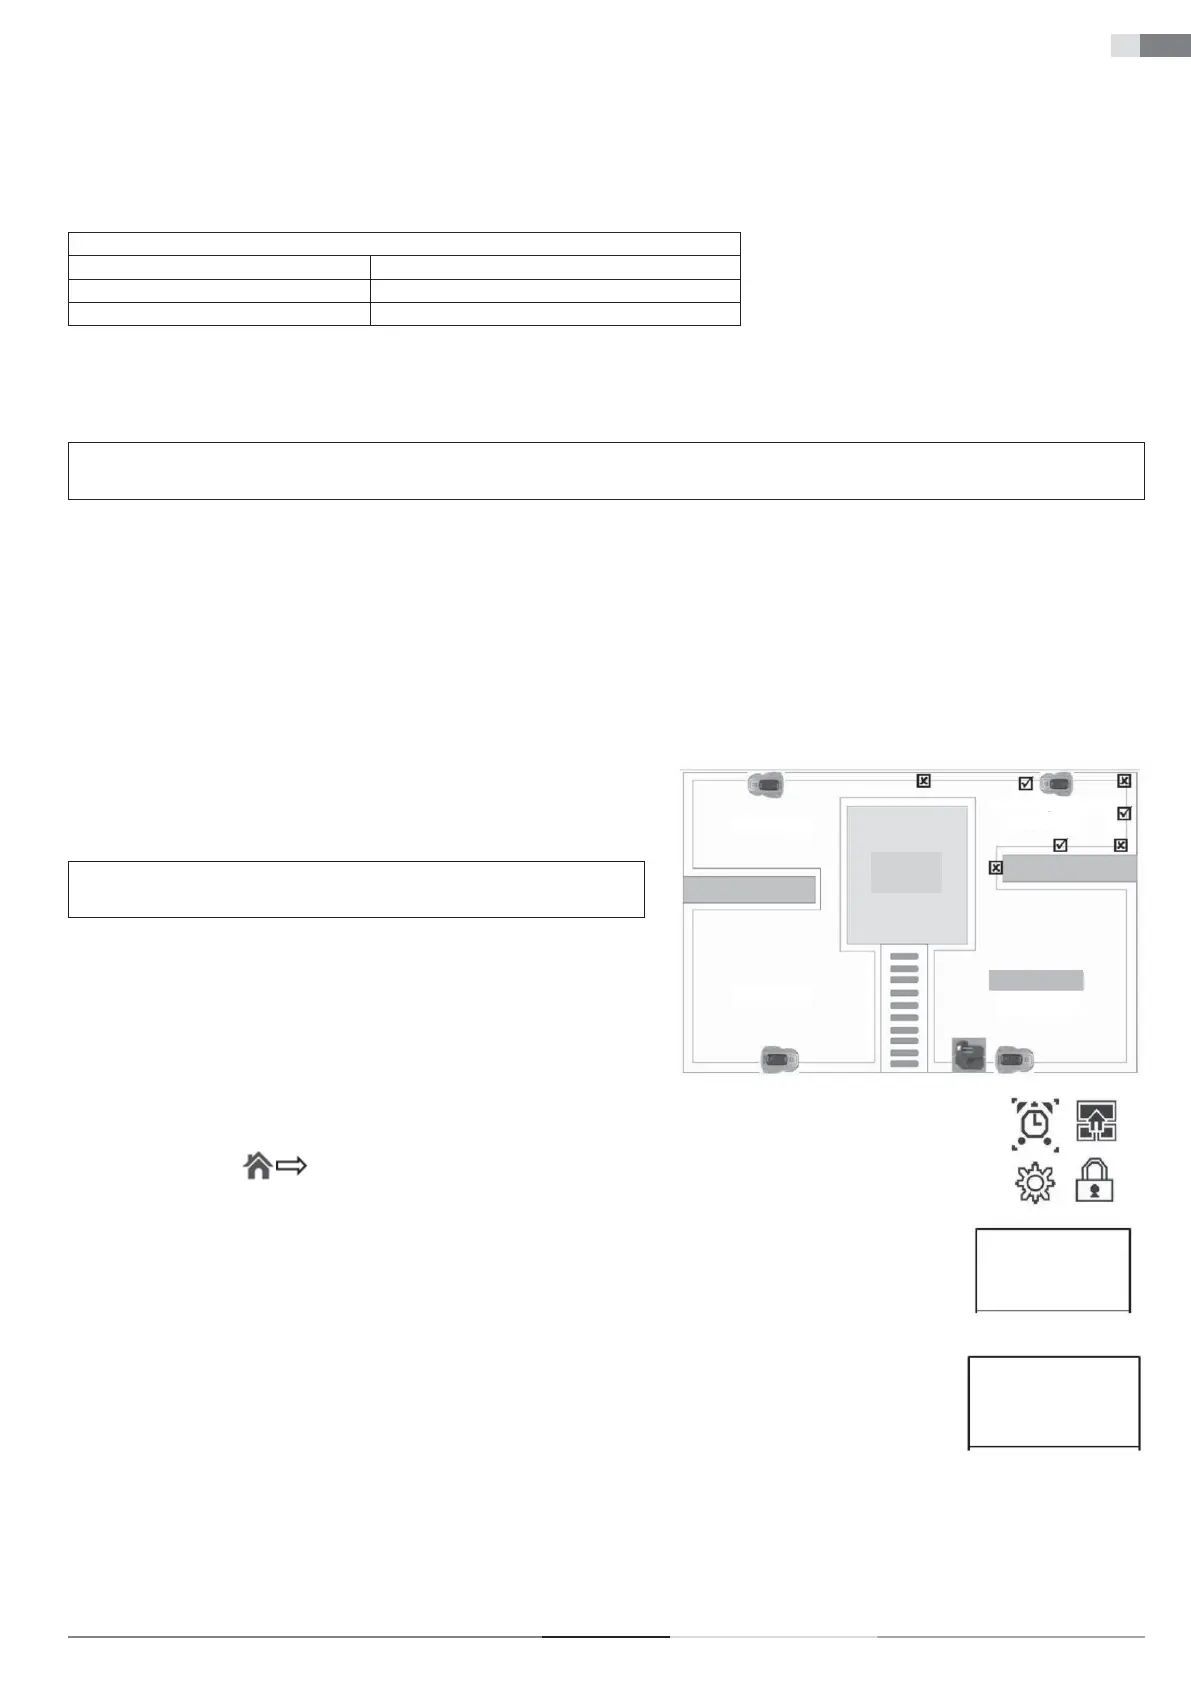
DIVISION INTO ZONES
In this section, you will primarily learn how to create subzones for the robotic lawn mower. For information on dividing the lawn into zone, see sections “Types of Lawns”
on page 11 and “Installation of the Perimeter Wire” on page 14.
Note:
When dividing into zones, the robotic lawn mower must leave the charging base.
Dividing into zones is achieved by setting different memory points for different working zones.
Zone 3
Zone 4
(Zone 1)
Zone 2
Memory Point 2
Main Zone
HOUSE
The memory point is a specifi c point on the perimeter wire and the initial position of the
mower in each working zone.
In the main zone, the predefi ned memory point is the location of the charging base.
IMPORTANT INFORMATION
A memory point cannot be set at a corner or narrow passage.
Set additional memory points as follows:
1. Ensure that the robotic lawn mower is correctly parked in the charging base.
2. Open the control panel cover and press the SET button to enter the main menu.
3. Press the right button (
) to move the cursor to the zone divion symbol.
Add Zone-2
<Dividing Zones>
4. Press the SET button to confi rm the selection of zone settings, the screen will display "Add Zone-2".
5. Press the SET button to start the setup. The robotic lawn mower backs out of the charging base, turns 180 degrees and starts
moving counterclockwise along the perimeter wire. The screen will display "GO".
<Dividing Zones>
Zone-2 Finished
Next Zone...
6. When the mower reaches a position suitable for setting memory point 2 (see examples in the fi gure above), press the STOP button
on the mower. The mower stops at this point and saves it as memory point 2.
The display will show "Zone-2 Finished, Next Zone, etc.”.
7. Press the SET button to continue setting additional memory points following the procedure specifi ed above.
The exact starting position in each subzone will deviate slightly from the memory point.
If you want to change or modify the zones, you can directly set it again following the steps above; the old setting will be replaced with the new one.
When setting the division of zones, the mower does not mow.


 To Next Page