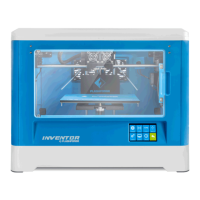
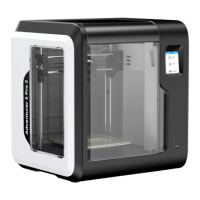
The Flashforge Inventor II is a 3D printer designed for ease of use and reliable performance. This quick start guide provides essential information for unpacking, setting up, and operating the device, along with important safety warnings.
Function Description
The Flashforge Inventor II is a Fused Deposition Modeling (FDM) 3D printer that creates three-dimensional objects by extruding molten thermoplastic material layer by layer. It is designed for both beginners and experienced users, offering features like a touch screen interface, assisted build plate leveling, and a fully enclosed build chamber for stable printing conditions. The printer supports various filament types and includes an internal memory for storing print files, as well as a USB stick input for external file loading.
Important Technical Specifications
While specific technical specifications like build volume, print speed, and supported filament types are not explicitly detailed in the provided manual pages, the following can be inferred or are directly mentioned:
- Model Name: Inventor II
- Model Number: SZ15-EN-A02
- Filament System: Utilizes a filament cartridge system, suggesting a proprietary or specific spool size. The manual shows a filament spool and a filament guide tube, indicating a guided filament path.
- Extruder: Features a heating nozzle (Nozzle 14) and a turbo fan (Turbo Fan 16) with a baffle (Turbo Fan Baffle 15) for cooling. The manual mentions an extruder temperature of 220°C during filament loading/changing, which is typical for PLA filament.
- Build Plate: Equipped with a build plate (Build Plate 9) and leveling knobs (Leveling Knob 10) for calibration.
- Connectivity: Includes a USB Cable Input (11) and a USB Stick Input (12) for transferring print files.
- User Interface: Features a Touch Screen (7) and a Touch Screen Button (8) for intuitive operation.
- Power: Has a Power Switch (17) and a Power Input (18) for connecting to a power adapter and cable.
- Motion System: Uses Z-Axis Guide Rod (1), Y-Axis Guide Rod (5), and X-Axis Guide Rod (6) for precise movement of the print head and build plate. A servo motor (Servo 13) is also part of the motion system.
- Enclosure: The printer has a fully enclosed design with a lid, which helps maintain a stable temperature environment for printing and reduces noise.
Usage Features
The Flashforge Inventor II is designed with several features to enhance the user experience:
- Quick Start Guide: The inclusion of a quick start guide (SZ15-EN-A02) indicates a focus on getting users up and running quickly.
- Intuitive Touch Screen Interface: The printer features a touch screen that allows users to navigate through various functions such as "Build," "Preheat," "Filament," "Level," "Home," "Manual," "Setting," "Status," and "About."
- Multi-language Support: The interface supports multiple languages, including English, Simplified Chinese, Japanese, and Traditional Chinese, making it accessible to a wider user base.
- Assisted Build Plate Leveling: The manual details a step-by-step assisted leveling process for the build plate. This involves adjusting three knobs under the platform until they cannot be tightened further, followed by a verification process where the extruder moves to different points to check the distance between the nozzle and the plate. The system provides feedback ("Distance Too Big" or "Distance Too Small") and guides the user to adjust the knobs clockwise or anticlockwise until a "steady beep" is heard, indicating correct spacing. This feature simplifies a critical setup step for successful prints.
- Easy Filament Loading/Changing: The printer incorporates a straightforward process for loading and changing filament. Users lift the filament cartridge, insert the filament into a guide tube, and then press a spring presser to feed the filament into the intake. The extruder automatically heats up and draws the filament through. For changing filament, the process involves preheating the extruder, holding down the spring presser, pulling out the old filament, and then inserting the new filament.
- Print from USB Stick or Internal Memory: The printer supports loading print files from a USB stick, which is inserted into the dedicated USB Stick Input. It also has internal memory for storing files, providing flexibility in how users manage their print jobs.
- Real-time Print Monitoring: During a print job, the touch screen displays information such as the file name, total print time, current extruder temperature, and estimated time left, allowing users to monitor the progress.
- Pause and Abort Functions: Users can pause or abort a print job directly from the touch screen interface, providing control over ongoing prints.
- Enclosed Design: The printer's enclosed structure helps maintain a consistent temperature around the print, which is beneficial for printing with certain materials and can lead to better print quality by reducing warping. It also helps contain odors and noise.
Maintenance Features
While the manual primarily focuses on initial setup and operation, some aspects related to maintenance can be inferred:
- Tool Kit Inclusion: The "Kit Contents" list includes a "Tool Bag" with items like an Allen Wrench / Grease, Solid Glue, and an Unclogging Pin Tool.
- Allen Wrench / Grease: The Allen wrench is typically used for tightening or loosening screws on various printer components, while grease is essential for lubricating moving parts like guide rods to ensure smooth operation and prevent wear. Regular lubrication is a common maintenance task for 3D printers.
- Solid Glue: Often used as an adhesive on the build plate to improve print adhesion, preventing prints from detaching during the printing process. This is a consumable item that needs to be applied before printing.
- Unclogging Pin Tool: This tool is specifically designed to clear blockages in the nozzle, a common issue in FDM 3D printing. Its inclusion suggests that Flashforge anticipates potential clogs and provides users with the necessary tool for self-maintenance.
- Filament Guide Tube and PTFE Tube: These components are part of the filament path. The PTFE tube (Polytetrafluoroethylene) is known for its low friction, which helps the filament slide smoothly. These parts may require occasional inspection or replacement if they become worn or damaged, though specific instructions are not provided in this quick start guide.
- After-sales Service Card: The inclusion of an "After-sales Service Card" and contact information (support@ff3dp.com, Tel: +86 579 82273989, Web: www.flashforge.com) indicates that Flashforge provides official support for troubleshooting and repairs, which is crucial for more complex maintenance issues.
- User Guide on USB Stick: The full "User Guide" is provided on the USB stick. This comprehensive guide would likely contain detailed maintenance instructions, troubleshooting tips, and safety information beyond what is covered in the quick start guide.
- Packaging Retention Advice: The manual advises users to "Save packaging for future transportation and storage," which is a practical tip for protecting the printer during relocation or if it needs to be sent for service.
Overall, the Flashforge Inventor II appears to be a user-friendly 3D printer with features designed to simplify setup, operation, and basic maintenance, supported by comprehensive documentation and customer service.