Do you have a question about the FlashPoint eVOLV 200 R2 and is the answer not in the manual?
Read the manual carefully to ensure safety and proper operation.
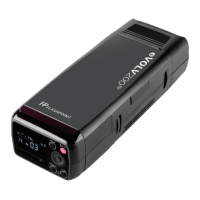
Introduction to the eVOLV200 features, modularity, and R2 system compatibility.
Compact and lightweight design, powerful output, more potent than speedlites.
Interchangeable Fresnel and Barebulb heads for versatile lighting setups.
Features R2 2.4G TTL, High Speed Sync, and various sync options.
Includes sharp LCD, interchangeable battery, 8-stop range, stable color, and stand mount.
Keep dry, avoid disassembly, stop use if damaged, avoid flammable gases.
Avoid touching high-voltage circuits, contacts, and manage overheating.
Power off immediately and seek professional help for sparks, heat, flames, or smoke.
Explains the meaning of Caution and Note symbols used throughout the manual.
Identifies Barebulb Head, Fresnel Head, mounting systems, and power switch.
Identifies R2 Radio Sensor, LCD Panel, battery compartment, ports, and release buttons.
Details the Lithium Battery pack and mounting socket features.
Identifies buttons like GR/CH, Test/C.Fn, Select Dial, Set, and Mode.
Explains the various icons and indicators on the LCD screen for different functions.
Lists all components provided in the eVOLV200 standard package.
Lists accessories sold separately to enhance the flash's capabilities.
Step-by-step guide for connecting the bare bulb flash head and flashtube.
Step-by-step guide for connecting the Fresnel speedlite flash head.
Describes the high-capacity Li-ion battery, safety circuits, and charging time.
Explains battery indicators and lists important usage warnings and advice.
Explains power switch operation and automatic sleep mode settings.
Details TTL mode operation, functionalities like FEC, HSS, and R2 compatibility.
Step-by-step guide to adjust auto exposure bias from -3 to +3 stops.
Explains manual mode, power adjustment, and flash output range.
Configures S1 and S2 optical slave modes for wireless triggering without radio.
Explains flash duration measurement (t=0.1) and its representation on the LCD.
How to enable/disable the t0.1 flash duration display in M mode.
How to set firing frequency, number of flashes, and flash output.
Warnings on overheating, limits, recommended use, and shutter speed calculation.
Tables showing maximum flashes for different output levels and frequencies.
How to activate HSS for synchronization with high shutter speeds.
Notes on flash range, multi-flash restriction, and overheating protection with HSS.
Table of available flash modes for wireless operation and turning wireless ON/OFF.
Steps to set communication channel IDs and group IDs for flash control.
Assigning slave units into groups for TTL autoflash with ratio control.
Using R1 remote control with the wireless control port for power adjustment and triggering.
How to use a 3.5mm sync cord for wired triggering.
Lists functions controllable by R2 transmitter (Mode, Sync, Power, Audio, Modeling Lamp).
Details custom functions like Beeper, S1/S2 mode, Auto hibernate, Mask, t0.1 display.
Steps to enter, select, change, and exit the Custom Function menu.
How MASK function creates digital masks for photo editing layers.
Addresses underexposure/overexposure and suggests FE lock or manual mode adjustments.
Lists and explains common error prompts (E1, E2, E3, E9) and recommended actions.
Tables showing the number of flashes that trigger over-temperature protection at different power levels.
Limits for overheating protection specifically during high-speed sync triggering.
Instructions on how to upgrade the flash unit's firmware using a USB port.
Details model, wireless slave unit, flash modes, and compatible cameras.
Includes guide numbers, flash duration, power output, power range, and sync modes.
Data on Delay Flash, Mask, Beeper, Modeling Lamp, Optic Slave, and Flash Duration Indication.
Details on wireless reception, channels, power, flashes, recycle time, dimensions, and weight.
Advice on shutting down, cleaning, avoiding impacts, and handling the flash tube.
Information on product warranty, authorized maintenance, and unauthorized service.
Contact details (email, phone, address) for product support and Adorama.com resources.
Details the two-year warranty period and what it covers.
Lists conditions and damages not covered by the warranty.
Steps to initiate a warranty claim, including obtaining RMA and proof of purchase.
| Maximum Power | 200Ws |
|---|---|
| HSS | Yes |
| Wireless Communication | 2.4GHz |
| Channels | 16 |
| Power Source | Lithium-ion battery |
| Color Temperature | 5600K ± 200K |
| Wireless Triggering | Yes |
| PC Sync Port | Yes |
| Charging Time | 2.5 hours |
| Guide Number | 60m (ISO 100) |
| Flash Modes | TTL, Manual, Multi |
| Groups | 5 |
| Flashes per charge | 500 at full power |
| Recycle Time | 0.01-1.5 seconds |
| Compatibility | Canon, Nikon, Sony, Fujifilm, Olympus, Panasonic |
| Modeling Lamp | LED |
| USB Port | Yes |