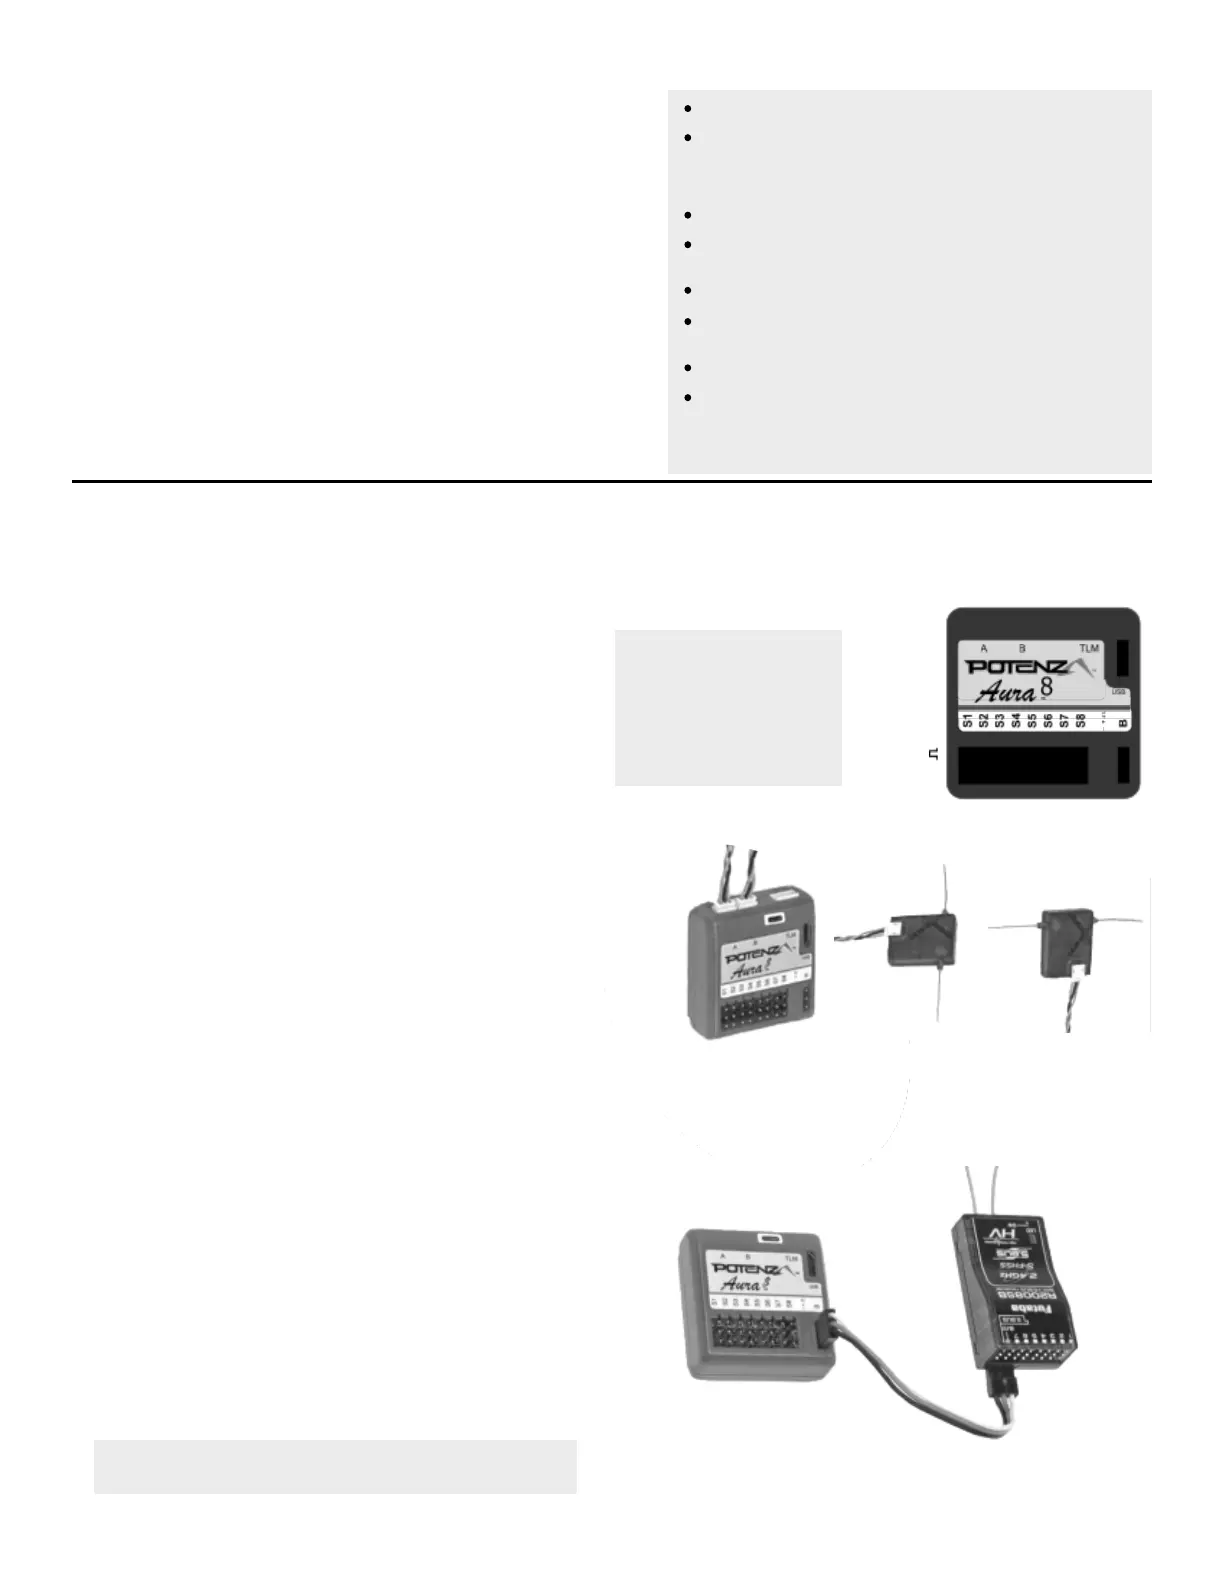
AURA 8 AFCS
12
Works conveniently with all major radio systems
Accepts signals from DSM Satellite(s), Spektrum SRXL,
Futaba S.Bus, Graupner Ho (Sum D of 8), JR XBus (Mode
B), Je UDI12 (standard), PPM Stream, or any brand of
receiver via male to male servo connecons*
Expertly tuned and ready to use
USB port allows loading model conguraons, user
programming, and rmware updates (cable included)
Flexible and extensive programming through PC
3 ight modes in Aura allow precise or aggressive sengs,
or gyro o to be selected in ight
3-axis gyro ulized in Cessna 170 programming
Powerful 32-bit processor and 6 axis sensor for future
updates and re-use
The Aura 8 advanced ight control system installed in your Cessna 170 is a
giant leap forward in aircra ight control system technology. Compable
with virtually every receiver on the market today via PWM connecons,
the Aura features special conguraon for DSM systems via remote
receiver connecon, and serial data connecon for Futaba S.Bus, Spektrum
SRXL, Graupner HOTT (Sum D of 8), JR XBus (Mode B), and Je UDI12
(standard) systems.
The Aura 8 advanced ight control system in your Cessna 170 has been
pre-tuned for ease of use, eliminang many hours of seng gains. For the
latest Aura features, programs, transmier downloads, and instrucons,
please visit www.exinnovaons.com/aura
The Aura is programmable through any Windows based computer, and
every axis has independent gain adjustment and by each ight mode. All
dual rate, expo, travel, and assignable mode programs are adjusted inside
the Aura through the PC applicaon. Anassignable master gain that is OFF
by default can be enabled by the Aura applicaon. If desired, assign it to
CH 8/AUX 3 on a proporonal dial or slider.
By default, CH5/Gear is used to select the 3 ight modes by 3 posion
transmier switch.
*Visit hp://wiki.exinnovaons.com/wiki/Aura for the latest
Aura-related product informaon.
RECEIVER INSTALLATION/SERVO CONNECTIONS
DEFAULT AURA CONNECTIONS
S1
S2
S3
S4
S5
S6
S7
S8
Throle (ESC/BEC)
Le Aileron
Right Aileron
Elevator
Rudder
Le Flap
Right Flap
Float Rudder
For Je/UDI users, please visit hp://wiki.exinnovaons.com/wiki/Aura/JeUse for more informaon.
For FrSky Taranis users, please visit hp://wiki.exinnovaons.com/wiki/Cessna170 for more informaon.
For Graupner users, please visit hp://wiki.exinnovaons.com/wiki/Aura/GraupnerHoUse for more informaon.
Aura will Auto-Detect modern data-linked receivers. The advantage of using a modern data-linked receiver is the ability to have 4 addional gyro-enabled
outputs to servos (total of 8 outputs), as well as wiring simplicity versus tradional PWM connecon types. To connect a modern data-linked receiver,
follow the steps on this page, then skip ahead to page 14.
For tradional PWM receivers (male to male servo leads for each channel), refer to the connecon diagram on page 13.
Aura will Auto-Detect these modern data-linked receivers:
Spektrum Remote Receivers (2 required for the Cessna)
Spektrum SRXL
Futaba S.Bus
JR XBus, Mode B
Graupner HOTT, Sum D of 8*
Je UDI12* (Standard)
Note: When using S.Bus, Aura reverses the throle direcon. It is
therefore NOT necessary for Futaba S.Bus users to reverse the
throle IF the throle/ESC is le plugged into the Aura.
Supported Modern Data-Linked Receivers
Connecng Your Receiver to Aura
- +
Aura
Polarity
Spektrum Remote Receivers
1.
2.
3.
4.
All Other Data-Linked Receivers
1.
2.
3.
4.
5.
Connect (2) Spektrum Remote Receivers to Mini Port 'A' and Mini Port 'B' at
the top of the Aura case.
To bind a DSMX Spektrum Remote Receiver connecon, insert a bind plug into
Aura Port S8.
To bind a DSM2 Spektrum Remote Receiver connecon, insert a bind plug into
Aura port S1 AND S8.
Power up the model, and the remote receivers should begin to ash, indicang
they are ready to bind. Bind from here as recommended in your transmier
manufacturer's instrucons.
Once bound (indicated by each remote receiver showing a solid orange LED),
Aura will begin the Auto-Detect process, searching for a valid control signal,
indicated by sweeping LEDs on the Aura. Once found, you will see solid orange
(power and calibrated sensor) and solid green (valid receiver data) LEDs,
indicang the Aura is in its ight-ready state.
Mount your receivers using double sided foam tape, or hook and loop tape.
Consult your receiver manual for proper mounng orientaons.
For JR DMSS, Graupner Ho and Je, consult your radio documentaon and
program the transmier/receiver to output the correct digital data format as
listed above. (Spektrum and Futaba typically always output the digital data
stream.
Bind your transmier and receiver per your manufacturer's instrucons.
Connect the included male to male extension to the receiver's data port (ex:
S.Bus) and connect to servo port 'B' on the face of the Aura. Refer to your radio
manufacturer's instrucons for specic informaon on appropriate serial port
connecons and system sengs.
With the transmier powered, power up the aircra. Aura will search
(sweeping LEDs) and lock onto the signal. You will then see solid orange (power
and calibrated sensor) plus solid green (valid radio source), and have control of
the model.
Mount your receiver using double sided foam tape or hook and loop tape.
Consult your receiver manual for proper mounng and antenna placement.
You can also use a PPM (8ch, Negave, Approximately 22ms Frame) connecon in Port B, but it
will not auto-detect, and will need to be set in the Aura Cong Tool (Windows Applicaon)
 Loading...