Maintenance | 45
7. Set the IR sensor aside on a clean, flat surface. Ensure that the IR sensor side is facing up.
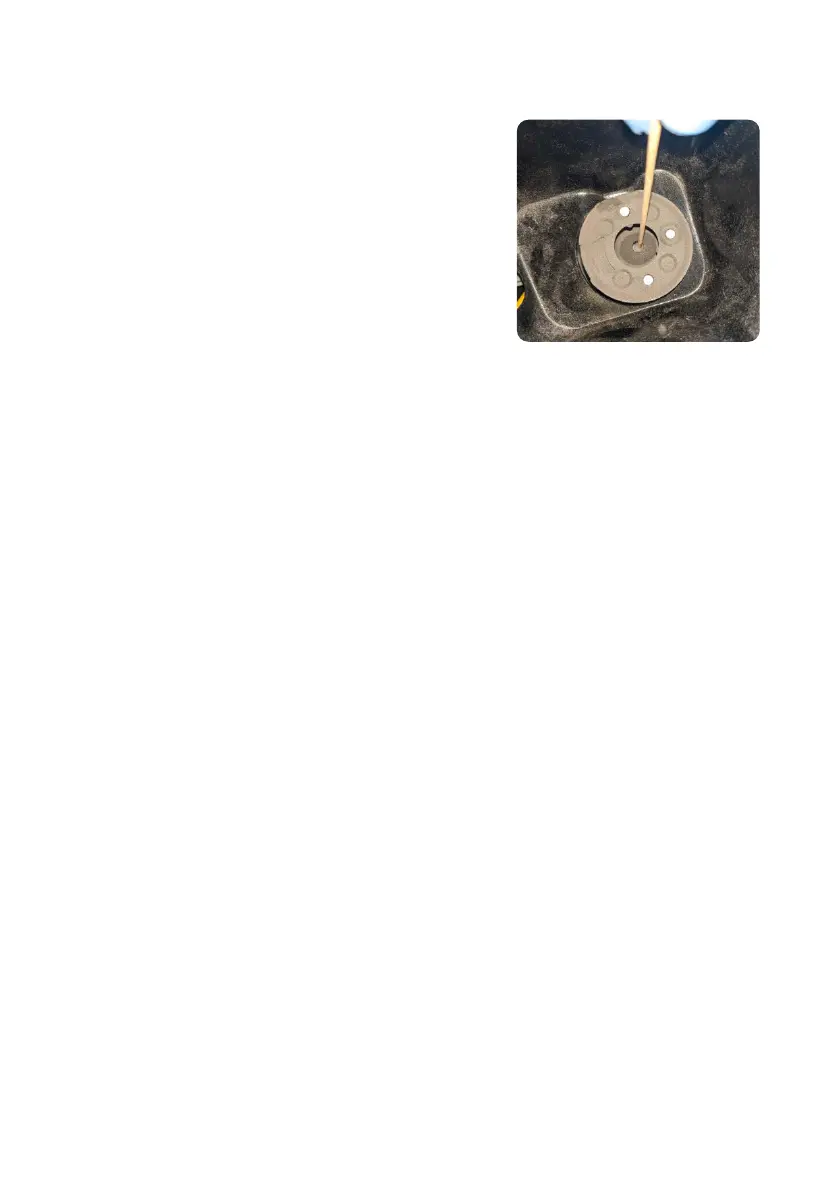
8. Using the provided telescoping mirror, visually locate the IR sensor housing.
9.
Wet a polyester cloth swab with a small amount
of ethanol. The swab should not be saturated or
dripping ethanol.
10.
Insert the swab from the top of the IR sensor housing
through the small aperture at the top of the cone.
Move the swab around in a circle to fully contact the
edge of the cone.
11. Visually inspect the cone to ensure no large pieces
of debris remain.
12.
Reconnect the IR sensor to the yellow wire inside the
IR sensor panel and push the cap back into place
until the LED turns green.
6.4.3 Cleaning the exhaust filter
The Fuse 1 uses a filter to remove powder and laurolactam from its exhaust that may be
expelled into the workspace. The exhaust filter should be cleaned every 30 hours of printing,
whichever comes first. Used filters that have experienced 20 prints or 400 hours of printing
should be cleaned after every print to extend their lifetime.
To clean the exhaust filter:
1. Disable the Fuse 1’s air system before performing maintenance on the exhaust filter.
a. Navigate to the filter maintenance procedure by tapping the checklist icon on the Print
Status screen, or
b. Drag the Open Door slider on the touchscreen.
2. Open the air filter door on the right side of the printer.
3. Disconnect the vacuum hose from the side of the Fuse Sift.
4.
Turn on the vacuum by pushing the Vac button on the control panel or by tapping the
vacuum hose icon on the touchscreen.
5. Vacuum the rectangular air filter as well as the inside door panel.
6. Remove the exhaust filter to clean the back of the filter and the recess behind it.
a. Depress the retainer hook at the top of the exhaust filter and disengage it from the pin,
then do the same for the bottom one.
b. Move the retainer out of the way, then remove the filter using the fabric pull tabs. Set
the filter aside.
c. Vacuum the rear side of the exhaust filter.
d. Vacuum the recess behind the exhaust filter bay.
7. If laurolactam has accumulated on the fan, clean the fan and the exhaust tube below it.
a. Using a 2.5 mm hex driver, loosen and remove the four screws that fasten the fan to
its housing.
b.
If necessary, gently pull out the grommet that the fan wires run through. This allows easier
access to both sides of the fan. Do not pull sharply on the fan or its wires.
c. Clean the five moving blades on the top of the fan with a small brush.
d. Clean the seven fixed blades on the bottom of the fan with a small brush.