Do you have a question about the GE MULTILIN 269 MOTOR MANAGEMENT RELAY Series and is the answer not in the manual?
| Frequency | 50/60 Hz |
|---|---|
| Weight | 1.5 kg |
| Digital Inputs | 6 |
| Communication Ports | RS485, Ethernet |
| Protocols | Modbus RTU, Modbus TCP, DNP3 |
| Mounting | Panel |
| Protection Functions | Overload, Overcurrent, Ground Fault, Phase Loss, Undercurrent |
| Storage Temperature | -40°C to +85°C |
| Humidity | 5-95% non-condensing |
Discusses requirements for modern motor protection and the need for advanced relays.
Details the capabilities and integrated package of the 269 Motor Management Relay.
Lists common applications and uses for the 269 relay in motor protection.
Explains how to specify and order the 269 relay and its available options.
Provides detailed electrical and performance specifications for the 269 relay.
Details the physical size and mounting dimensions of the 269 relay.
Guides on how to properly mount the 269 relay in a panel.
Explains how to make external wiring connections to the 269 relay.
Describes how to supply and connect control power to the 269 relay.
Explains the connection and selection of phase CTs for the 269 relay.
Details how to connect the ground fault CT input to the 269 relay.
Describes how to wire and configure the trip relay contacts.
Guides on connecting RTD sensors for temperature monitoring.
Details the operation and installation of the drawout version of the 269 relay.
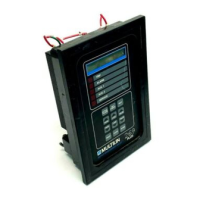
Explains the front panel controls, indicators, and keypad functions.
Describes the four operating modes of the 269 relay display.
Details viewing motor parameters, timers, event causes, and modes.
Explains how to view and alter the relay's trip and alarm setpoints.
Guides on using HELP mode and understanding TRIP/ALARM messages.
Details setpoints for phase CT ratio and motor full load current.
Details setpoints for acceleration time and motor start inhibit features.
Covers setpoints for unbalance and ground fault detection and protection.
Details setpoints for undercurrent, mechanical jams, short circuits, and overload alarms.
Details setpoints for monitoring stator and other RTD temperatures, including alarms and trips.
Explains how to select standard overload curves based on motor characteristics.
Explains how the relay's thermal memory models motor heating and capacity.
Explains restart features and how to reset the relay after trips.
Describes the relay's internal self-test feature for verifying circuitry.
Covers viewing statistical data, factory setpoints, and meter option configuration.
Describes verifying system operation by injecting current through phase and ground fault CTs.
Details performing single-phase secondary injection tests for relay verification.
Explains how to test phase current readings and simulated trip/alarm conditions.
Describes testing the ground fault current input circuitry and functions.
Guides on testing RTD inputs by simulating RTDs with potentiometers.
Explains how to test relay behavior during AC voltage decreases and power failures.
Details testing the analog current output by adjusting simulated RTD values.
Provides guidance on annual testing to verify protection system operation.
Explains the factory Hi-Pot test procedure for verifying dielectric strength.
Details the relay's hardware components, including microcomputer, display, and power supply.
Explains the relay's firmware structure and operation, including interrupts and modules.
Illustrates ensuring motor trip on loss of control power by using fail-safe relays.
Explains how loss of control power affects relay tripping and the need for fail-safe relays.
Demonstrates using the FLC Thermal Capacity Reduction setpoint to coordinate thermal limit curves.
Provides a step-by-step calculation example for motor unbalance.
Explains the discreet time-based algorithm used for the relay's thermal model.
Details how RTD readings bias the relay's thermal model for accurate temperature compensation.
Explains the internal circuitry used for RTD measurements and lead compensation.
Illustrates how two CTs can be used to sense three-phase currents.
Explains the concept of asymmetrical starting current and its implications for relay settings.
Provides essential recommendations for proper grounding and RTD wiring for reliable operation.
Discusses instantaneous elements for ground fault and short circuit protection and their settings.
Explains the importance of CT withstand capability for high current faults.
Details how to determine CT output current and evaluate CT performance using excitation curves.


