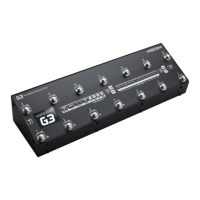
THE ADVANCED SWITCHING SYSTEM
THE GIGRIG G3 USER MANUAL
5. DEEP EDIT
5.1 DEEP EDIT FUNCTIONS
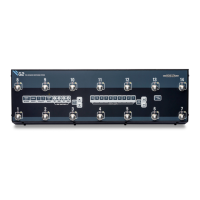
To the left-hand side of the LCD screen, you will
see the DEEP EDIT push button.
This push button gives you access to G3’s Deep
Edit Menu.
Except for the Global Settings, the Deep Edit
functions are associated with each preset. We
must first choose the preset we want to edit.
5.2 NAVIGATING DEEP EDIT
Next to footswitches 1,2,3 and 4 you will see these symbols -
You will use these footswitches to navigate around the Deep Edit Menu.
On pressing the button, the LCD screen will display the following:
Use the button (footswitch 2) to access more of the Deep Edit Menu,
including the following sub-menus:
1. NAME - This is where we edit the name of the preset.
2. MIDI - This is where we edit G3’s MIDI functionality.
3. EXPRESSION - Assign your Expression Pedal parameters here.
4. LOOP ORDER - Change the order of your effect’s loops.
5. STOMPBOX – Determine if Stompbox Mode on this preset is Standard, Sticky, or Flash.
6. TRAILS - Set up your effects Trails/Spill-over.
7. PARALLEL - Use this to create Parallel or Wet/Dry signal chains.
8. TAP TEMPO - Use G3’s Tap Tempo with remote switches and MIDI CC’s.
9. COPY/RESET – Copy/ paste/ reset, presets, entire banks or MIDI
10. HIDDEN PRESET - Each preset in G3 has a separate, fully programmable hidden preset. This is accessed by
pressing this footswitch a second time.
11. SUB STOMP – Turn this on to enable STOMP BOX to add and subtract any function from a preset.
12. GLOBAL SETUP- setup Global Options including Stereo Pairs, Bluetooth, MIDI IN, etc.