48 49
MAX automatically scans the entire scene to choose the exposure level
for your shot. Exposure Control lets you decide if only a section of the
shot should be used to set the exposure.
Check out the shot preview on your touch screen. Try Exposure Control if
there are sections that are too dark or too light.
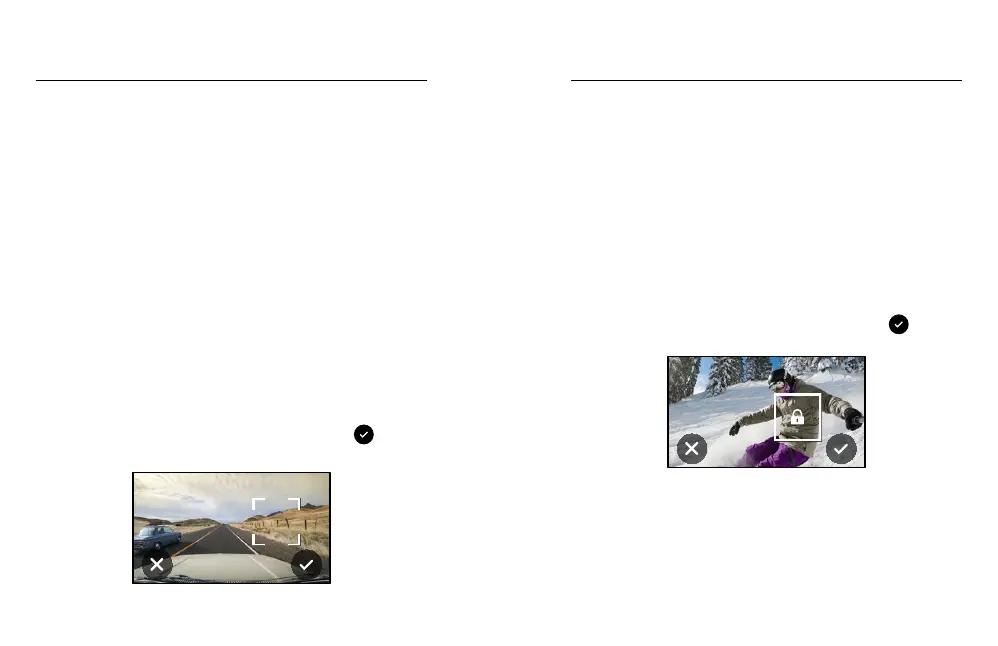
SETTING EXPOSURE CONTROL USING AUTO EXPOSURE
With this option, the camera automatically bases exposure on the area
that you select.
Imagine your camera is mounted on your dashboard. You probably want
to set the exposure based on the scene outside the car instead of the
dashboard. This will help prevent your shots from being overexposed
(too b ri ght).
1. Press the touch screen until a set of brackets with a dot in the middle
appears in the centre of the screen. This is the Spot Meter. It will base
the exposure on the centre of the shot.
2. Drag the brackets away from the centre if you want to use another
area of the shot to set the exposure. (You can also tap that area
instead of dragging the brackets.)
3. Check the screen to see if the exposure looks good. Tap
in the
lower right corner.
AUTO EXPOSURE
Exposure Control
SETTING EXPOSURE CONTROL USING LOCKED EXPOSURE
With this option, your camera locks the exposure until you cancel it.
If you’re snowboarding on a sunny day, you might try locking the exposure
on your subject’s jacket. This will help prevent your shots from being
underexposed (too dark) compared to the bright snow.
1. Press the touch screen until a set of brackets with a dot in the middle
appears in the centre of the screen. This is the Spot Meter. It will base
the exposure on the centre of the shot.
2. Drag the brackets away from the centre if you want to use another
area of the shot to set the exposure. (You can also tap that area
instead of dragging the brackets.)
3. Tap inside the brackets to lock the exposure.
4. Check the screen to see if the exposure looks good. Tap
in the
lower right corner to lock it in.
LOCKED EXPOSURE
Exposure Control