Repair
Check Check
Check
Valve Valve
Valve
Repair Repair
Repair
NOTE: NOTE:
NOTE:
Kitsareavailablefornewcheckvalveballs
andseatsinarangeofmaterials.Seepage27
toorderkitsinthematerial(s)desired.O-ringand
fastenerkitsalsoareavailable.
NOTE: NOTE:
NOTE:
Toensureproperseatingofthecheckballs,
alwaysreplacetheseatswhenreplacingtheballs.
Also,replacetheo-ringseverytimethemanifoldis
removed.
Disassemble Disassemble
Disassemble
the the
the
Check Check
Check
Valve Valve
Valve
1.FollowthePressureReliefProcedure,page10.
Disconnectallhoses.
NOTE: NOTE:
NOTE:
Thepumpisheavy.Alwaysusetwo
peopleoralifttomoveit.
2.Removethepumpfromitsmounting.
3.NOTE: NOTE:
NOTE:
Usehandtoolsuntilthread-locking
adhesivepatchreleases.Usea17mm(11/16in)
socketwrenchtoremovethemanifoldfasteners
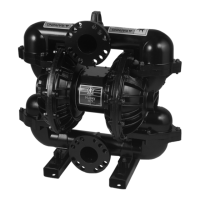
(5),thenremovethemanifold(3).
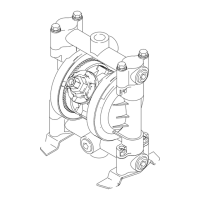
4.Removetheo-rings(9),seats(7),andballs(8).
5.Turnthepumpoverandremovetheinlet
manifold(4).
6.Removetheo-rings(9),seats(7),andballs(8).
Reassemble Reassemble
Reassemble
the the
the
Check Check
Check
Valve Valve
Valve
1.Cleanallpartsandinspectforwearordamage.
Replacepartsasneeded.
2.Reassembleinthereverseorder,followingall
notesintheillustration.Puttheinletmanifoldon
rst.Besuretheballchecks(7-9)andmanifolds
(3,4)areassembledexactly exactly
exactly
asshown.Theball
mustseatonthechamferedsideoftheseat.
Thearrows(A)ontheuidcovers(2)must must
must
point
towardtheoutletmanifold(3).
Figure1Checkvalveassembly
Torqueto190to200in-lb(21to25
N·m).Followtorquesequence.See
TorqueInstructions,page18.
Arrow(A)mustpointtowardoutlet
manifold
Thechamferedsideoftheseatmustface
theball.
3A2714H13

 Loading...