EasyManua.ls Logo

Graco TexSpray EXT HP - User Manual

Graco TexSpray EXT HP
28 pages
Print Icon
To Next Page IconTo Next Page
Loading...
308717
Rev. K
7120B
Model 231761
shown
ti5068a
INSTRUCTIONS–PARTS LIST
INSTRUCTIONS
This manual contains important
warnings and information.
READ AND KEEP FOR REFERENCE.
– For Water-Based Materials Only –
ELECTRIC TEXTURE SPRAYER WITH COMPRESSOR
TexSprayt EXT HP and Twin Tank
100 psi (0.7 MPa, 7 bar) Maximum Working Pressure
Power Model Description
120V,
60 Hz
231761 Sprayer Model 231561
with 1-in. fluid hose, 3/8-in. air
hose, and Trigger Gun with fine
finish tip
231762 Sprayer Model 231561
with 1-in. fluid hose, 3/8-in. air
hose, and Flex Gun
231763 Sprayer Model 231561
with 1-in. fluid hose, 3/8-in. air
hose, and 3-ft Pole Gun
240V,
50 Hz
231769 Sprayer Model 231563
with 1-in. fluid hose, 3/8-in. air
hose, and Trigger Gun with
fine-finish tip
231770 Sprayer Model 231563
with 1-in. fluid hose, 3/8-in. air
hose, and Flex Gun
231771 Sprayer Model 231563
with 1-in. fluid hose, 3/8-in. air
hose, and 3-ft Pole Gun
None 231753 Twin-Tank Model 231587
with 1-in. fluid hose, 3/8-in. air
hose, and Trigger Gun with
fine-finish tip
231754 Twin-Tank Model 231587
with 1-in. fluid hose, 3/8-in. air
hose, and Flex Gun
231755 Twin-Tank Model 231587
with 1-in. fluid hose, 3/8-in. air
hose, and 3-ft Pole Gun
GRACO INC. P.O. BOX 1441 MINNEAPOLIS, MN 55440–1441
ECOPYRIGHT 1997, GRACO INC.
Graco Inc. is registered to I.S. EN ISO 9001
Parts
Question and Answer IconNeed help?

Do you have a question about the Graco TexSpray EXT HP and is the answer not in the manual?

Overview

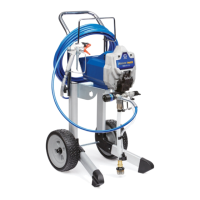
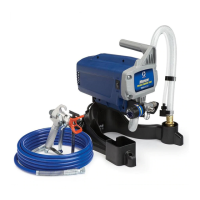
This document describes the Graco TexSpray EXT HP and Twin Tank electric texture sprayer with compressor, designed for water-based materials. It operates at a maximum working pressure of 100 psi (0.7 MPa, 7 bar).

Function Description

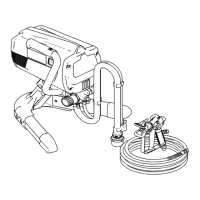
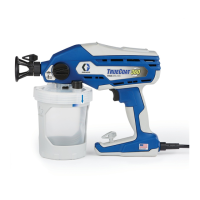
The TexSpray EXT HP and Twin Tank system is an electric texture sprayer with an integrated compressor, designed for applying water-based texture materials. The system uses compressed air to pressurize a material pot, which then feeds texture material to a spray gun. The compressor also supplies air to the gun for atomization and spraying. The system is available in various models, including 120V and 240V versions, and configurations with different gun types (Trigger Gun with fine-finish tip, Flex Gun, or 3-ft Pole Gun). Twin-tank models are also available for increased capacity.

Important Technical Specifications

  • Maximum Air and Fluid Working Pressure: 100 psi (0.7 MPa, 7 bar)
  • Air Pressure Operating Range: 25 to 100 psi (0.17 to 0.7 MPa, 1.7 to 7 bar)
  • Compressor Specifications: AC brushless open motor, thermally protected, oil-less; 120/240V, 50/60 Hz, 15/13A.
  • Compressor Air Consumption: 11.9 displacement scfm; 8.5 scfm at 40 psi (0.238 m³/min at 2.8 bar); 6.8 scfm at 90 psi (0.19 m³/min at 6.3 bar).
  • Generator Required: 7 kW
  • Pressure Pot Capacity: 5 gallons (19 liters)
  • Maximum Delivery with Texture Material: 1 to 1.5 gpm (3.8 to 5.7 lpm)
  • Dimensions (EXT HP System with handle): Length: 23 in. (584 mm); Width: 24 in. (610 mm); Height: 40 in. (1016 mm)
  • Weight:
    • EXT HP System w/o hoses or gun: 124 lb (54 kg)
    • EXT HP System with hoses & gun: 135 lb (61 kg)
    • Twin-Tank System: 94 lb (32 kg)
  • Wetted Parts: Acetal, glass-filled acetal, buna-N, aluminum, brass, polyethylene
  • Sound Data: Sound pressure level: 79 dB(A) (measured while spraying at 1 m); Sound power level: 87.5 dB(A) (measured per ISO-3744).
  • Hose Size and Lengths: Comes with a 1 in. ID x 25 ft (25 mm x 7.6 m) fluid hose and a 3/8 in. ID air hose. The 1 in. hose set includes an adapter hose between the gun and main hose. Do not use more than 75 ft (23 m) of fluid hose.
  • Electrical Requirements: 120V AC, 60 Hz, 15A circuit with a grounding receptacle, or 240V AC, 50 Hz, 16A circuit with a grounding receptacle. Extension cords should be 3-wire, 12 AWG (1.5 mm²) minimum for up to 25 ft (7.6 m), or 3-wire, 10 AWG (2.5 mm²) minimum for 25 to 50 ft (7.6 to 15.2 m).

Usage Features

  • Compressor Break-in: Before first use, run the compressor under no load for 15 minutes to improve performance and lengthen its life.
  • Pressure Relief Procedure: Always relieve system pressure before stopping spraying, checking/servicing equipment, or installing/cleaning the spray nozzle. This involves shutting off the system, triggering the gun into a pail, opening the gun air ball valve, and unplugging the system.
  • System Setup: Connect hoses and gun, ensure the air filter is in place, and plug the power cord into a properly grounded outlet.
  • Operation Characteristics: Always start the system with the compressor air relieved. Air bleeds from the gun nozzle when the gun air ball valve is open. A compressor unloader valve releases air when airflow at the gun is too restricted, resetting automatically when airflow increases. The motor has a thermal overload switch; if it shuts down, turn the ON/OFF switch OFF.
  • Wetting the Hose: Before spraying, wet the inside of the hose with clean water to flush sediment and prevent material packing.
  • Material Mixing: Use only water-based, simulated acoustic and gypsum-based wall texture materials. Do not use solvent-based materials. Proper material mixture is essential; the sprayer will not operate if the material is too thick. Thin or thicken as needed. Premixed cementitious material is typically sprayable; bagged cementitious material may not be.
  • Priming the System: Disconnect the gun, open the fluid supply valve, thin 2 quarts of material to half thickness and pour into the tank. Fill the pressure pot with prepared texture material, install the float assembly. Install the gun and nozzle. Open the gun air valve partially. Turn ON/OFF switch ON, trigger the gun into a pail until a solid stream of texture material is achieved.
  • Spray Techniques: Adjusting the system requires balancing compressor air to the gun and pump, and proper nozzle selection. Start with the gun air valve fully open, then slowly decrease airflow to achieve a good spray pattern with minimum bounce back. Test patterns on cardboard, holding the gun 18 to 30 inches from the surface. Overlap strokes 50% in a circular motion. Select nozzles based on application and material aggregate size. All spraying adjustments are made at the gun; material pressure and flow rate adjustments are made at the regulator.
  • Preventing Material Surge: Slowly squeeze the trigger to the fully triggered position while moving the gun quickly.
  • Continuous Spraying: Use the trigger bail to hold the trigger open and reduce operator fatigue.
  • Material Consistency: Periodically check and thin material as needed.
  • Auxiliary Air Compressor: An external compressor (output pressure not greater than 100 psi and delivery not greater than 6.8 scfm at 90 psi) can be connected to supplement or replace the internal compressor.

Maintenance Features

  • Shutdown and Cleanup: Thorough cleaning is essential for good operating condition.
    • Relieve compressor pressure by opening the gun air ball valve.
    • Partially open the gun air ball valve and turn ON/OFF switch ON.
    • Trigger the gun into a pail to empty fluid.
    • Half fill the pot with clean water and clean the inside with a brush.
    • Trigger the gun until the float stop shuts off material flow.
    • Fill the pot with clean water and install the lid.
    • Start the sprayer, spray half the water into a pail, shut off, and relieve pressure.
    • Remove the spray gun, close the fluid outlet valve, disconnect the hose, install hose cleaning balls, reconnect the hose, and open the fluid outlet valve.
    • Start the sprayer to force cleaning balls and water through the hose. Recover the balls. Use low pressure.
    • Turn off the switch, open the gun air valve and pot vent valve to relieve compressor pressure.
    • Remove, wash, and reinstall the air filter.
    • Clean and dry the gun, oil daily at indicated points.
    • Remove dry residue from the cooler.
    • Drain the frame air line after each use by opening the drain cock valve, starting the sprayer, rocking it back and forth, stopping, and closing the valve.
  • Troubleshooting: The manual provides a detailed troubleshooting guide for common issues like compressor not starting, no material output, material surges, slow application speed, and pattern irregularities.
  • Removing and Reinstalling Compressor: Instructions are provided for removing the compressor for service, including relieving pressure, removing covers, cleaning the air filter, and disconnecting wires. The cooler should be cleaned whenever the compressor is serviced.
  • Compressor Repair: Graco offers repair kits for the two-cylinder compressor. For repair assistance, contact a Graco distributor.
  • Removing and Inspecting Cooler: Instructions are provided for removing and inspecting the cooler for leaks, dents, or dust plugging.
  • Accessories: A range of accessories is available, including hose cleanup balls, pole spray guns, twin-tank hose kits, fine finish kits, connecting rod kits, compressor valve plate kits, compressor replacement kits (110V/60Hz and 220V/50Hz), and various hose sets (25 ft, 1 in. clear, braided; 25 ft, 1-1/4 in. clear).

Graco TexSpray EXT HP Specifications

General IconGeneral
BrandGraco
ModelTexSpray EXT HP
CategoryPaint Sprayer
LanguageEnglish

Related product manuals