the distance from the main listening position to the
center speaker. Repeat the procedure for all active
speaker positions, first using the
¤
Navigation
Button
n
©
to change to the next position; then
use the
‹
/
›
Navigation Button n
©
to change
the setting. Note that only the speaker positions that
have been set to
LARGE or SMALL in the
SPEAKER SETUP menu, as shown on
page 30, may be adjusted. The appearance of three
dashes next to a speaker position in place of a dis-
tance setting indicates that you have not configured an
active speaker for that location.
If you have already run EzSet/EQ, return to the settings
established by the automated system by pressing the
⁄
/
¤
Navigation Button n
©
until the cursor is
pointing to the
EZSET SETTINGS line. Next,
press the
‹
/
›
Navigation Button n
©
so that
ON is highlighted in reverse video. The settings will be
resent to the values calculated by EzSet/EQ, and the
menu will be locked so that the settings may not be
changed. To go back into the menu and make any
manual changes to one or more channels, you must first
return the cursor to the
EZSET SETTINGS
line and press the
‹
/
›
Navigation Button n
©
so that OFF is highlighted in reverse video. This will
unlock the menu to allow changes.
When the delay time for all speaker positions has
been set, you may return to manual setup by pressing
the
⁄
/
¤
Navigation Button n
©
until the
cursor is pointing to
BACK TO MANUAL
SETUP
; then press the Set Button p
œ
.
The delay settings may also be adjusted at any time
using the main remote control and while viewing an
on-screen image by pressing the
Delay Select
Button
. The A/V Sync Delay setting is first, and it
may be adjusted by pressing the
Set Button p
within five seconds of when the A/V SYNC
DELAY
message appears in the on-screen display
and the
Lower Display Line $. Then, press the
‹
/
›
Navigation Button n to enter the desired
delay setting that brings the video and sound back
in sync. Press the
Set Button p again to enter
the setting.
Note that the A/V Sync Delay setting is unique to each
video input source, so you may enter a different set-
ting to compensate for the differences between any
product attached to the different inputs.
To change one of the individual speaker positions
directly, press the
Speaker Select Button ,
followed by the
⁄
/
¤
Navigation Button n to
select the desired position as that name appears in the
on-screen display and the
Lower Display Line $.
When the name of the speaker position to be adjusted
appears press the Set Button p within 5 seconds.
Press the
‹
/
›
Navigation Button n to enter the
desired delay setting for that speaker and then press
the
Set Button p to enter the setting. The
⁄
/
¤
Navigation Button n may be used to select
another position, or you may simply wait 5 seconds for
the system to time out and return to normal operation.
When all changes to the Delay settings have been
made press the
⁄
/
¤
Navigation Button n
©
until the cursor is on the BACK TO MANUAL
SETUP
menu and then pressing the Set Button
p
œ
so that you may make any other adjust-
ments to the system parameters. If the changes just
made complete the manual adjustments needed,
press the
OSD Button
∫
to exit the menu
system and resume normal system operation.
Output Level Adjustment
Output level adjustment is a key part of the configura-
tion of any surround sound product. It is particularly
important for a digital receiver such as the AVR 645,
as correct outputs ensure that you hear soundtracks
with the proper directionality and intensity.
In most cases, you will not need to make any
adjustments to the output level, as the settings
made by running EzSet/EQ are as accurate as those
made manually. However, you are able to use the
CHANNEL ADJUST menu to trim the settings
to suit your personal preferences or to configure the
system so that the output settings are different from
one input source to another.
The ability to make individual output level adjustments
on a per-input basis is useful for listeners who may
prefer different settings for the subwoofer or an indi-
vidual channel group such as the front speakers when
playing musical selections via the CD input as
opposed to the movie soundtracks more frequently
used with the DVD input. This menu also allows you to
adjust the output levels using external sources such as
a test disc or other program material that you use as a
standard, rather than the system’s test tone.
IMPORTANT NOTE: Listeners are often confused
about the operation of the surround channels. While
some assume that sound should always be coming
from each speaker, most of the time there will be little
or no sound in the surround channels. This is because
they are only used when a movie director or sound
mixer specifically places sound there to create ambi-
ence, a special effect or to continue action from the
front of the room to the rear. When the output levels
are properly set, it is normal for surround speakers
to operate only occasionally. Artificially increasing the
volume to the rear speakers may destroy the illusion
of an enveloping sound field that duplicates the way
you hear sound in a movie theater or concert hall, even
when making manual adjustments.
Before beginning the output level adjustment process,
make certain that all speaker connections have been
properly made. The system volume should be set to the
level that you will use during a typical listening session.
We recommend that EzSet/EQ be used when the AVR
is first installed to establish the initial level settings.
To make any changes to the channel output settings,
go to the
CHANNEL ADJUST sub-menu
within the
MANUAL SETUP menu (Figure 18).
To do this, first press the
OSD Button
∫
so
that the
MASTER MENU (Figure 1) appears.
Next, press the
⁄
/
¤
Navigation Button n
©
until the cursor is on the EZSET/EQ line on the
menu in use and press the
Set Button p
œ
.
Navigate to
EZSET/EQ MANUAL
SETUP
and press the Set Button p
œ
.In
the
MANUAL SETUP menu, press the
⁄
/
¤
Navigation Button n
©
again until the cursor is
on the
CHANNEL ADJUST line and press the
Set Button p
œ
to view the CHANNEL
ADJUST
menu (Figure 22).
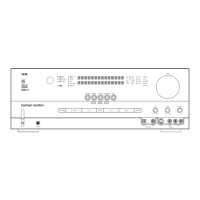
Figure 22
To provide the maximum flexibility, channel output level
adjustments may be made either with or without the
internal test tone, and when the tone is in use it may
be programmed to automatically circulate among the
active channels or to only move from one channel to
the next on your command. When the
CHANNEL
ADJUST
menu first appears we recommend that
you always run the test tone once the automatic mode
to verify that the speakers have been properly con-
nected. To do this, press the
⁄
/
¤
Navigation Button
n
©
again until the cursor is on the TEST
TONE
line and then press the
‹
/
›
Navigation
Button
n
©
until AUTO is in highlighted video.
This will cause the test tone to circulate among all of
the channels for five seconds at each position.
As the test tone circulates, the cursor will flash and
move next to each position to indicate where the tone
should be coming from. If the tone is coming from a
different speaker than the one indicated on the menu
screen turn the AVR 645 off using the
Main Power
Switch
A and check the speaker wiring or connec-
tions to external power amplifiers to make certain that
each speaker is connected to the correct output ter-
minal. When you have verified that all speakers are
* CHANNEL ADJUST *
→ FL : 0 dB SBR: 0 dB
CEN: 0 dB SBL: 0 dB
FR : 0 dB SL : 0 dB
SR : 0 dB SUB: 0 dB
TEST TONE : AUTO OFF MAN
LEVEL RESET: OFF ON
CH ADJUST: GLOBAL
EZSET SETTINGS: OFF ON
BACK TO MANUAL SETUP
SYSTEM CONFIGURATIONSYSTEM CONFIGURATION
SYSTEM CONFIGURATION 33SYSTEM CONFIGURATION 33
HKP1445AVR645om 6/7/06 6:35 PM Page 33
 Loading...