Page 37
CALIBRATION
NOTE: For the
purposes of slightly greater accuracy, you
may wish to
check
your Dip Meter
against an instrument or a signal
of
a
known
frequency. The
following
paragraphs and steps suggest two
methods
to do
this.
However, the
tuning dial
adjustment
you
did previously
will have calibrated the
Dip Meter for
relatively close
measurements.
CALIBRATION USING A
KNOWN
SIGNAL
Refer
to
Figure
1-2
for
the following steps.
)
Tune a
receiver
to
station WWV
at
1 5.0 MHz.
)
Plug the
green coil
(12.5-26 MHz) into the Dip Meter coil socket.
)
Turn the Dip Meter on and tune it
to
approximately 15 on the
green scale.
)
Turn the
OSC
LEVEL until you obtain
a
high reading.
)
Position the
Meter coil close to the
antenna
lead-in on the
receiver.
Carefully
move the
tuning dial of the Dip
Meter across the
"15"
on the
green
meter dial scale and
notice how it affects the
sound coming
from the
receiver.
NOTE: In the next
step,
as
you tune the Dip
Meter
to
station WWV, the
des.red
response will be a
blanking of the station as
heard from the receiver.
(
)
Position the Meter
tuning dial until WWV is entirely
quieted.
i
^^^^
;
OLIO
OIP ft
S .1
1
A
• T ATI
1tT(P
m
(
)
If
necessary,
loosen the tuning dial setscrew.
move the dial so
the
"15"
on
the
green scale is directly under the
hairline. Then,
retighten the
setscrew.
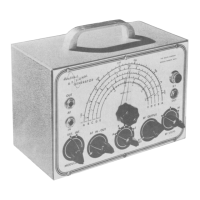
Figure
1-2
PICTORIAL
7-1