18
hobie.com
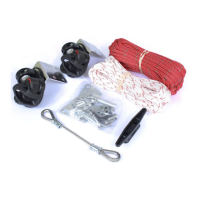
Following the diagram on the previous page, lace the tension lines
through each batten end cap. Pass the line through the hole in the cap
then through the grommet on the opposite side. For the smaller caps,
pass the line over the “V” cleat, and pull tight to force the batten into
the pocket, then pull the line into the cleat to hold it. For the larger
caps, pass the line through the second hole in the cap, then pass the
line through the first grommet and back to the “V” cleat. Pull tension
on the line forcing the batten into the pocket and cleat it. Tie a small
figure 8 knot in the end of each line to prevent the battens from falling
from the sail if the line releases from the cleat. Tension each batten
so that the batten is well seated and the wrinkles in the batten pockets
are removed. Excessive batten tension will cause the sail to be more
difficult to handle.
3
Assembly Required
The upper two battens are narrower and have a different cleat shape.
To be sure these cleats work correctly, position them so that the
hollowed-out side of the cap faces the bowline that you have tied to the
sail grommet. Position the larger caps so that the hollowed sides face
away from each knot.
2