6
LED Indication/Tone Icon
The LED Indicator glows
green.
The LED Indicator glows
orange.
The LED Indicator glows
red.
The LED Indicator glows
red and an alert tone
sounds.
The battery runs low.
Please recharge or
replace the battery for
proper radio operation
Basic Operation
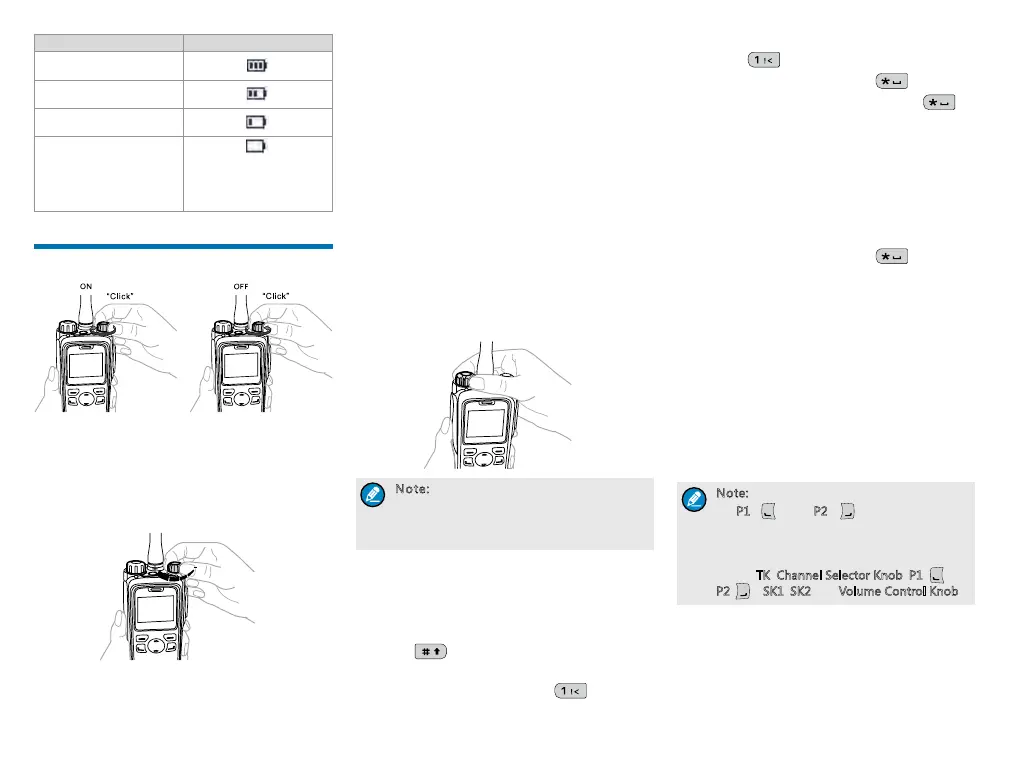
Turning the Radio On/Off
Adjusting the Volume
You can adjust the volume of output voice, alert tone
and channel notication tone by rotating the Volume
Control Knob. For other tones, the volume will be
congured by the dealer.
Selecting a Zone
A zone is a group of channels with the same property,
which can facilitate convenient management over
the channels. The radio supports 64 zones, each of
which consists of up to 16 channels. Your dealer can
program the zone for your specic needs.
You can select a zone through any of the following
ways:
●
Menu: Go to “Menu -> Zone”, press the Up/Down
key to select an appropriate zone, and then press
the OK key to switch to the selected zone.
●
Shortcut key: You can toggle to the appropriate
zone by pressing the programmed Zone Up or
Zone Down key preset by your dealer.
Selecting a Channel
Note: If the Channel Notify feature is
enabled by your dealer, the radio will
announce the channel number upon
channel switching.
Inputting via Keypad
You can input alias, call numbers and messages via
the keypad of the radio. In the editing mode, you may
do as follows.
●
Press to switch the text input methods
between alphabetic mode and numeric mode
●
In the alphabetic mode, press to input the
special characters. But in the numeric mode,
pressing will input the numeric digit 1
●
In the alphabetic mode, press to input the
space. But in the numeric mode, pressing will
input the special characters
Locking and Unlocking the Keypad
When the keypad is not in use, you can lock the
keypad to prevent accidental keypad operation. The
following methods are available for you to lock or
unlock the keypad:
●
Key Combination: Press “OK+ ” to lock or
unlock the keypad.
●
Shortcut key: Press the programmed Keypad Lock
key to lock or unlock the keypad.
●
Menu: Go to “Menu -> Settings -> Radio Set ->
Keypad Lock” and then select “Enable” or “Disable”.
»
Enable: The keypad will be locked automatically
if no operation is made within the preset time
period. After the “Enable” option is selected, you
can press the Up/Down key to set the Keypad
Auto Lock Delay Time.
»
Disable: The keypad will not be locked
automatically.
Note: All keys on the front panel except
for
P1 ( ) and P2 ( ) will be locked by
default. Moreover, you can go to “Settings
-> Radio Settings -> Select Button Lock”
to configure the following lockable keys or
knobs:
TK, Channel Selector Knob, P1( )、
P2( ), SK1, SK2 and Volume Control Knob.
Managing the Contact
Contact management allows you to view, edit, delete
or add contacts.
Contact List
The contact list is used to save private call contact,
 Loading...