Do you have a question about the InstroTek CoreDry and is the answer not in the manual?
Warning about the drying chamber becoming very hot during and after the test.
Awareness of the vapor trap reaching temperatures below freezing.
Warning about 120V present inside the cabinet; do not probe or remove cover without contact.
Unit maintenance must be done by trained technicians; do not attempt repairs.
Change vacuum pump oil after 80 hours of use, using recommended vacuum oil.
Change tank filters every 1-2 months and exhaust filter annually.
Call InstroTek at (919) 875-8371 for technical assistance and questions.
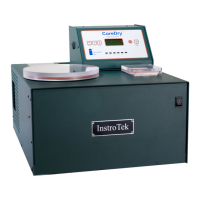
Introduction to the CoreDry as a new device for rapid vacuum drying of samples.
Addresses industry need for rapid testing, providing results in minutes for density or moisture content.
Uses high vacuum and thermoelectric cold trap to draw, evaporate, and condense water.
Identifies key components visible on the front of the CoreDry unit.
Identifies connection points and service components on the rear of the unit.
Instructions for unpacking, placing the unit, and ensuring proper ventilation.
Guidance on filling the vacuum pump with oil for initial use or maintenance.
Locating and preparing accessories like the sample chamber lid and flow plate.
Steps for powering on the unit and initial system preparation cycles.
Explanation of screen messages indicating sample dryness and vacuum levels.
Procedure for cleaning and performing a sample-free test to verify vacuum performance.
Tips for speeding up drying, such as single-sample drying and sample temperature.
Steps for placing sample, closing lid, and starting the drying operation.
Procedure for handling samples that are not completely dry after multiple cycles.
Instructions for removing moisture accumulation from the cold trap.
Warning to use lint-free cloths and avoid paper towels for cleaning.
Instructions on using buttons to access and control menu options.
Using the 'Program #' menu to define up to 5 different drying settings.
Accessing 'Oil Change', 'Run Hours', 'Max Cycles', 'Cool Time' for system status.
Utilizing the 'Self-Test' feature to check operational status of system components.
Resetting timers for Oil, Tank Filter, and Exhaust Filter after maintenance.
Adjusting the 'Beeper Vol.' setting for audible alerts.
Configuring the CoreDry to Program 2 and preparing the sample chamber.
Preparing the aggregate fixture, weighing aggregates (Weight A), and taring the scale.
Running the drying cycle and weighing the fixture with dry aggregate (Weight B).
Procedure for re-orienting and continuing drying for samples not fully dry.
Formula for determining moisture content: (Weight A – Weight B).
Recommended sample weights for different types of aggregates.
Accessory kit for rapid drying of asphalt emulsions to recover residual asphalt.
Listing of essential kit items: metal pan, silicone sheet, rack, and applicator.
Detailed list of all items included in the eDry™ kit.
Preparing workspace and weighing a clean silicone sheet and metal pan.
Pouring emulsion onto silicone sheet and spreading with thin-film applicator.
Weighing pan/sheet/emulsion promptly and cleaning the applicator.
Placing prepared pans on rack, repeating prep, and selecting Program 5 for drying.
Removing rack after drying, weighing pans to calculate residual content.
Instructions for removing residual binder from silicone sheets and washing them.
Warning against using specific solvents on silicone sheets due to property changes.
Cleaning or replacing tank filters and resetting the timer.
Procedure for changing vacuum pump oil every 80 hours of use.
Detailed steps for draining and refilling the vacuum pump oil.
Recommendation to change pump filter if vacuum is low or every 12 months.
Lists required tools and initial steps for replacing pump filters.
Guides on locating, removing, and installing the exhaust filter.
Resetting the exhaust filter timer via menu option 10 after replacement.
Specific instructions for changing filters on Welch pump models.
Detailed steps for removing and installing filter elements on Welch pumps.
Resetting the exhaust filter timer after replacement for Welch pumps.
Procedure to verify vacuum pressure accuracy using a gauge.
Contacting InstroTek for instructions on adjusting vacuum pressure offset.
Troubleshooting steps for when the unit fails to power on.
Addressing issues where the CoreDry runs but does not draw vacuum.
Solutions for when the CoreDry takes longer than expected to dry samples.
Troubleshooting steps for when the CoreDry unit fails to release vacuum.
Guidance for responding to the warning screen prompting an oil change.
Details the 1-year warranty, covered components, and conditions of use.
Circumstances that will void the warranty, such as misuse or unauthorized repairs.
Outlines limitations on liability and exclusions from warranty coverage.
Provides the official website address and primary phone number for InstroTek.
Lists various InstroTek office locations with their respective phone numbers for service.
| Brand | InstroTek |
|---|---|
| Model | CoreDry |
| Category | Laboratory Equipment |
| Language | English |