EN
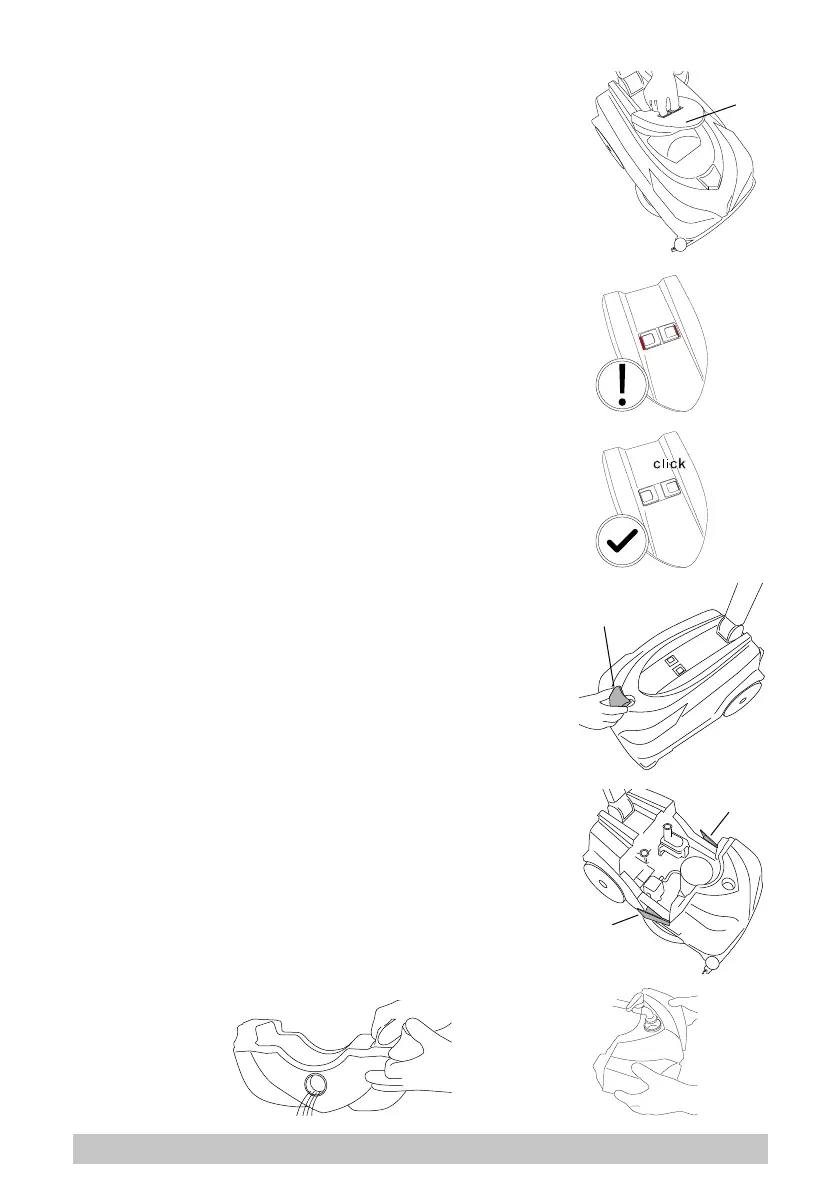
Removal of dirty water tank lid
• Release the lid of the dirty water tank by pressing the two sliding
catches toward one another (g. 19, ref. 1).
• Lift o the lid.
Installation of dirty water tank lid
! INFORMATION
INCORRECT positioning of the lid on the dirty water tank will cause
the machine to malfunction when the oor is being dried.
• Place the lid on the tank.
• Apply downward pressure to the lid, sucient to make certain that
the two sliding release catches spring outwards and engage with
the top of the dirty water tank (Fig.20).
! INFORMATION
The lid is correctly installed when the RED background presented
by the recesses of the two catches can NOT be seen (g. 20).
Filling the water/detergent tank
! DANGER
Unplug the machine from the power socket (mains powered model).
! INFORMATION
Remember to empty the dirty water tank every time the clean water
and detergent tank is lled.
The tank can be lled in two dierent ways:
Tank installed on the machine:
• Turn o the machine at the main switch.
• Remove the cap of the detergent tank (g.21, ref. 1).
• Fill the tank.
Tank removed from the machine:
• Turn o the machine o at the main switch.
• Press in the two lateral tank retaining catches (g. 22, ref. 1),
separate the dirty water tank from the frame and set it down on
the oor.
• Remove the cap of the detergent tank.
• Separate the detergent tank from the frame.
• Fill the tank (g. 23).
Emptying the water/detergent tank
! DANGER
Unplug the machine from the power socket (mains powered model).
The tank can be emptied by proceeding as follows:
• Turn o the machine o at the main switch.
• Take the machine to the designated disposal area.
• Press in the two lateral tank retaining catches (g. 22, ref. 1),
separate the dirty water tank from the frame and set it down on
the oor.
• Separate the detergent tank from the frame.
• Remove the cap of the detergent tank.
• Empty the contents of the tank by way of the front opening (g. 24).
Fig.19
Fig.20
1
1
1
1
Fig.21
Fig.22
Fig.23
Fig.24
19