25
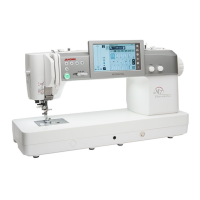
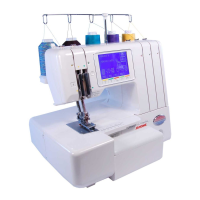
Automatic Thread Tension Display Screen
1
1
3
4
6
7
9
8
2
5
10
11
12
13
14
15
16
17
1 Stitch pattern
2 Tension setting (automatic setting)
3 Stitch width key (STD/WIDE)
4 Current stitch length setting (Manual set-
ting)
5 Recommended stitch length (Standard)
6 Needle setting position
7 Recommended thread type (Standard)
8 Recommended differential feed ratio
(Standard)
9 Current differential feed ratio (Manual
setting)
10 Information key
(Press to display recommended needle
position, presser foot, chaining finger set-
ting knob and extension table.)
11 Manual key
(Manual setting for thread tension.)
12 Menu key
13 Return key
14 Needle setting position
15 Presser foot A or B
16 Chaining finger setting knob (S) or (R)
17 Extension table (A) or (B)
SETTING:
Indicates the required machine settings for
the selected stitch.
10
1 When you select the desired stitch from stitch
pattern keys, the thread tensions will be auto-
matically set.
Settings such as the stitch length and differen-
tial feed ratio will be indicated on the visual
display screen as well.
Now simply begin sewing.
The following three pages show all the machine
settings related to each stitch type.
Choose the Needle and Thread
The choice of needle and the thread depends on the
fabric you are sewing.In your needle case, you will find
the following needles:
#11 Needle....for lightweight fabrics.
#14 Needle....for medium or medium -heavy weight
fabrics.
Note: These needles are found in the accessory box (see page 4).
Check the Needle
1. Look for barbed or blunt point.
2. A damaged needle can cause permanent
snags or runs in knits, fine and silk-like fabrics.
Always buy a good quality thread. It should
resist tangling and be strong, smooth and
consistent in thickness.