Do you have a question about the JVC BM-H2000PN and is the answer not in the manual?
Precautions to prevent fire or shock hazards, and warnings about internal high voltages.
Guidelines for safe usage, power source, and environmental conditions.
Warning about prolonged display of static images causing screen burn-in.
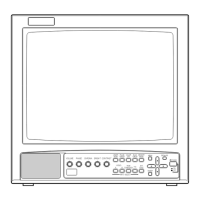
Indicator for tally signal input to the TALLY/REMOTE terminal.
Built-in speaker for audio output.
Receives infrared signals from the optional wireless remote control.
Turn to adjust speaker volume.
Turn to adjust picture hue, using natural skin colour as reference.
Turn to adjust picture colour density.
Turn to adjust picture brightness.
Turn to adjust picture contrast.
Reduces display area to show the whole picture on screen.
Checks retrace period by delaying input signal phase.
Eliminates colour signals for a black-and-white picture.
Displays a monochrome blue picture by eliminating red/green signals.
Recalls stored picture adjustment data from memory.
Push to select a rear terminal video signal input.
Synchronizes the monitor with an external sync signal.
Used to operate on-screen menu functions.
Push to demagnetize the picture tube.
Press to turn the power on or off.
Glows to indicate that power is on.
Connects to an AC outlet using the provided power cord.
Composite video signal input and bridge-connected output.
Sets impedance for bridged connection or input signal only.
Composite video signal input and bridge-connected output.
Sets impedance for bridged connection or input signal only.
External sync signal input and bridge-connected output.
Sets impedance for bridged connection or input signal only.
Y/C signal input and bridge-connected output.
Sets impedance for bridged connection or input signal only.
Analogue RGB or component signal input and bridge-connected output.
Sets impedance for bridged connection or input signal only.
Audio signal input/output linked with VIDEO A terminals.
Audio signal input/output linked with VIDEO B or Y/C terminals.
Audio signal input/output linked with RGB/COMPO(SDI) terminals.
Adjustment hole exclusively for service personnel.
External input for tally signal or remote control signal.
How to synchronize the monitor with external or internal sync signals.
Setting for RGB or component signal input type.
Procedure to switch the monitor on and off.
How to choose the video signal input source.
Adjusting the volume of the speaker.
Using the DEGAUSS switch to correct color patches.
Adjusts the contrast level of the picture.
Adjusts the brightness level of the picture.
Adjusts the colour density of the picture.
Adjusts the hue of the picture.
Reduces display area to fit the whole picture on screen.
Displays signal areas to check sync periods and signal integrity.
Displays the picture in black and white.
Displays the picture in monochrome blue.
How to access and navigate the on-screen menu for settings.
Switches picture aspect ratio between 4:3 and 16:9.
Selects built-in filters for NTSC composite video signals.
Enhances picture quality by adjusting luminance signal frequency and level.
Adjusts AFC time constant for video signal correction.
Sets the white balance colour temperature.
Adjusts luminance signal level for NTSC video.
Sets the chrominance level for component video signals.
Accessing and releasing stored picture settings from memory.
Saving current picture settings to memory.
Modifying previously stored picture settings.
Guide to accessing and using the SET-UP MENU for adjustments.
Adjusts size and position for RGB signal pictures.
Fine-tuning color balance by adjusting drive and cut-off levels.
Configuring the TALLY/REMOTE terminal for control functions.
Shows input terminal status and selected input types.
Details for remote control terminal settings and their positions.
Explains how to use the TALLY/REMOTE terminal for control.
Controls the visibility of status information on screen.
Disables front panel controls except volume.
Resets menu and picture settings to factory defaults.
Using the remote for on-screen menu functions.
Adjusting picture settings like contrast, brightness via remote.
Adjusting volume and mute settings via remote control.
Assigning unique IDs to monitors for remote control.
Displaying a monitor's programmed ID number on screen.
Linking the remote control to a specific monitor ID.
Troubleshooting inoperable controls by checking mode and lock settings.
Verifying if remote control picture settings have been changed.
Checking if external sync settings are correctly configured.
Verifying front control settings are not at maximum or minimum.
Checking if ID number 00 is programmed for other monitors.
Checking if the monitor's ID number is assigned correctly.
Verifying if the audio input terminal matches the video input terminal.
Ensuring correct buttons are pressed to display the INITIALIZE MENU.
Checking if a function is applied commonly to CNTL-1 and CNTL-2.
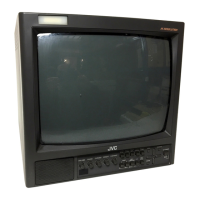
Monitor type and basic features.
Supported color standards (NTSC, PAL).
Details on the CRT type, size, and specifications.
Physical dimensions of the display area.
Supported horizontal and vertical scan rates.
Maximum horizontal detail capability.
Selectable white balance colour temperatures.
Specifications for all video input connectors.
Details on external synchronization signal inputs.
Specifications for audio input connectors.
Information on the Tally/remote interface.
Speaker output power rating.
Details of the integrated speaker.
Operating environmental range.
Required power input specifications.
Monitor's power usage.
Physical measurements of the unit.
The monitor's mass.
List of included accessories.
List of available add-on items.