V
vreidSep 23, 2025
Why does my Kodak Scanmate i1120 produce distorted images?
- AAmanda WalkerSep 23, 2025
The feeder of your Kodak scanner holds up to 50 documents in the input tray. While scanning, do not add documents; this may distort images.


Why does my Kodak Scanmate i1120 produce distorted images?
The feeder of your Kodak scanner holds up to 50 documents in the input tray. While scanning, do not add documents; this may distort images.
What to do if Kodak Scanmate i1120 is jamming?
If documents are jamming or multiple documents are feeding in your Kodak scanner, make sure that the input tray, output tray, and side guides are adjusted for the document size; all documents meet the size, weight, and type specifications; the scanner is clean; and the pre-separation pad is properly installed and replaced if necessary.
How to fix Kodak Scanmate i1120 not scanning or feeding documents?
If your Kodak scanner isn't feeding documents, ensure the power cord is securely plugged into both the scanner and the wall outlet. Check that the green LED is lit and the power switch is on. Verify the wall outlet isn't defective and that the PC was restarted after software installation. Lastly, confirm the documents are making contact with the feed rollers.
Why does the first image in my Kodak Scanmate i1120 Scanner batch look washed out?
If the scanned documents in a batch from your Kodak scanner have more than a 25-degree skew, the first image may appear washed out. Ensure documents are placed in the input tray with the edges aligned and the side guides positioned correctly.
Why does the first image in a batch appear washed out with my Kodak Scanner?
If the scanned documents in a batch with your Kodak scanner have more than a 25 degree skew, the first image in the batch may appear washed out.
How to fix black background bleed-through on Kodak scanner?
When scanning translucent documents with your Kodak scanner, black bleed-through may appear. To minimize this, adjust the Contrast value or select Fixed Processing.
How to fix incorrect cropping on Kodak scanner?
If auto or aggressive cropping is enabled and your Kodak scanner images are not cropped correctly, clean the white background strips in the calibration area.
How to remove roller marks from Kodak Scanmate i1120?
If roller marks appear on the document after scanning with your Kodak scanner, clean the rollers.
Why is my Kodak Scanmate i1120 Scanner scanning multiple pages in single page mode?
When scanning multiple pages using Single Page mode on your Kodak scanner, the scanner will pre-feed the next document, and the last document scanned will stay in the transport until the next page is scanned. This is a normal scanner process.
Why is the image quality poor on my Kodak Scanmate i1120?
If your Kodak scanner images have poor or decreased quality, clean the scanner, following the procedures in Chapter 5, Maintenance.
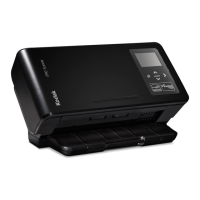
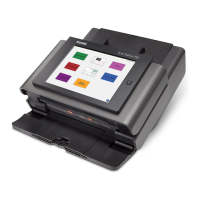
Lists key features of the Kodak ScanMate i1120 Scanner.
Covers safety, environmental, MSDS, EMC, and regulatory compliance.
Lists package contents and necessary computer system specifications.
Step-by-step guide for installing the scanner hardware.
Instructions for installing the scanner's driver software from the CD.
Instructions for assembling the scanner components, like the input tray.
Steps to check for a functional USB port using the test tool.
Steps to connect the scanner's power supply and cord to the wall outlet.
Instructions for connecting the scanner to the PC using the USB cable.
Steps to turn on the scanner and complete driver installation.
Guide to installing additional bundled scanning applications.
Identifies and describes the external parts of the scanner.
Identifies and describes internal parts of the scanner.
Instructions for turning the scanner on/off and adjusting paper trays.
Guidelines for preparing documents and starting/stopping scans.
Steps to confirm successful scanner installation using the validation tool.
Viewing test images and information on bundled application software.
Explanation of the scanner's smart touch feature for quick scanning tasks.
Configuring destinations for scanned documents (File, Application, Email, etc.).
Defining how scanned images are saved or processed (e.g., file type, compression).
Steps to customize and assign scanner function numbers for smart touch.
Using bundled third-party applications as scan destinations.
Using the window to view and edit scanned images before sending.
Launching functions via scanner buttons/listing and basic document scanning.
Introduction to image processing concepts and launching the validation tool.
Explanation of the TWAIN datasource and setting shortcuts.
Initial steps for selecting setting shortcuts and beginning scans.
Choosing predefined shortcuts and input document settings.
Configuring scanner-specific options like power saver and timeouts.
Overview of the primary user interface and available setting shortcuts.
Details the General, Size, Adjustments, and Enhancements tabs.
Explains toolbar icons and the preview area for image settings.
Setting scan type, document type, media, and resolution.
Adjusting image cropping, paper size, and orientation.
Configuring conversion quality, contrast, and filters for B/W scans.
Adjusting brightness, contrast, and color balance for color/grayscale scans.
Options for image edge fill and blank image detection.
Configuring settings for different sides of a document.
Example: Scanning for both color and B/W images per document side.
Example: Configuring color front and B/W back scan settings.
Step-by-step guide to creating custom scanner setting shortcuts.
Modifying existing image settings for a shortcut.
Overview of scanner-specific options and diagnostics.
Configuring transport control, power saver, and timeouts.
Settings for detecting and handling document overlaps (multifeeds).
Modifying existing device settings for a shortcut.
Accessing scanner diagnostic functions via tabs.
Performing scanner tests and viewing time information.
Storing communication logs and optionally saving raw/processed images.
Viewing scanner hardware and communication logs.
General guidance on when and how to clean the scanner.
Step-by-step instructions for cleaning the scanner's feed rollers.
Instructions for cleaning the scanner's pre-separation pad.
Guide for cleaning the scanner's calibration guides and glass.
General information on when and how to replace scanner parts.
Detailed steps for replacing the pre-separation pad.
Detailed steps for replacing the scanner's feed roller assembly.
List of available supplies and their catalog numbers for ordering.
Explains scanner status lights and error code meanings.
Procedures to follow when a document jam occurs.
A guide to common problems and their potential solutions.
Steps to troubleshoot and reinstall drivers when the scanner fails.
How to test and verify the scanner's USB connection.
Common USB connectivity problems and recommended solutions.
Detailed technical specifications for the Kodak ScanMate i1120 Scanner.
| Film scanning | No |
|---|---|
| Color scanning | Yes |
| Input color depth | 48 bit |
| Maximum scan size | 215 x 863 mm |
| Optical scanning resolution | 600 x 600 DPI |
| Flatbed scan speed (b/w, A4) | 3 sec/page |
| Scanner type | Sheet-fed scanner |
| Product color | Black, Grey |
| Sensor type | CCD |
| Daily duty cycle (max) | - pages |
| Auto document feeder (ADF) input capacity | 50 sheets |
| USB version | 2.0 |
| Standard interfaces | USB 2.0 |
| Sustainability certificates | ENERGY STAR |
| Maximum ISO A-series paper size | - |
| Power supply type | AC/USB |
| Depth | 157.3 mm |
|---|---|
| Width | 300.6 mm |
| Height | 147.5 mm |
| Weight | 2700 g |